

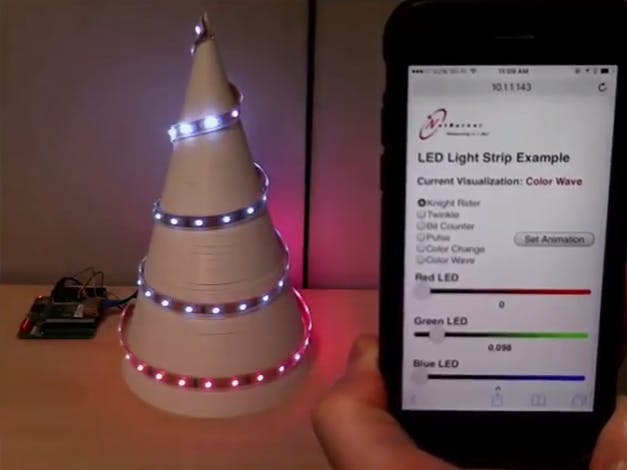
We wanted to be able to easily control the settings of an off-the-shelf RGB LED light strip using a mobile phone. We thought this would be a lot of fun for the office and could be used as a high tech holiday or party decoration. While it's designed for mobile web, this application is also accessible from a tablet or PC.
There was no app development needed for iOS or Android as we utilized standard HTML, Javascript, Ajax and CSS technologies that are enabled through nearly any web browser. The code library is good as-is, or you can use it as a springboard to try out new animations and lighting ideas.
To build the project, we used NetBurner's Eclipse based IDE, which allowed us to program, build, and deploy the project to the module easily. To get our data from the device to the strip, with used the devices DSPI module. The device itself also function as a web server, which allows it to receive and process requests from the browser-based control panel.
Here's a short video we made that covers the hardware components and their connections in a bit more detail:
Getting Started- Create an empty NetBurner Project for a NetBurner Device Executable and leave all of the options on the Project Options page blank. There's a lot of documentation for this available, so we won't bore you with the details here. For more information, look in the
docs/Eclipsefolder of your tools installation directory.
- When the project has been created, we will import all of the code and files from the LED Light Strip project that can be found at the GitHub repo linked below.
- Once the code is loaded, it should build automatically, and from this point on, you are ready to roll! If you selected your device during project creation, you can push the application to your device by simply hitting the green arrow button located on the NBEclipse toolbar. If you didn't, you will need to add it as per the NBEclipse Guide, and then you can proceed as normal.
The rest of this tutorial is going to cover the application itself, and will outline the steps that are needed for you to create your own ingenious lighting animations.
The CodeTo start, let's take a look at the classes that our application is composed of:
LED: This class controls the state of an LED's individual color values
LEDStrip: This class controls which animation is playing at a given time, and also contains the logic for each of the animations. By callingSetCurVis(), you can set which animation is actively playing.
SpiInterface: This class is the project's interface to the SPI module, and ensures it is properly configured. It allows data to be written to the module through theWriteSpi()function. The SPI module is how the device transfers data to the light strip, and provides the color information for all of the LEDs.
There are a few other files that are important, but don't define a class. A description of these is given below:
main.cpp: This contains the application's entry point in the functionUserMain(). Here, we initialize the device and establish a network connection. It also initializes our objects, and registers the callback function that will be used to handle HTML POST requests. Finally, it creates a separate task that will run the LED animations. In this way, we can ensure that our animations run smoothly even when the device receives and is processing user requests.
web.cpp: This file contains all of the functions that are required to serve web pages to the user, as well as to respond to all of their requests. The functionMyDoPost()is called whenever a POST request is made, and from here we determine what the request entails, such as which animation to play, and respond accordingly. In addition to using standard web technologies such as AJAX, NetBurner provides several mechanisms for exposing and displaying dynamic data from the application directly into the web page before it is sent to the user. In our LED Light Strip example, we leverage this to display the current animation being played as well as the values of each of the color sliders. This ensures that the information given to the user is always in synch with what is on the server.
index.html: This file is the single page used for our control panel. It lists the different animations that the users can choose from, and provides them with a way to control the color that is used in select animations. Additionally, it houses some javascript functions that are used when we manipulate the controls on the page, and to make adjustments to our page’s style to ensure mobile compatibility.
app.css: The base styling info for the elements on the page (except the range sliders) is stored here.
"This is all great out of the box," you might be saying, "but how do I add my own custom animations?" In order to do this, the following additions need to be made to the code:
1) In LedVis.h
- Add a new value for your animation in the enum
LedVis. Be sure to include it aboveeLedVisCount.
- Add a function that will contain the logic of the animation. See void
PlayBitCounter()as an example.
2) In LedVis.cpp
- In
Main(), add a case for your visualization in the switch statement that will call your animation function.
- Write the animation function that you created in
LedVis.h. There are a few important things to note in order to get your animation rolling along. At the beginning of your animation function, callClearLeds(). This will ensure all data that has currently been sent to the LED strip will be wiped clean. After that, the inside of your animation function should contain a while loop that checks the value ofm_currentVisualagainst the enum value that you created inLedVis.has well againstm_resetbeing true. Inside of this while loop, is going to be the bulk of your actual animation code. At the end of the while loop, be sure to callWriteLeds()to send your color data to the strip, and then anOSTimeDly()of at least 1, so that the device can process other tasks. After the while loop, be sure to setm_resetto false. Feel free to take a look atPlayBitCounter()as an example of how it should be set up.
3) In index.html
- Add a radio button option for your new visualization next to the ones listed starting at line 22. Be sure to change the "value" attribute accordingly.
- Next, we move to the javascript statement that changes the css properties of elements with the class of
selectVis(all of our radio buttons). This bit of code will ensure that the color sliders are only available if they need to be for a given animation. If your animation will use a color that is specified with the color sliders, add a case statement with the value of the "value" attribute of your new animation below the one for the pulse animation. Otherwise, if it will display colors that are NOT chosen by the user with the color sliders, add a case statement with the value of the "value" attribute below the one for the colorWave animation.
4) Finally, in web.cpp
- In
GetCurrentVisualization(), be sure to add your new enum value to the switch statement.
- In
MyDoPost(), in the if statement that tests the url againstLEDFORM, add another else if statement to the end of those that check against the animation names. The string that should be compared against in your new else if statement is that of the "value" attribute for the radio button that you created inindex.html. Notice that it should be in all caps, even if your value inindex.htmlisn't.
That's really all you need in order to start adding your own animations! Once the changes are made, recompile, push the new application to your device, and enjoy the results.


Comments