

Hardware components | ||||||
 |
| × | 1 | |||
 |
| × | 1 | |||
Have you ever wanted to control your garage door opener from your smartphone? Of course, you could buy a Wi-Fi module for your garage door opener and use the manufacturer’s app to interact with the door, but wouldn’t it be fun if you had a quick and simple home-grown solution you could use? This project is a super simple garage door controller built using the Tessel 2 (https://tessel.io/) development board and a relay module. The relay module connects to your garage door in parallel with the existing garage door button and simulates a button press by shorting the contacts across the relay. The Tessel development board runs a web server application that serves a simple web page with a button the user taps to trigger the relay to open or close the garage door.
ComponentsTo build this project, you'll need the following:
- Two lengths of 20ga wire
According to the Tessel project web site:
“Tessel is a completely open source and community-driven IoT and robotics development platform. It encompasses development boards, hardware module add-ons, and the software that runs on them.”
I selected Tessel for this project because the Tessel 2 development board provides most of the components needed for the project, except for the relay - which is easily added as a module. The board has enough processor power and memory to host the web server application the project uses plus it has networking hardware, both wired and wireless, built in. The Tessel development board includes the following hardware components:
- A 580MHz Mediatek MT7620n processor
- 64 MB DDR2 RAM and 32 MB of flash memory
- A 48MHz Atmel SAMD21 coprocessor which provides real-time I/O and better power management
- 2 Tessel Module ports (explained later)
- 2 USB ports
- 802.11bgn Wi-Fi
- Ethernet
- A microUSB port for development and for powering the board in production
Another reason I picked this platform is that it runs JavaScript applications. JavaScript is the core capability behind many client-side web applications (such as Gmail and Facebook) and is very popular for server-side applications as well. I’ve been doing a lot of JavaScript development for the last few years (both front-end and back-end), but I’d not yet worked with a JavaScript-focused development board. You can execute JavaScript applications on Raspberry Pi for example, but it’s not enabled out of the box. Tessel on the other hand only runs JavaScript code, so from unboxing to running code took no time at all and minimal effort.
Another benefit of a JavaScript-based project is that there’s a multitude of third-party and open source libraries and modules available, so if you can’t figure out how to do something in code, more than any other platform, there’s likely an example somewhere or a chunk of pre-built code you can find to solve the problem for you.
Tessel Modules are add-on modules you plug directly into the Tessel board; you can find the complete list at https://tessel.io/modules. For this project, I knew I needed a relay to mimic the garage door button and found that Tessel already had one ready to go. The Tessel 2 board has connectors for up to two Tessel Modules.
Hardware SetupFollow the instructions on the Tessel web site to setup your development system and connect the Tessel board. You’ll have to install the Long Term Support (LTS) version of NodeJS, plus the Tessel command line interface (CLI). Be sure to update the Tessel board's firmware to the latest version and connect the device to your Wi-Fi network as part of the setup process.
Install the relay module's software library through the terminal using the following command:
npm install relay-mono
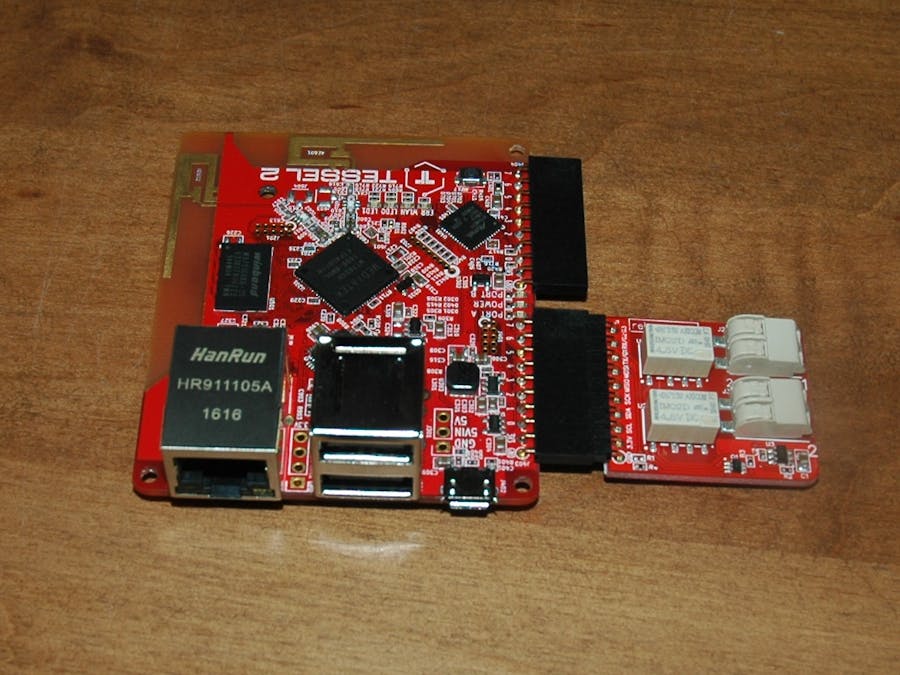
Next, disconnect the USB cable from the Tessel board then attach the relay module to the Tessel's module A port as shown in Figure 1. The Tessel board is the larger board on the left of the figure and the relay module is on the right. Figure 2 shows the completed installation.
All of the project’s code is available online on Github. Download the project's source code to a folder on your development system. The project consists of the following files:
- .tesselinclude – A text file that lists any additional files that must be deployed with the application. In this case, the application’s index.html file is listed as it needs to be on the server to be served to client devices.
- index-simple.html – A stripped down version of the application’s client-side code. This file was added to the project to more clearly illustrate what’s happening in the client application. This file isn’t used, but you can swap it for the project’s index.html if you want your web app to have an uglier UI.
- index.html – The client-side web application, this file is served by the web server.
- package.json – Describes the application to the Tessel CLI.
- readme.md – Documentation for the project.
- server.js – The project’s server application code.
Connect the Tessel board to your development system using the provided USB cable; several LEDs on the board will illuminate and start blinking to let you know it’s working. Give the board about 30 seconds to boot, then open a terminal window and navigate to the folder where you copied the files. Test the server process by issuing the following command in the terminal:
t2 run server.js
Assuming your development system ‘sees’ the Tessel board, the application should load and the terminal will display the following output from the application:
INFO Looking for your Tessel...
INFO Connected to tessel-gdo.
INFO Building project.
INFO Writing project to RAM on tessel-gdo (16.384 kB)...
INFO Deployed.
INFO Running server.js...
Server running at http://192.168.1.168:8080/
Initializing relay module
Relay command completed
Relay command completed
Relay module initialized
Note: As part of the setup process, I renamed my Tessel device to 'tessel-gdo' (for 'Tessel Garage Door Opener'), your output will properly reflect the name of your Tessel device, not mine.
At this point, you can open your browser of choice and navigate to the URL provided in the listed output (http://192.168.1.168:8080 in this example) to access the web application included with this project (Figure 3).
When you press the button in the web app, you should see the blue user LED illuminate for half a second and hear the relay click. At this point, bookmark the address on your device so you can access it whenever you want to open or close the garage door.
DeploymentSo far, the server app is just executing on the Tessel board when you need it to, for production use, you'll need to deploy the app (and its associated file(s)) to the device. To deploy the project's files to the device, use the same terminal window and issue the following command:
t2 push server.js
This command will save the server.js and index.html files to the device and configure it so it executes server.js every time you power on the Tessel device.
Finally, connect a length of wire between the relay contacts and the garage door button contacts, provide power to the Tessel device and you're all ready to go.
Customizing the Server ApplicationThe server application’s functionality is controlled by several constants defined in the first part of the project’s server.js file. There you’ll find the following code:
// use the blue LED when showing activity, change to 2 for green LED
const ACTIVITY_LED = 3;
//Change MODULE_PORT to B id your relay module is plugged into the Tessel's port B
const MODULE_PORT = 'A';
//Indicates the garage door is connected to relay 1.
//Change to 2 if you're using the second relay on the module
const RELAY_PORT = 1;
//Specifies how long the relay stays on in the toggleRelay function
const RELAY_DELAY = 500;  //milliseconds
To change the behavior of the app, change these values using a text editor, then redeploy the app to the Tessel device from a terminal window pointing to the app folder using:
t2 push server.js
On startup, the Tessel board will automatically attempt a connection to the last Wi-Fi access point it used. Unfortunately, if it cannot connect to that access point, it will not try again. So, if the device isn't working as expected, and you think it's the network connection, you'll need to remove power from the Tessel board then reconnect it to let it try its Wi-Fi connection again.
The device's IP address is assigned by your network router; if you replace your router, or get a new ISP, the network settings on the device may change. If this happens, or if you suspect this has happened, you'll need to use the:
t2 run server.js
command to execute the server.js command interactively to see what IP address the device is using then change your browser shortcut accordingly. Be sure to redeploy the app to the board (using the push command) once you’re done.


Comments