

Hardware components | ||||||
| × | 1 | ||||
Software apps and online services | ||||||
 |
| |||||
I gotta have one!
If you're like me, you jump at the chance to get your hands on the latest and greatest ESP8266/etc...and put it through its paces. The ESP32 is no different but I have found that there isn't too much out there yet with regards to documentation. The first 2 steps should pertain to most ESP32 flavors and not just the one depicted with the OLED. Hopefully these 'couple-of-steps' will get you started. Good Luck! Have fun! Let me know if it worked for you. A few assumptions are that you know how to navigate the Arduino IDE and work with their libraries.
UPDATE - Check out another easy 'get started' video. The sketch and library are in the YouTube Notes below the Vid.
Another Update - See this same ESP32 with working Bluetooth BLE connected to a LM35 Thermo and sending the data over BLE to an Android Bluetooth App.
Getting Started:
1. Assuming Arduino IDE Is Already InstalledBy default, the ESP32 does not show yet with the standard boards manager entries pointing to http://arduino.esp8266.com/stable/package_esp8266c...
Because of this we need to manually add them for the time being. Follow ALL steps at the following site to prepare your Arduino IDE for your new ESP32 board. https://github.com/espressif/arduino-esp32/blob/ma...
If you do have the integrated OLED, and would like to try and get it running, proceed to the next step.
2. Get the OLED Working on ArduinoNow that you've probably loaded an Arduino sketch on your ESP32, the 'pretty' pictures that were running on it when you first plugged it in are probably gone.
This particular ESP32 uses the SSD1306 libraries to communicate with the OLED display. I have had luck getting started by loading the following Arduino library and testing one of the SSD1306's included Example sketches. If the sketch fails to compile with errors, make sure you change the address it failed on to (0x3c, 5,4).
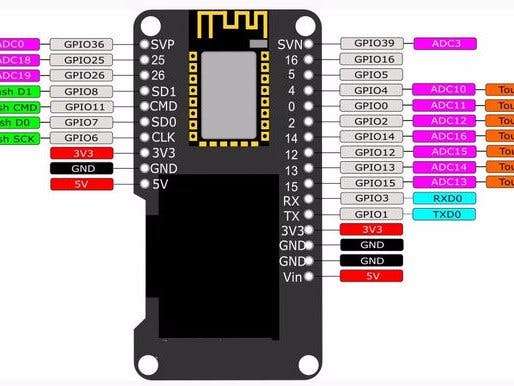
This ESP’s dedicated I2C pins are on GPIO 5 and 4 for data and clock respectively.
The attached ESP32_Wemos_I2C_Scanner sketch will confirm if your pins are addressed correctly. Load it on your ESP32 and check out serial monitor.
https://github.com/squix78/esp8266-oled-ssd1306
3. Functional OLED With Arduino LDR Analog InputI decided to just keep rolling with this and managed to get the OLED working with 'real' data and not just the examples. Analog LDR feed. I've attached the Arduino sketch to this to help. Take it for a spin and let me know how you make out! If you need a 'brush-up' on the workings of Arduino and Analog, head over to https://programmingelectronics.com/tutorial-21-ana...
I got started on my Arduino adventure with these guys, the course is definitely worthwhile.


Comments