

Hardware components | ||||||
| × | 1 | ||||
Software apps and online services | ||||||
 |
| |||||
This project successfully solved various challenges in the field of computer image processing, including image cutting, synthesis, and filter application. In the past, these tasks often relied on professional image processing software such as Photoshop. However, with our innovation, the same function can now be achieved efficiently and conveniently through a professional online AI drawing platform. This progress marks a major leap in image processing technology and provides users with a more intuitive and easy-to-use operating experience.
We are developing an advanced online AI drawing platform that aims to provide an innovative alternative that makes traditional Photoshop native software redundant. What’s unique about this platform is that by simply opening the website, users can use AI technology to automatically cut out images, combine images, apply filters, and more. Furthermore, it can also use AI to realize automated design of workflows, greatly improving work efficiency. The launch of this professional-grade online AI drawing platform will completely change the traditional, complex and time-consuming image processing methods. Even users who are unfamiliar with professional software such as Photoshop can easily process various images and enjoy a simple and intuitive image editing experience.
In the development of our AI projects, we use Pytorch ROCm 6.1, an open source machine learning library based on Python. It provides an efficient and flexible development environment for our projects. The online AI drawing platform we launched is characterized by its convenience, high efficiency and automated functions. Users can easily complete tasks such as cutout, image synthesis, and application of filters without relying on traditional client software such as Photoshop. Our project development direction has shifted from using NVIDIA hardware and the CUDA framework to using AMD AI hardware and the ROCm 6.1 framework. This shift enables us to design and develop our online AI drawing platform more efficiently and achieve better performance.
We have launched a powerful Android app, AI PixelPro, an artificial intelligence drawing assistant. This app can not only connect to remote servers, but also run on local PCs. Just make sure your local PC is equipped with AMD or NVIDIA GPU and install the compiled version of ComfyUI we provide, and you can easily achieve efficient drawing.
Go to the app store and download
https://www.amazon.com/gp/product/B0DK3XJP7L
https://global.app.mi.com/details?lo=ID&la=en_US&id=com.cmdmax.aipixelpro
Downalod AIPixelPro.ap
1. Powerful image generation model:Stable Diffusion 3 Medium support: Adopting the advanced Stable Diffusion 3 Medium image generation model, it can generate high-resolution, realistic and complex images. The model combines deep learning and probabilistic programming to ensure the high quality and diversity of the generated images.
2. Rich tags and preset tags:Tag collection and classification: The application contains more than 3, 000 tags covering a variety of topics and concepts. In addition, 30 sets of preset tags are provided, and users can quickly select and combine tags as needed to generate inspiring creative prompts.
3. Keyword library and intelligent prompt word generation:Rich keyword support: Built-in 100, 000 keywords support users to quickly find relevant prompt words through fuzzy queries, helping users to express their creative needs more accurately.AI drawing prompt word generation: Using a large language model, users only need to simply describe the image features or scenes they want, and the application can generate creative and rich drawing prompt words to provide inspiration support and direction.
4. Data privacy protection and local storage:Local image storage: All generated images are automatically saved on the user's local device to ensure user data privacy security.
5. ComfyUI client and local GPU support: LAN ComfyUI client: Android client supports connecting to local LAN ComfyUI client, users can add local GPU, use AMD graphics card to accelerate image generation. Simple operation experience: Provide the latest ComfyUI client compiled distribution, support Windows 10 and Ubuntu 22 systems, no complex settings, and use it in a similar way to popular image editing software such as Photoshop. Users use local GPU to accelerate image generation and data security.
6. Optimize image generation speed. ComfyUI client and local GPU support: LAN ComfyUI client: Android client supports connecting to local LAN ComfyUI client, users can add local GPU, use AMD graphics card to accelerate image generation. Simple operation experience: Provide the latest ComfyUI client compiled distribution, support Ubuntu 22 systems, no complex settings, and use it in a similar way to popular image editing software such as Photoshop. Users use local GPU to accelerate image generation and data security.d and quality:Extreme generation experience: Through optimization, AI drawing speed can complete a 512-pixel image in as fast as 2 seconds, ensuring that users can quickly obtain the desired creative results.
Support Flux.1 quantized Q8_0.gguf model
Former core members of Stability AI developed a new text generation image model – Flux.1, which has become another masterpiece in the open source field. The quality of this model far exceeds SD 3, and is even comparable to the closed-source Midjourney v6.1, becoming the latest benchmark for AI image generation and injecting new vitality into open source AI painting.
Flux.1 has a training parameter of up to 12 billion, far ahead of SD3 Medium’s 2 billion. According to the official introduction, FLUX.1 [pro] and [dev] have surpassed popular models such as Midjourney v6.0, DALL·E 3 (HD) and SD3-Ultra in terms of image quality, accuracy of prompt words, ability to adapt to different sizes, typesetting effects and output diversity, setting a new height for image synthesis. Especially in terms of complex English prompts, multi-person scenes and prompt word understanding, FLUX.1 Pro performs more outstandingly, and can accurately handle multi-person scenes to ensure that the details of the face and hands are not distorted. Even when generating very long text, the content and layout can be kept in place. In addition, FLUX.1 can effectively prevent the leakage of prompt words and ensure the accuracy of the generated content.
The following picture is generated using the flux1-dev-Q8_0.gguf quantitative model. The prompt words are: “A floating piece of paper with ‘FLUX-1.0’ written on it, the edges are burning, and the background is a 3D street scene similar to Super Mario World.”
Flux.1 provides three different versions to meet the needs of different scenarios:
- FLUX.1 [pro]: A closed-source version with the best performance, the strongest prompt word following ability, visual quality and diverse output effects. You need to apply for access rights by registering for the official API, and support enterprise customization.
- FLUX.1 [dev]: An open-source but non-commercial version, distilled from FLUX.1 [pro], with similar image quality and prompt word following ability, but higher efficiency.
- FLUX.1 [schnell]: An open-source and commercial version, optimized for local development and personal use, with the fastest generation speed and the smallest memory usage.
It is worth noting that the FLUX.1 [dev] model is large (24GB) and has high hardware requirements. To solve this problem, we quantized it and compressed it into Q8_0.gguf format, reducing the size to 12GB, so that most hardware can run smoothly.
We released the latest ComfyUI-0.1.1 compilation version on September 1, 2024, which supports Windows 10 and Ubuntu 22 systems, and adds support for the Flux1.dev model.
The download links are as follows:
Widowns 10 download: https://www.123pan.com/s/U3cgTd-HgKd3.html
Ubuntu 22 NVIDA download: https://www.123pan.com/s/U3cgTd-hgKd3.html
Ubuntu 22 AMD download: https://www.123pan.com/s/U3cgTd-dgKd3.html
Confirm whether the latest NVIDIA graphics card driver is installed. It is recommended to use an NVIDIA RTX 4060 Ti 16GB or higher graphics card. After downloading the driver, unzip the file and use it directly. When launching the program, first click main_launcher.bat, wait for the startup to complete, and then click main_browser.bat to use it.
Supports multiple platforms, no need to install Python, ROCm environment, just install AMD graphics driver to use.
Download ComfyUI compilation
https://www.123pan.com/s/U3cgTd-dgKd3.html
Directory structure
activation_date.txt
add-port-to-firewall.sh
comfyui_screenshot.png
DISCLAIMER.txt
extra_model_paths.yaml
_internal
main
main_browser.sh
main_launcher.sh
pytest.ini
workflow
Execute the startup script main_launcher.sh
#!/bin/bash

# Define the path of the main program
MAIN_PY_PATH="./main"

# Run the command
$MAIN_PY_PATH --preview-method auto --listen 0.0.0.0 --port 48567
7. User participation and reward mechanism:Contribution points system: Users participate in contributing accurate prompts and feedback, and can obtain system reward points to encourage users to actively participate in product improvement and community building.
This is the cmdmax-comfyui server open source codehttps://github.com/jianglishun/cmdmax-comfyui
To install and deploy the project cmdmax-comfyui, you can follow these steps:
Clone the Repository: First, clone the project from GitHub:
git clone https://github.com/jianglishun/cmdmax-comfyui.gitInstall the dependent environment
Install Nodejs
---------------------------------Installation Step 1
su root
cp -r node-v14.21.3-linux-x64.tar.gz /opt/
tar zxvf node-v14.21.3-linux-x64.tar.gz
chmod -R a+x node-v14.21.3-linux-x64

---------------------------------Installation Step 2
sudo vim /etc/profile
......
#nodejs
export NODE_HOME=/opt/node-v14.21.3-linux-x64/bin
export PATH=$NODE_HOME:$PATH

source /etc/profile

---------------------------------Installation Step 3
cd $NODE_HOME
cd $PATH
echo $PATH
echo $LD_LIBRARY_PATH
node -v
v14.21.3
npm -v
6.14.18
Install Python
---------------------------------Installation Step 1
sudo -i
sudo apt-get update
sudo apt-get upgrade
sudo apt-get install build-essential zlib1g-dev libncurses5-dev libgdbm-dev libnss3-dev libssl-dev libreadline-dev libsqlite3-dev wget libbz2-dev
sudo apt-get install build-essential python-dev python-setuptools python-pip python-smbus
sudo apt-get install build-essential libncursesw5-dev libgdbm-dev libc6-dev
sudo apt-get install zlib1g-dev libsqlite3-dev tk-dev
sudo apt-get install libssl-dev openssl
sudo apt-get install libxpm-dev libxext-dev
sudo apt-get install zlib1g-dev libbz2-dev libssl-dev libncurses5-dev libsqlite3-dev
sudo apt-get install python3-dev
sudo apt-get install libffi-dev -y

---------------------------------Installation Step 2
tar xvf Python-3.10.14.tar.xz
cd Python-3.10.14
sudo ./configure --prefix=/usr/local/python310 --enable-optimizations
sudo make
sudo make install

---------------------------------Installation Step 3
sudo vim /etc/profile
......
#python3.10.14
export PATH="/usr/local/python310/bin:$PATH"

source /etc/profile

---------------------------------Installation Step 4
/usr/local/python310/bin/python3 -m pip install --upgrade pip
/usr/local/python310/bin/python3 -m pip check
/usr/local/python310/bin/python3 -m pip cache purge
ldd /usr/local/python310/bin/python3
Install Reids
---------------------------------Installation Step 1
su root
cp -r redis-6.0.19.tar.gz /opt/
tar xzf redis-6.0.19.tar.gz

---------------------------------Installation Step 2
cd redis-6.0.19
make

The installation is complete:
......
    CC tls.o
    CC sha256.o
    CC timeout.o
    CC setcpuaffinity.o
    CC mt19937-64.o
    LINK redis-server
    INSTALL redis-sentinel
    CC redis-cli.o
    LINK redis-cli
    CC redis-benchmark.o
    LINK redis-benchmark
    INSTALL redis-check-rdb
    INSTALL redis-check-aof

Hint: It's a good idea to run 'make test' ;)

make[1]: Leaving directory '/opt/redis-6.0.19/src'

---------------------------------Installation Step 3
sudo chmod -R a+x /opt/redis-6.0.19/

---------------------------------Installation Step 4
sudo vim /opt/redis-6.0.19/redis.conf
......
# requirepass foobared
requirepass sf4uDgZLv6YTZK7MNtP

---------------------------------Installation Step 5
cp -r redis-server.service /etc/systemd/system/
chmod -R a+x /etc/systemd/system/redis-server.service
systemctl daemon-reload
systemctl enable redis-server.service
systemctl start redis-server.service
systemctl status redis-server.service
sudo journalctl -u redis-server.service -e

---------------------------------Installation Step 6
sudo apt-get install redis-tools
redis-cli -h 127.0.0.1 -p 6379

CONFIG GET requirepass
AUTH "sf4uDgZLv6YTZK7MNtP"
exit

AUTH "sf4uDgZLv6YTZK7MNtP"
flushdb
flushall
exit
Install ROCm
---------------------------------Installation Step 1
sudo apt-get update
su root
cd /opt
sudo chmod -R a+x amdgpu-install_6.1.60100-1_all.deb
sudo apt-get install ./amdgpu-install_6.1.60100-1_all.deb

---------------------------------Installation Step 2
sudo amdgpu-install --usecase=hiplibsdk,rocm

---------------------------------Installation Step 3
sudo usermod -a -G video $LOGNAME
sudo usermod -a -G render $LOGNAME

---------------------------------Installation Step 4
sudo find / -name rocm
......
/etc/alternatives/rocm
/home/ai-wmr/.local/lib/python3.10/site-packages/triton/third_party/rocm
/opt/rocm
/opt/rocm-6.1.0/share/rocm
/var/lib/dpkg/alternatives/rocm

---------------------------------Installation Step 5
sudo vim /etc/profile
......
#ROCm rocm-6.1.0
export PATH=$PATH:/opt/rocm-6.1.0/bin/:/opt/rocm-6.1.0/opencl/bin
export LD_LIBRARY_PATH=/opt/rocm-6.1.0/lib:/opt/rocm-6.1.0/lib64

source  /etc/profile

---------------------------------Installation Step 6
sudo find / -name "rocm-smi"
rocm-smi
sudo rocminfo

---------------------------------Installation Step 7
lspci | grep -i amd
sudo apt-get install dkms
dkms status
Start the program
/opt/node-v14.21.3-linux-x64/bin/node /cmdmax-comfyui/server.js
/opt/node-v14.21.3-linux-x64/bin/node /cmdmax-comfyui/socket_server.js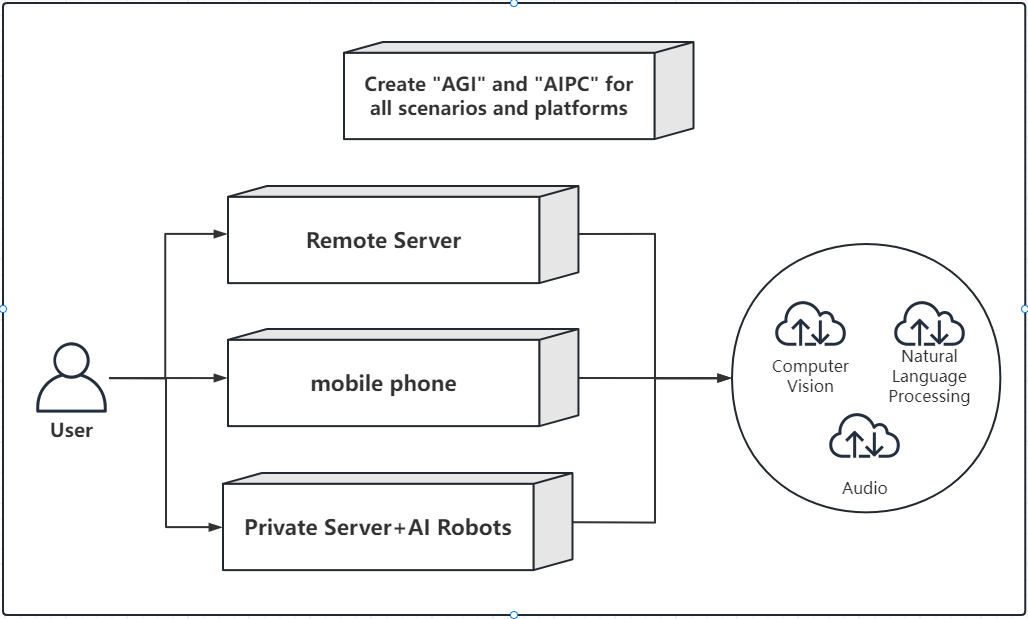
/cmdmax-comfyui/venv/bin/python3 /cmdmax-comfyui/main.py --preview-method auto --listen 0.0.0.0 --port 48567Create "AGI" and "AIPC" for all scenarios and platforms


Comments