


Hardware components | ||||||
 |
| × | 1 | |||
| × | 1 | ||||
| × | 1 | ||||
Hand tools and fabrication machines | ||||||
| ||||||
 |
| |||||
I need a way to visualize the amount of time left for a given duration. The desire is to display how much time has lapsed for 1 hour.
SolutionIOT to the rescue! Use LEDs to display time in the shape of an octagon. Using some WiFi boards and some plexiglass, we created a wall-mounted countdown clock.
I ended up choosing the Particle for the project based on the ability to control it via REST API. I also chose to use the Command Line to setup the Particle.
Step 1: Install & SetupInstall: Particle CLI
$ npm install -g particle-cli
Then Login:
$ particle login
Once installed and logged in, you can then run Particle commands. To get a list of available commands, run Help.
$ particle help
To Configure the board, connect the board to your computer with a USB. Then run the Setup command:
$ particle setup
This will walk you through a series of steps during Setup. You should see this at the end:
Mac users will need Homebrew. Then you can install everythin else.
brew install dfu-util
Let's make sure everything is working thus far with a 'Hello World' example. Then make an LED blink. And Finally working with NeoPixels
For the portion we will use the Web IDE
click on CODE > CREATE NEW APP (mine will be named neopixel-demo-jr-1)
Paste in the following code that toggles the state of the onboard LED:
#define PIN D7             // on board LED
int state = 0;             // toggle state
void setup() {
   pinMode(PIN, OUTPUT);    //tell the device we want to write to this pin
}
void loop() {
   digitalWrite(PIN, (state) ? HIGH : LOW);     //apply high or low
   state = !state;                              //invert the state
   delay(500);                                 //wait half a second
}
Click FLASH to upload the code the the Photon.
Time to add some NeoPixels! Lets do this by going to: Libraries > Community Libraries and search for 'NeoPixels'.
Select NEOPIXEL then the INCUDE IN PROJECT button.
You will then select which app the Library will be added to. Click CONFIRM to finish adding the Library to your project.
You will now see that the Library is added in line 2. You can click Verify to ensure that the Library is loaded correctly.
Now that the Library is added, we can run some Hello World code for the NeoPixels. Here we will define the output pin and the amount of pixels. We then use a function to cycle trough the color spectrum. I've created a repo where you can download the code:
https://github.com/jhey/neopixel-demo/blob/master/NEOPIXEL-DEMO-JR-1.INO
It should look like the following:
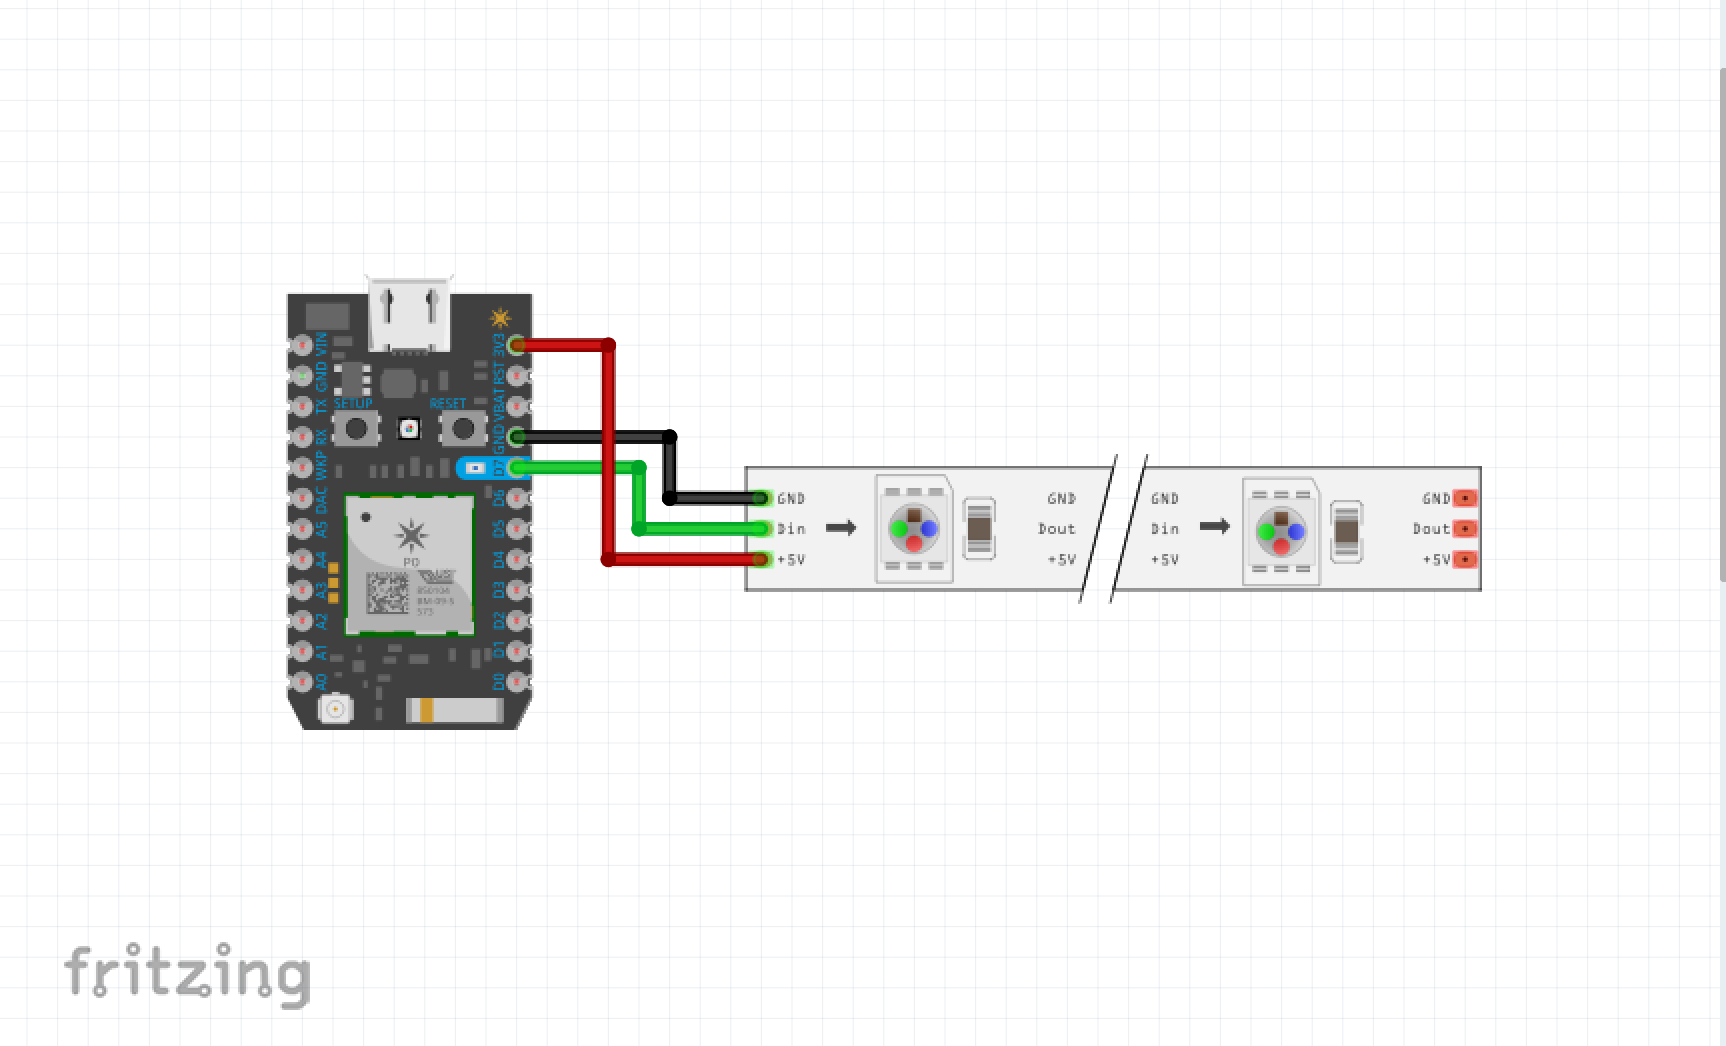
Here is the wiring for the Photon to NeoPixel strip:
For this portion I am Using the Particle Dev IDE. Then we will use BLYNK to simplify the UI. after you are past with the basics, we then start adding our custom code:
... TO BE CONTINUED ...ERRORS:
If your photon does not connect to the cloud...
try flashing the tinker app first:
COMING SOON....


Comments