Homework 5
Challenges
I was very careful as I soldered the wires together, making sure not to produce a short circuit. When I finished soldering, I noticed that the servo was able to make a full rotation but stopped directly after, and the LEDs were unable to turn on. I suspected a few things: perhaps my 1k ohm was too much, or I had a short circuit somewhere. I realized this was a problem with my program rather than the wiring. The fix was easy: make the servo loop forever and turn on the LED lights with the digitalWrite() function in setup().
Project 1: Drawing Machine
Ideating
Sketching in Illustrator
First iteration
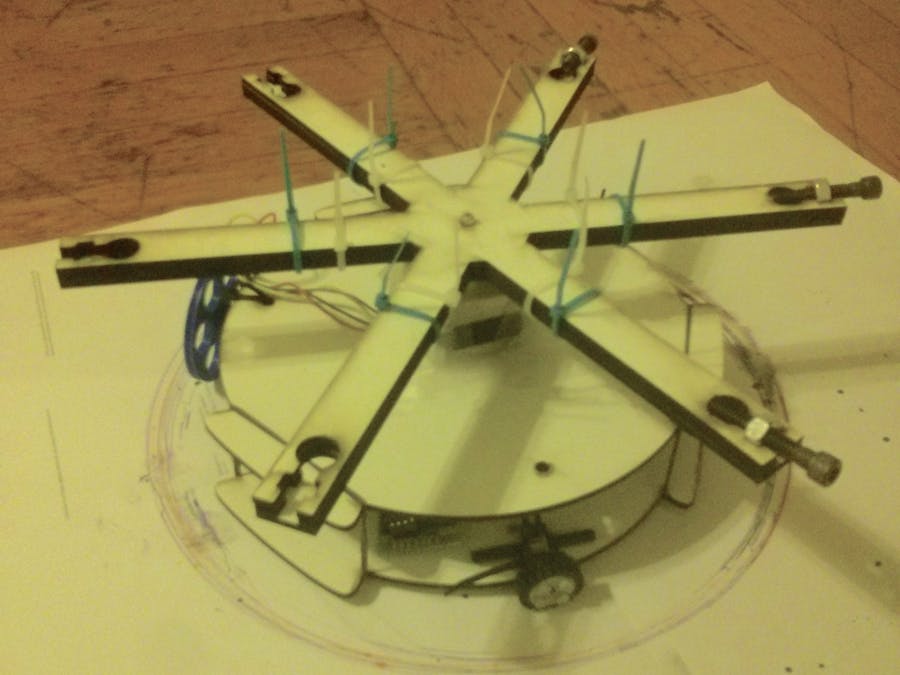
For my first iteration, I wanted to try and see what my product would look like with a propeller-like structure that would hold my pens. I laser cut a propeller to think about how I might want to fasten my pens, and just to get a better sense of the whole structure. Several problems I encountered that I addressed in Iteration 2:
- The screws and nuts that are supposed to hold the pens in place kept falling because there wasn't anything supporting the nut.
- I underestimated the size of the base that would hold together my circuitry and ended up making my propeller wings too short.
- I jumped into this idea too quickly.
Iteration 2
I ended up tweaking my idea a little and adding an additional motor that would spin the base so that my machine wouldn’t just be tracing the same circle.
- I addressed my problems in iteration 1 by adding two more layers to the propeller. The bottom most layer was designed to fit the pen only and not the nut/screw to keep the nut from falling.
- I extended the propeller and designed the base to be just small enough so as to not be in the way of the pens and large enough to contain the circuitr
- Added some flair to my machine and added three wheels to the base, driven by an additional motor.
After addressing these problems in my new design, I ran into even more problems…
By using acrylic for my three-layer propellers, the D-shape cut out was way too tight for the stepper and when I had to remove the propellers from the stepper, all of the acrylic pieces broke…:(
So I set out to use wood instead, which worked fairly well. A tradeoff however is that wood can be quite heavy…(which would pose some more problems later)
Assembling the machine
I wanted to challenge myself to use only fasteners and rubber bands to hold the structure together. I used zip-ties to hold the triple layer propeller together as well as the wheels on the base. I used only 6 zip ties at first, one for each wing, but after seeing that the layers were shifted a bit in one direction, I used 6 more zip ties to counterbalance the layers.
I used rubber bands for holding the top and bottom of my base together.
The problem with a wall-free base held together by rubber bands was that it created an uneven surface with one side of the machine higher than the other. Because the surface was uneven, this caused a lot of friction and tension when the pens would hit a hard surface. As a result, the motor would be lifted out of the square cutout that is meant to hold the stepper in place. This would cause the stepper to get jammed. To solve this problem I used some screws to support the structure on the leaning side.
Yes, I ended up using tape to hold the stepper down. And yeah...I used hot glue to hold down the stepper container (but not after first trying out different sizes to see which would fit the stepper perfectly).
If I were to improve on this, I would drill four holes and have four screws holding the stepper in place. Here is the final product...
Finally, the machine in motion.


Comments