Soldering a Perfboard
The first part of the assignment was to create, on a piece of perforated breadboard, a small Arduino shield consisting of 3 LEDs (and their necessary resistors) and 1 header for a servo motor. This included learning how to solder by soldering scrap pieces of electrical wire into rings.
After checking in with Michael, I was able to confirm that my shield was soldered correctly. Each of the LEDs function as desired, however the servo requires a larger power supply.
Spirograph Drawing Machine
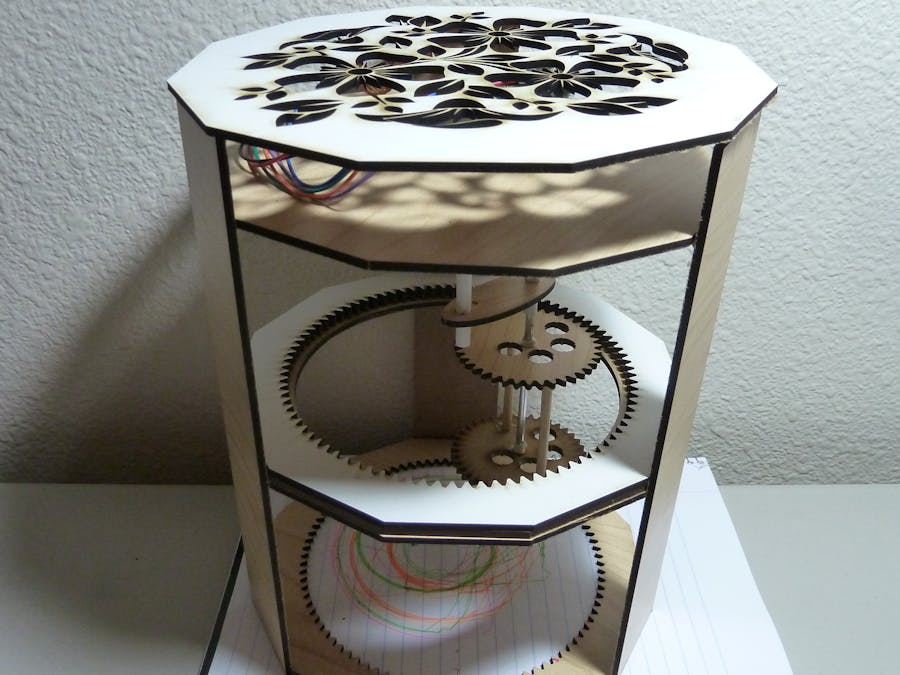
The rest of the assignment was to design and prototype a drawing machine. The term "drawing machine" is quite vague, but is essentially anything that leaves a mark on something. I remember being enthralled by spirographs when I was younger, so I was inspired to make a drawing machine that creates spirographs using annular or planetary gears.
Although I had an idea in mind, I wasn't really sure how to control the movement of the inner gear with a motor. An alternative method would be to move the paper and outer hoop while leaving the inner gear stationary. To test out my ideas, I found and 3D-printed a spirograph STL from Thingiverse (http://www.thingiverse.com/thing:905849). It was extremely useful having a physical spirograph to play around with.
In the process of filling my paper full of spirograph drawings, I realized that while the inner gear rotates on itself to create the design, the movement of the gear in relation to the hoop is a constant circular pattern around the inside of the hoop.
I initially planned on gluing all of my laser cut pieces together, but discovered that leaving some range of modification was very useful. By mounting small triangles on the side panels instead of gluing it permanently down, I was able to remove my cover as needed.
For the Arduino portion of the drawing machine project, I powered the center axis using a 28BYJ-48 stepper motor. When I tested it out using the example code in the Arduino library, the stepper motor rotated very slowly and also heated up significantly. As seen in my code below, I ended up using the AccelStepper library which allowed me to increase the speed of the stepper motor. A bonus is that the motor also did not heat up as much.
Unfortunately, the rotating shaft of the stepper motor was too short to connect to my 3D printed motor wheel without wobbling. While the rest of my spirograph arms and gears were constrained (offset layers for both arms and gears to constrain motion of pen), the gear would slip off from the outer track.
I 3D modeled and printed a plate to constrain the motion of the gear and keep it from slipping, but the friction stops all rotation and pops the gear up.
A possible fix would be to increase the width of my circular rim (one I placed below the geared outer circle to guide the inner gear), which would render one of the pen slots unusable. Alternatively, I could also attach the stepper motor to a larger shaft and mount it to the cover with bearings.
Videos of the drawing machine in action:
Drawing produced by machine:
Update (12/18/15)
After making a few changes to the drawing machine, it now works perfectly. I'm very happy to say that the machine draws beautiful spirographs, and the movement of the pen as it draws is a bit hypnotic.
I added the 3D-printed plate to act as a guide for the gear, and sanded the edges of the plate to reduce friction and uneven edges. The DC motor is sandwiched between two layers of laser-cut wood. A series of connectors and a motor shaft coupler allow the motor to spin the plate, thus controlling the motion of the drawing utensil as the gear rotates.
I also simplified my spirograph drawing machine by removing the need for an Arduino. An Arduino could still be useful if you want to vary the speeds of the drawing machine and add more complex functions. However, in this case, as long as the DC motor is receiving power from the battery pack, the machine will continue to run. 4 AA batteries causes the drawing machine to spin too quickly, while 2 AA batteries produces the perfect speed. In addition, I added magnets to keep the lid in place.
Check out my video of the complete spirograph drawing machine!


Comments