Jashwanth Valurouthu
Created April 30, 2020 © LGPL

Ultraviolet Robot

A robot with can kill corona virus in its surroundings, it can be an user to clean the are used by the corona patient easily and quickly.

IntermediateFull instructions provided2 hours36
Ultraviolet Robot

Things used in this project

Hardware components

Ultraviolet C Lamp (Short wave UV-C Band)
×1
Arduino UNO
Arduino UNO
×1
4-CHANNEL RELAY CONTROLLER FOR I2C
ControlEverything.com 4-CHANNEL RELAY CONTROLLER FOR I2C
×1
Dual H-Bridge motor drivers L298
SparkFun Dual H-Bridge motor drivers L298
×1
Stepper Motor
Digilent Stepper Motor
×4
JS Series Switch
C&K Switches JS Series Switch
×1
SparkFun Bluetooth Modem - BlueSMiRF Silver
You can Purchase Bluetooth or WiFi as per your range requirement. Bluetooth - 2m - 4m IoT - Unlimited Radio - 2km maximum
×1
NodeMCU ESP8266 Breakout Board
You can Purchase Bluetooth or WiFi as per your range requirement. Bluetooth - 2m - 4m IoT - Unlimited Radio - 2km maximum
×1

Software apps and online services

Arduino IDE
Arduino IDE

Hand tools and fabrication machines

Soldering iron (generic)
3D Printer (generic)

Story

Read more

Schematics

Bluetooth

Circuit Diagram

Wi-Fi Code

Circuit diagram

Code

Bluetooth

C/C++
Arduino Code
char t;
 
void setup() {
pinMode(13,OUTPUT);   //left motors forward
pinMode(12,OUTPUT);   //left motors reverse
pinMode(11,OUTPUT);   //right motors forward
pinMode(10,OUTPUT);   //right motors reverse
pinMode(9,OUTPUT);   //Led
Serial.begin(9600);
 
}
 
void loop() {
if(Serial.available()){
  t = Serial.read();
  Serial.println(t);
}
 
if(t == 'F'){            //move forward(all motors rotate in forward direction)
  digitalWrite(13,HIGH);
  digitalWrite(11,HIGH);
}
 
else if(t == 'B'){      //move reverse (all motors rotate in reverse direction)
  digitalWrite(12,HIGH);
  digitalWrite(10,HIGH);
}
 
else if(t == 'L'){      //turn right (left side motors rotate in forward direction, right side motors doesn't rotate)
  digitalWrite(11,HIGH);
}
 
else if(t == 'R'){      //turn left (right side motors rotate in forward direction, left side motors doesn't rotate)
  digitalWrite(13,HIGH);
}

else if(t == 'W'){    //turn led on or off)
  digitalWrite(9,HIGH);
}
else if(t == 'w'){
  digitalWrite(9,LOW);
}
 
else if(t == 'S'){      //STOP (all motors stop)
  digitalWrite(13,LOW);
  digitalWrite(12,LOW);
  digitalWrite(11,LOW);
  digitalWrite(10,LOW);
}
delay(100);
}

Wi-Fi Code

C/C++
Arduino Code
#include <SoftwareSerial.h>

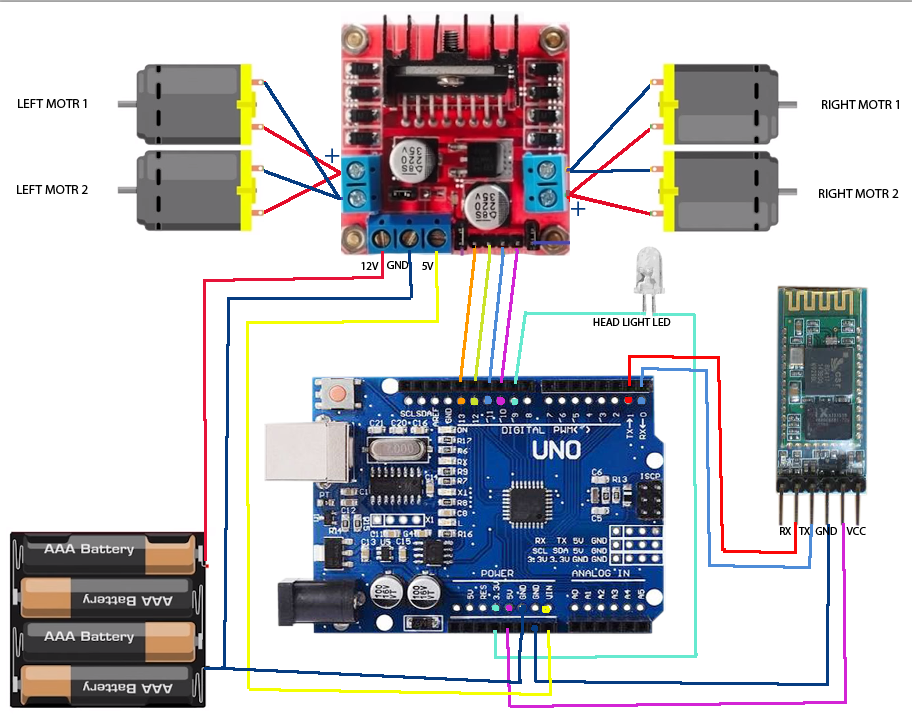
/* Pins 8, 9, 10 and 11 of Arduino are connected to L298N Motor Driver Input pins i.e. 
IN1, IN2, In3 and IN4 respectively*/

#define IN1 8
#define IN2 9
#define IN3 10
#define IN4 11
#define DEBUG true
#define RXPIN 2
#define TXPIN 3

SoftwareSerial esp8266Serial(RXPIN,TXPIN); //Pin 2 & 3 of Arduino as RX and TX. Connect TX and RX of ESP8266 respectively.


void setup()
  {
    pinMode(IN1, OUTPUT);
    pinMode(IN2, OUTPUT);
    pinMode(IN3, OUTPUT);
    pinMode(IN4, OUTPUT);
    digitalWrite(IN1, LOW);
    digitalWrite(IN2, LOW);
    digitalWrite(IN3, LOW);
    digitalWrite(IN4, LOW);
    Serial.begin(9600);
    
    esp8266Serial.begin(115200); //Baud rate for communicating with ESP8266. Your's might be different.
    esp8266Data("AT+RST\r\n", 5000, DEBUG); // Reset the ESP8266
    esp8266Data("AT+CWMODE=1\r\n", 5000, DEBUG); //Set station mode Operation
  
    /*Change the following command as per your requirement i.e. enter the 
    SSID and Password of your WiFi Network in the command.*/
    
    esp8266Data("AT+CWJAP=\"SSID\",\"PASSWORD\"\r\n", 5000, DEBUG);//Enter your WiFi network's SSID and Password.
                                   
    /*while(!esp8266Serial.find("OK")) 
    {
      }*/
      
    esp8266Data("AT+CIFSR\r\n", 5000, DEBUG);//You will get the IP Address of the ESP8266 from this command. 
  
    /* The following statement is to assign Static IP Address to ESP8266. 
    The syntax is AT+CIPSTA=<ip>,<gateway>,<netmask>. 
    This will assign a Static IP Address of 192.168.1.254 (in my case)
    to the ESP8266 Module. Change this value as per your requirements i.e. this IP address 
    shouldn't conflict with any other device. 
    Also, the second and third parameters are Gateway and Net Mask values. 
    You can get these values from ipconfig command in command prompt*/
  
    esp8266Data("AT+CIPSTA=\"192.168.1.254\",\"192.168.1.1\",\"255.255.255.0\"\r\n", 3000, DEBUG); // Assign Static IP Address
    esp8266Data("AT+CIFSR\r\n", 5000, DEBUG);//You will get the IP Address of the ESP8266 from this command. 

    esp8266Data("AT+CIPMUX=1\r\n", 5000, DEBUG);
    esp8266Data("AT+CIPSERVER=1,80\r\n", 5000, DEBUG);
  }

void loop()
  {
    if (esp8266Serial.available())
      {
        if (esp8266Serial.find("+IPD,"))
          {
            String msg;
            esp8266Serial.find("?");
            msg = esp8266Serial.readStringUntil(' ');
            String command1 = msg.substring(0, 5);
            String command2 = msg.substring(6);
                        
           if (DEBUG) 
              {
                Serial.println(command1);//Must print "robot"
                Serial.println(command2);//Must print "FWD" or "REV" or "LFT" or "RGT" or "STP"
              }
            delay(100);

              if (command2 == "FWD") 
                {
                  forward();
                 }
                 if (command2 == "REV") 
                {
                  reverse();
                 }
                 if (command2 == "RGT") 
                {
                  right();
                 }
                 if (command2 == "LFT") 
                {
                  left();
                 }
                 if (command2 == "STP") 
                {
                  stoprobot();
                 }
                 
          }
      }
  }

void forward()
{
  digitalWrite(IN1, HIGH);
  digitalWrite(IN2, LOW);
  digitalWrite(IN3, HIGH);
  digitalWrite(IN4, LOW);
}

void reverse()
{
  digitalWrite(IN1, LOW);
  digitalWrite(IN2, HIGH);
  digitalWrite(IN3, LOW);
  digitalWrite(IN4, HIGH);
}

void left()
{
  digitalWrite(IN1, LOW);
  digitalWrite(IN2, LOW);
  digitalWrite(IN3, HIGH);
  digitalWrite(IN4, LOW);
}

void right()
{
  digitalWrite(IN1, HIGH);
  digitalWrite(IN2, LOW);
  digitalWrite(IN3, LOW);
  digitalWrite(IN4, LOW);
}

void stoprobot()
{
  digitalWrite(IN1, LOW);
  digitalWrite(IN2, LOW);
  digitalWrite(IN3, LOW);
  digitalWrite(IN4, LOW);
}
   
String esp8266Data(String command, const int timeout, boolean debug)
  {
    String response = "";
    esp8266Serial.print(command);
    long int time = millis();
    while ( (time + timeout) > millis())
      {
        while (esp8266Serial.available())
          {
            char c = esp8266Serial.read();
            response += c;
          }
      }
    if (debug)
      {
        Serial.print(response);
      }
    return response;
  }

Wi-Fi Code transmitter

HTML
HTML Code
<html>
	<head>
		<title>WiFi Controlled Robot</title>
	</head>
	<body>
	
	<h2> <i> WiFi Controlled Robot using Arduino and ESP8266 </i> </h2>
	<h5> <i> by ElectronicsHub.org </i> </h5>
	
	<button id="FWD" class="robot">FORWARD</button> 
	<button id="REV" class="robot">REVERSE</button> 
	<button id="RGT" class="robot">RIGHT</button> 
	<button id="LFT" class="robot">LEFT</button> 
	<button id="STP" class="robot">STOP</button> 
		
	<script src="jquery.js"></script>
	<script type="text/javascript">
		$(document).ready(function()
		{
			$(".robot").click(function()
			{
				var cmd = $(this).attr('id'); 
				$.get("http://192.168.1.254:80/", {robot:cmd}); 
			});
		});
	</script>
	</body>
</html>

Credits

Jashwanth Valurouthu

Jashwanth Valurouthu

8 projects • 1 follower

Comments