


I was dragging my feet. Managing a full-time workload at my day job and entertaining side projects is always a joy. It's like doing a headstand while typing this paragraph backward character by character. Luckily, I overcame the powers that be and set my 10+ years of hardware design experience on this red Jeep Wrangler.
Theproblem:
How to install some cheap-o Chinese LED light bars and do it in a way that wouldn't make my customer cry.
The concern:
If I did mange to burn to the Jeep to the ground, the customer (my dad) would surely disown me.
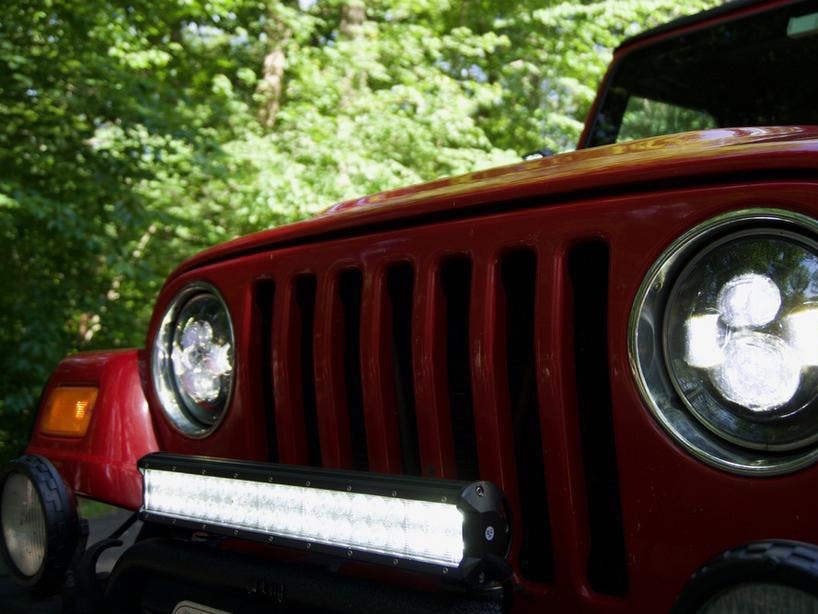
The result:
Did I do alright?
I think so. I'll let you be the judge. 😉
As we start this twisty road into Jeep LED light bliss, I hope you take some of the techniques and my learnings here and use them in your own projects. If you do, I'd love to hear from you in the comments section at the bottom!
Let's get started!
CrimpingLooking around Digikey, I wanted to find some connectors that would hold up to being exposed to the elements while keeping the electrical connections for this project protected. I stumbled upon the MX19 Series from JAE and they seemed to fit the bill and also look/operate similarly to connectors i’ve seen in the wild before.
As with all these types of connectors, they do require you (or someone) to connect the crimps, which make the electrical connection, to the wire itself. In the video below, I describe how to fasten the female connector crimps to bare wires. In the next video I will go into detail on how to fasten the male connector ends as well.
The most important and tedious detail to be aware about is pre-bending the wings that pop out which retain the cable sheathing. They don't play nice with the crimpers so you will need to be careful about their orientation when inserting them and squeezing down with the crimpers.
Once you've got the part above done, you can focus on the next step of the process: crimping the other terminals for the mating connector.
My biggest tips to you are:
- Make sure that you crank down on the crimper and check your work afterwards. The last thing you want to do is insert the crimp into a fresh connector only for the wire to fall out leaving the crimp behind. It's happened to me and it will happen to you. Beeeeeeewaaaaaaareeeeeeee. 🙀
- Be ready and aware on how to pull a crimp out if the above happens or you put it in the wrong place. Using a dental pick, I was able to remove a crimp that I had put in the wrong position. Anything long, small and sharp (like a long needle) should do the trick. The important part is finding the metal tab that is bent outward on the circular portion of the crimp and push it inwards in order to evacuate the crimp.
- As I suggested above, pre-bending the sheathing part of the crimp with a pair of pliers, (at least before using the crimp tool) is recommended. That way you spend less time fiddling with the crimper and more time making a good solid connection.
Using a combination of head-shrink, solder and wire you can make any wire-to-wire connection extremely solid and nearly permanent. This is a slower technique (and a bit more hazardous) if you don’t have any butt splice crimps on hand but is useful in a pinch.
Additionally, It’s also fantastic when you are restricted by the size of the wire and anything wrapped around it. For instance, if you're going to be feeding these wires through a small hole butt splices increase the diameter of the overall connection so they will not work here!
Reference SchematicEagle CAD has been my go-to ever since I started designing circuit boards back about 10 years ago (yes, you can call me sensei and/or grandpa 👴🏻). It’s typically used for circuit board design but I’m going to be using it here to show how this circuit can be represented in a schematic format. That way, when you’re knee deep in random wires, you have a better idea what needs to be connected where.
The above video covers 75% of what's actually in the Jeep now. I’ve since modified the schematic in the video below to accommodate for the LED bar that I attached to the bumper.
The summary of operation for the window lights are the same. The new section involves several relays connected to the same type of switch used for the window lights. The biggest difference is the grill bar draws too much current for the switch in the cab to handle. Thus, the addition of some 12V relays was necessary.
Some benefits of relays include:
1. The relays act like remote switch which can handle much higher sustained currents.
2. These relays also enables you, the installation wizard, to control the lights in different ways other than just a simple on/off switch.
Want to have those lights only turn on with the ignition? Done.
Want to have those lights only turn on with the ignition and only when the high beams are turned on? Completely doable.
The most unfortunate drawback of using a standard automotive relay is the fact they they are much more costly to run compared to a solid state relay (or similar). In other words, they draw more power but that's something we're not concerned about here.
It's hard to explain in words how I mushed this circuit together so it's best to watch the video below. Just remember, if there's nothing else you take away from this, be sure to always use fuses and place them as close to the battery or fuse box as possible on the positive leads.
Creating Neoprene GasketsThings are all fun an games until you scratch the paint on your shiny new cool-mobile. 🚗😎 By tracing and cutting neoprene rubber to form to the light mount, you can protect the paint at the point between the mount and the forward A-frame of the Jeep touch.
Attaching Window MountsFor this task, I used all stainless steel hardware to attach the lights to the mounts. Luckily my local hardware store had all the necssary bolts and nuts for the install.
Here's a table of the hardware that I bought:
The only other thing that I added for the window lights was a plastic standoff / spacer to get the light off of the mount. Otherwise, the light faces downward which is not what the customer wanted.
McMaster Carr has some black plastic tubing which is perfect for this. The piece is a little long so you will have to cut it using a saw or a rotary tool like a Dremel. In my case, I used a Dremel to do the dirty work.
For mounting the mounts to the windshield itself, using the already existing Torx head bolts is key here. I will warn you that those bolts are likely hard to remove. After some struggling with the front ones, I gave up and left them in. If I continued in my quest I would likely stripped them out. Plus, the whole father disowning son thing wasn't a very attractive prospect. 😉
Wiring TechniquesFerrules ferrules ferrules.
Noooooot the cat kind. 😸
Ferrules help your projects in several ways:
- They help protect and prevent accidental shorts
- They help get the best possible electrical connection for high current circuits.
- As an added bonus, they play nice with euro style terminal blocks and fuse blocks/circuit breakers.
My crimp of choice for terminating wires are ferrules for the above reasons. They're a newer discovery of mine and I'm glad I came across them. Not only can they be used in an application like this one, but they also can be used for stereo installs and anything else that requires the insertion of wire into a terminal block.
Uninsulated butt splice crimps are another favorite of mine. It's the second best thing to soldering two wire ends together. Once crimped, I will typically cover them with heat shrink tubing to keep out all the bad things.
(By the way, here is a non-exhaustive list of bad things: dirt, grime, sand, water, slime, earwax. Ghosts and boogymen not included.)
Heat shrink end caps are another great option for keeping out the bad stuff (see the above). I did forget to mention them in the video but they're great for capping the ends of unused multi-cable wire or exposed multi-cable wire.
Running the WiresOrganizing the wiring underneath the cowling is straightforward as long as you keep your wires away from moving parts. There are several areas where you can easily zip tie your wiring to to keep it secure.
This process is different for different vehicles. Sometimes you are not as lucky to have a panel that is removable to run wires. One important thing to note here is that the cowling is actually quite difficult to put back. Meaning, it's harder to replace lights later down the road. I still don't regret using the JAE connectors but their benefits are less now that they're underneath the cowling.
See the video below to watch me monkey around with putting the cowling back on. If you have this part down, move on over to the next step.
Below, I show where I ended up putting all my terminating connections and where I recommend you should put them as well. Most notably, inside the cab behind the black cigarette lighter panel and out by the fusebox next to the battery. You can see I took advantage of what was provided to me regarding terminal connections. I even re-used the fuse that was already pre-connected to the headlight wire to operate the relays I placed under the fuse box.
Dielectric grease is fantastic for keeping the bad things out of your circuitry and away from any important contact points like the ground. Without a good ground connection, you may run into issues later on where the lights may or may not work. Skip that problem entirely and use that dielectric grease! I do recommend wearing some disposable nitrile gloves while applications the grease. It is grease after all and will make a mess of everything you touch.
CostOverall the total computed cost, though I used some connectors, lights, mounts and hardware I already had on-hand, is about $281.66 + %15 for good measure (and taxes and shipping).
In terms of time, it took about 8 hours of combined time. In my case, it spanned over several weekends because I had to dismantle previous lights and install the new ones!
The end productThere's no proof until there are pictures! See the pictures below. This is how everything is set up today and it's the way they're going to stay for a while to come!
I want to thank you for making it this far with me. It's been a hoot to share my experience with all of you. If you'd like to get notified about the other projects I'm working on sign up for my mailing list on Circuit Dojo.
See you on the next one!

_t9PF3orMPd.png?auto=compress%2Cformat&w=40&h=40&fit=fillmax&bg=fff&dpr=2)


Comments