



Hardware components | ||||||
 |
| × | 1 | |||
 |
| × | 1 | |||
| × | 1 | ||||
| × | 1 | ||||
| × | 1 | ||||
| × | 1 | ||||
 |
| × | 1 | |||
| × | 4 | ||||
 |
| × | 2 | |||
| × | 1 | ||||
| × | 1 | ||||
 |
| × | 12 | |||
 |
| × | 15 | |||
| × | 1 | ||||
 |
| × | 50 | |||
 |
| × | 4 | |||
 |
| × | 54 | |||
Software apps and online services | ||||||
| ||||||
 |
| |||||
Hand tools and fabrication machines | ||||||
 |
| |||||
 |
| |||||
 |
| |||||
 |
| |||||
The Problem
I wanted to build an autonomous rover that patrols forest trails to spot wildfire risks on the ground before ignition occurs. Satellites and high-altitude drones are great for detecting established fires, but they can't see through the dense tree canopy to evaluate the dry brush, leaf litter, and dead pine needles accumulating on the forest floor. I built TerraGuard to drive directly under the canopy, measure local temperature and humidity, and use an onboard camera with Edge AI to classify the ground vegetation in real-time.
Buildingthe Hardware
The brain of this project is of course the Arduino Uno Q. It turned out to be a fantastic board for this project because it combines an STM32 real-time microcontroller and a Linux Debian application processor on the same PCB.
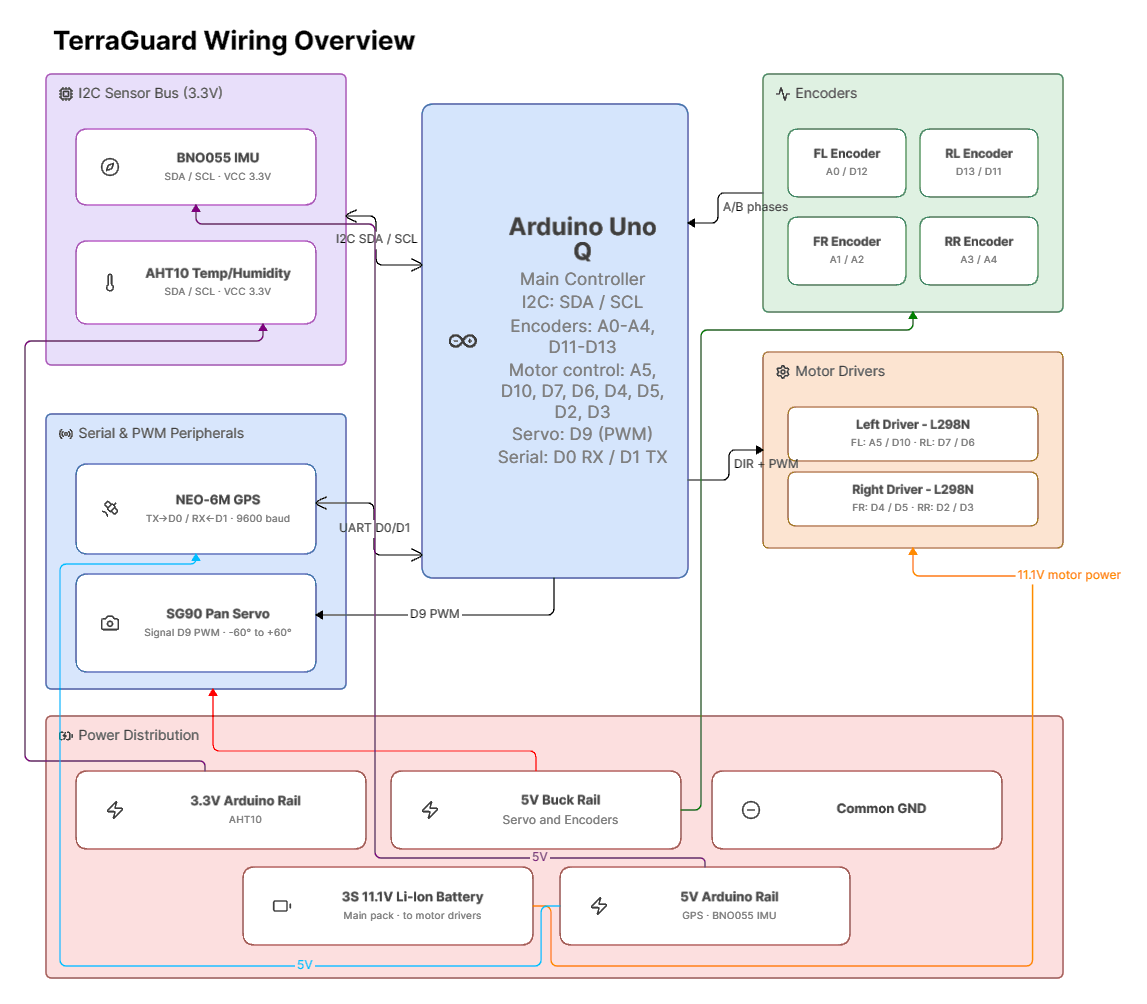
For the drivetrain, I used a standard 4WD off-road chassis with large 12.5 cm rubber tires and a 20.5 cm track width, which gives plenty of ground clearance to roll over roots, pinecones, and gravel. I controlled the four DC motors using two identical L298N dual H-bridge drivers, one for the left side and one for the right.
Also worth mentioning is that I decided to split the robot into two separate physical decks to keep things clean and functional:• Lower Deck: This is where I tucked away most of the messy wiring, the main 3S 11.1V Li-Ion battery pack, the camera pan servo motor, and the AHT10 temperature and humidity sensor. Mounting the AHT10 on the lower deck was an intentional design choice, it places the sensor just a few centimeters above the forest floor, measuring the actual microclimate boundary layer where combustible needles and leaves dry out, also preventing direct sunlight influence the result.• Upper Deck: This deck holds the clean brain electronics, the Arduino Uno Q, both L298N motor drivers, the Bosch BNO055 IMU, and the U-blox NEO-6M GPS module with its antenna pointing straight up to catch satellite signals through the trees.
To track exactly how far the rover moves (odometry), I attached magnetic quadrature encoders to all four wheels. For orientation, I added a Bosch BNO055 9-DOF IMU for absolute, drift-free gyroscopic heading, an AHT10 sensor for ambient weather, and a U-blox NEO-6M GPS for mapping. The whole rover is powered by a 3S 11.1V Li-Ion battery pack, with a 5V buck converter stepping down voltage to provide clean power to the encoders and the servo motor, while motor power is fed directly to the L298N drivers.
For the camera, I decided to use the Seeed Studio XIAO ESP32S3 Sense board. It's tiny, lightweight, and streams MJPEG video frames over its own local Wi-Fi access point directly to the Arduino's Linux side. The Xiao has its own small 3.7V Li-Ion battery right next to it. Because the camera is placed out on the very front edge of the rover, running power wires all the way from the main battery on the lower deck through a moving joint would have been clumsy and prone to snagging. I also figured that it would be super convenient for the camera to be able to move, so I designed a custom socket for the Xiao, controlled by a small SG90 servo motor mounted on the lower deck. This lets the camera smoothly pan from -60° to +60° so the rover can inspect both flanks of the trail without having to turn the whole chassis.
The complete electrical connections and pinout table can be found on GitHub right here.
Training the Model
To make TerraGuard actually recognize dangerous wildfire fuel on the forest floor, I needed a computer vision model that could tell the difference between wet grass, regular leaves, and dry combustible brush, and run fast enough on the Uno Q's Linux CPU without needing an external GPU or internet connection.
Step 1: Data Collection
Rather than downloading generic aerial photos from the web (which look completely different from the ground), I used TerraGuard itself to collect the training data. Operating in 'Teach Mode' via a custom Android mobile controller (see image below), I manually drove the rover through varied woodland trails.
Whenever I spotted interesting terrain, I tapped one of the photo buttons. I captured photos across three camera pan angles: left (-60°), center (0°), and right (+60°). Along with each image, the rover automatically recorded the live temperature and humidity from the AHT10 sensor, as well as its current odometry coordinates.
I sorted the captured photos into three practical risk categories:
• Low Risk: Moist soil, damp moss, gravel, rocks, and lush green vegetation like clover and grass with high moisture content that naturally resists fire.
• Medium Risk: Normal forest floor debris, decaying leaves, mixed twigs, and patchy brush that needs to be watched.
• High Risk: Thick blankets of dry fallen pine needles, desiccated brush, brittle dead leaves etc., the exact surface fuels that ignite easily from a stray ember and spread surface fires.
In total, I’ve managed to capture around 400 pictures.
Step 2: The model
For the neural network architecture, I selected MobileNetV2 pretrained on ImageNet. MobileNetV2 uses depthwise separable convolutions, making it remarkably lightweight (around 2.2 million parameters) and super fast on embedded CPUs. I replaced the final classification layer with a custom head: a 20% dropout layer to prevent overfitting, followed by a linear layer outputting scores for my three risk classes.
I trained the model in PyTorch on my PC using the Adam optimizer with an initial learning rate of 1e-4 and cosine annealing over 18 epochs.
Validation Metrics & Safety Optimization: When evaluating the model on my 53 held-out test photos, it achieved an overall accuracy of 64.2% and a weighted F1-score of 0.67. But what mattered most to me was the recall on the High Risk category: it hit a perfect 100% (all 6 true high-risk test samples were correctly identified, with zero false negatives).
The results could be improved by adding more images to the training set.
Step 3: Edge Quantization & Deployment
Once training was finished, I exported the PyTorch model to ONNX format (opset 13) and generated an INT8 dynamically quantized version (wildfire_model_int8.onnx). On the Arduino Uno Q, the Python daemon loads the model using ONNX Runtime.
When a frame arrives from the Xiao camera stream, the script resizes it to 224x224, normalizes it with standard ImageNet values, and feeds it to the ONNX session. Running on the Uno Q's Linux CPU, inference takes only about 45 to 65 milliseconds per frame, plenty fast for a rover moving at trail walking speeds, and completely self-contained with no cloud dependencies.
Navigation
The navigation software runs as a multi-threaded Python service on the Uno Q's Linux system, talking to the STM32 firmware over the MessagePack RPC bridge. To make the rover intuitive to use in the field, I organized the software into three simple modes, selectable right from the Android app:
1. Teach Mode (Manual Scouting): You drive the rover manually using the on-screen virtual joystick on the Android app over Bluetooth Low Energy (BLE). While driving, you can tap photo buttons to stop, pan the camera, take inspection photos, and see live AI risk predictions pop up on your phone screen in real time.
2. Waypoints Mode (Recording a Trail): When you switch to Waypoints, the rover zeroes its wheel encoders and gyro heading at origin (0, 0). As you drive the trail, the software automatically tracks your movement and drops a breadcrumb waypoint every ~0.5 meters (or when you make a turn of at least 15° with some forward movement). It intelligently filters out stationary turns on the spot so you don't get messy clusters of duplicate waypoints if you pause. When you're done, it saves the full route to missions/latest_route.json on the Uno Q.
3. Drive Mode (Autonomous Replay & Inspection): Put the rover back at the start and hit Drive. The rover retraces the recorded path completely on its own! When it reaches a waypoint where an inspection photo was originally taken, it stops, aims the camera servo to the exact recorded angle (-60°, 0°, or +60°), pauses for 0.8 seconds so any vibration settles, snaps a frame, runs the AI model, logs the risk score, sends an alert to your phone, and then continues smoothly along the path.
Testing and Problem solving
I took TerraGuard out for real-world field trials in the forest trails. The rover clocked over 1.6 kilometers of travel. Ambient temperatures ranged between 19.5°C and 25.4°C, with humidity between 37.5% and 63.7%.
Testing in a real forest revealed several tricky engineering bugs that never showed up on my living room rug:
1. The 5.6-Million-Meter GPS Coordinate Jump: During my very first autonomous replay run outdoors, I hit 'Drive', and the rover instantly cranked its wheels and spun 90° hard to the right. It turned out I had accidentally mixed my local metric odometry (x, y) with raw GPS coordinates relative to latitude 0.0 (the Equator). The moment the GPS got a lock, the rover's local y-coordinate suddenly shot up from 0 to 5.6 million meters. The navigation code thought the target waypoint was millions of meters off to the side, so it spun out trying to steer toward it.Fix: I completely decoupled autonomous driving from GPS. The rover drives purely on wheel encoders and gyro dead-reckoning. The GPS is used strictly to establish an origin point and plot the final track on satellite maps.
2. Pine Trees Bouncing GPS Signals (Multipath Teleporting): Under thick pine canopies, GPS signals bounce off wet tree trunks and thick branches before reaching the antenna. This caused multipath interference where the rover would randomly 'teleport' 400 meters away for a single second and then snap back. If plotted on a map, the path looked like a spiderweb.Fix: I added a simple velocity filter in the mission visualizer: if a GPS jump implies the rover moved faster than 4.0 m/s (which is impossible for a little 0.6 m/s rover), the point is discarded and filled in with the smooth dead-reckoning trace.
Visualisation
At the end of a patrol run, the rover saves everything to a clean JSON database on the Uno Q. It records a full breadcrumb trail every half-second: (x, y) position, heading, GPS coordinates, speed, temperature, humidity, and all inspection photos with their AI risk classification.
To view the mission, I wrote an interactive map generator using Leaflet.js (visualize_mission.py). All I have to do is run fetch_mission.bat on my laptop while connected to the same Wi-Fi. It pulls the mission files over SSH and opens latest_mission_map.html in my browser:
• High-Res Satellite View: Draws the rover's exact GPS path overlaid on satellite imagery and street maps.
• Color-Coded Risk Pins: Places interactive pins at every spot the rover stopped to inspect. Pins are colored Green for Low Risk (healthy moist vegetation), Yellow for Medium Risk, and Bright Red for High Risk / Severe Fire Weather.
• Clickable Photo Popups: Clicking any pin pops up the actual photo taken by the Xiao camera, showing the angle it took it at, the AI confidence percentage, ambient temperature, humidity, and whether fire weather triggered an elevated risk.
And it runs 100% offline too.
Quick Setup InstructionsIf you want to build your own TerraGuard scout rover, here's the quick-start guide to get it up and running:
1. Flash the STM32 Firmware: Plug the Arduino Uno Q into your PC via USB-C. Open uno_q_stm32/sketch.ino in the Arduino App Lab or IDE, make sure you have the required libraries (Arduino_HardwareServo, ArduinoLEDMatrix, Adafruit_BNO055, Adafruit_AHTX0, TinyGPS++, and Arduino_RouterBridge), and upload it to the STM32 core.
2. Flash the Xiao Camera: Plug the Seeed Studio XIAO ESP32S3 Sense into your PC. Open xiao_esp32s3_camera/xiao_esp32s3_camera.ino in the Arduino IDE (enable OPI PSRAM in the tools menu) and flash it. It will boot up as a Wi-Fi access point (TerraGuard_Cam) streaming video at http://192.168.4.1/stream.
3. Deploy the Linux Stack: Make sure your PC and the Uno Q are on the same Wi-Fi. Run deploy.bat (or./deploy_to_arduino.ps1 in PowerShell) to copy the Python navigation code and the ONNX model (wildfire_model.onnx) to ~/terraguard/python on the Uno Q.
4. Launch the Rover Daemon: SSH into the Uno Q (ssh arduino@[YOURIP]) and run python3 ~/terraguard/python/main.py. (You can also run bash install_autostart.sh so it starts automatically on boot).
5. Connect with the Android App: Open rover_controller_android in Android Studio, install it on your phone, open the app, and connect to TerraGuardRover via Bluetooth. Use Teach mode to drive manually, Waypoints to record a trail, and Drive to let it roam autonomously!
6. View Your Mission Map: When the mission is done, connect your PC to the rover's network and run fetch_mission.bat. It automatically downloads the latest run and pops up the interactive satellite map in your browser.


Comments