


Hardware components | ||||||
 |
| × | 1 | |||
 |
| × | 1 | |||
| × | 1 | ||||
Software apps and online services | ||||||
 |
| |||||
 |
| |||||
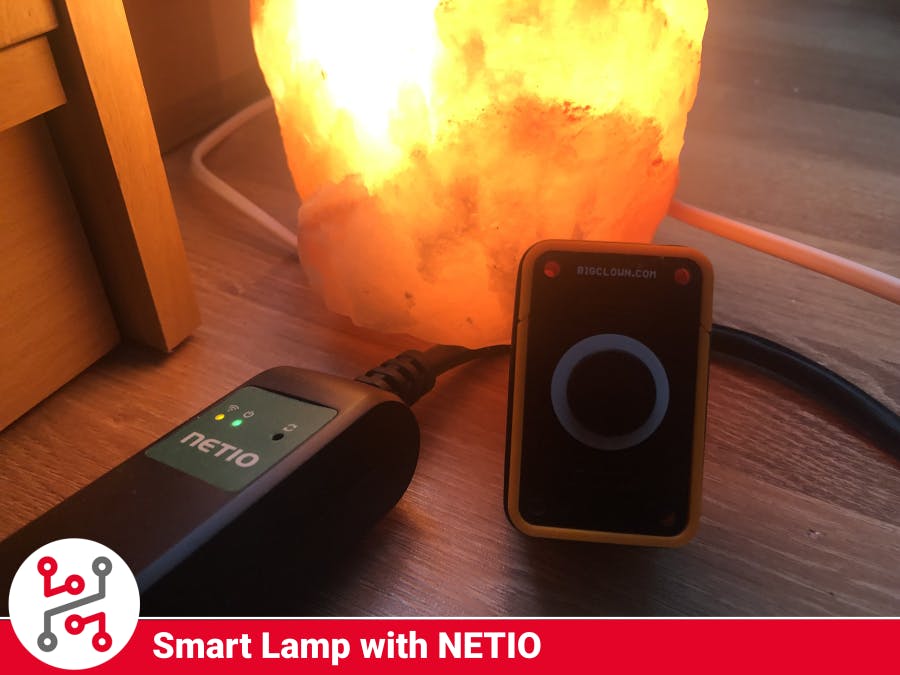
If you want to make your ordinary lamp a smart one. You can use this guide for that. You will not have to do any work with the wiring you will just plug in the NETIO socket between your ordinary power socket and the lamp.
For this project, we will use the simple solution where you just press the button on the Push button kit and the lamp turns on/off.
If you want to make a more complex solution like that the lamp will react to the light in the room you can of course do that later.
1. Build hardwareYou will need just the Push Button Kit from HARDWARIO IoT Kit and NETIO smart socket, for this project it will be PowerCable REST 101x, For the assembly of Push button Kit you can watch the video below but it is really simple.
Put all of that into the 3D-printed enclosure and you are done with the hardware for now.
The lamp part is even easier. Take the lamp plug it out of the socket and put the NETIO smart socket in between.
Put the switch on the lamp into the position when it is on because the default state of the smart socket is on it should light up.
If the light didn't go on please check if the LEDs on the smart socket is on, if not you should try another power socket or contact NETIO support.
2. Flash firmware- Download HARDWARIO Playground.
- If you bought the Push Button Kit you will receive the Core Module with the firmware on it.
- Otherwise you can see documentation page on how to flash the firmware with HARDWARIO Playground.
- You will need the bcf-radio-push-button firmware for this project.
- If you bought the Starter Kit you will receive everything paired and ready for use.
- Otherwise you will have to pair it yourself. You can follow the guide on this page
Open Node-RED in the Playground or Raspberry Pi and import the flow from the Attachments. In the Menu -> Import -> Clipboard. Do not forget to hit "Deploy" in the top right corner to apply the changes.
This is just a simple function there is not much that you can customize here. But you can expand it a lot with HARDWARIO IoT Kit sensors etc.
You will just have to change the IP address of your socket but more on that later.
This NETIO solution uses an XML M2M protocol that communicates over http. The set msg.payload changes the payload to an XML formatted message that is recognized by NETIO smart socket. You can read more about this communication here.
5. Set up the NETIO smart socketYou should get the manual with the socket but if you are struggling with the set up you can follow the guide below.
- Plug the socket into the ordinary socket to power it up
- Click the network button.
- In the list you should see the network with name PowerCable-AP-xx. Instead of the "xx" there will be some numbers.
- Connect to this network and go to the IP address 10.0.42.1 in your browser. You should see something like this.
- Select your network and click Next. In the next step just fill in your password and click Next again.
- Get the IP address of the device on your network
- Log into the device. Default log in values are: "admin" and "admin".
- Go to M2M API Protocols tab
- Check all the boxes that will be needed. If you want you can fill up the Username and Password or you can leave it empty.
- Click Save Changes.
- You should have everything mandatory for this project ready now.
Now that you know the IP address of the socket you can finish setting up of the flow.
All you have to do is to open the HTTP Request (GET) and HTTP Request (POST) nodes and change the URL value.
Change the value according to this format:
http(s)://username:password@"IP-Address"/netio.xml
If you left your username and password blank at the previous step it will look like this:
http(s)://"IP-Address"/netio.xml
7. Test your lampIf you did every step you should be able to press the button on the Push Button Kit and the lamp should toggle between on and off state.
Summary
You can make more lamps in your house smart with this solution. Make it better with the sensors from HARDWARIO IoT Kit like Lux Meter Tag so the lamp turns on when the room is too dark.
Make your projects with devices from those two companies. With the sensors from HARDWARIO Iot Kit and smart sockets from NETIO you can make a lot of great stuff.
Feel free to ask any questions about this project.
- Visit HARDWARIO page on hackster.io for more interesting projects or go directly to their website
- Go to HARDWARIO documentation to learn more about their modules and other possibilities of the platform.
- Try more firmware from HARDWARIO Playground or write your own, it is easy to start.
- Because everything is Open source you can get all firmware on GitHub, get some inspiration and try to make your own applications.
- Get your own HARDWARIO Hub to replace your computer in this project so you have always access to your applications.
- Check out more applications that can be used with HARDWARIO IoT Kit in Integrations section.


Comments