


Hardware components | ||||||
 |
| × | 1 | |||
 |
| × | 1 | |||
 |
| × | 1 | |||
 |
| × | 1 | |||
Software apps and online services | ||||||
 |
| |||||
| ||||||
You can control a lot of things in your home today with smart technologies.
If you do this project you will have functioning light made from LED strips and control it with a Samsung watches.
You will learn how to install the needed application to them and how to connect it with some of your devices, so you can do a lot more than just lit up your room on a push of a button.
1. Build hardwareYou will need Power Controller Kit from HARDWARIO IoT Kit and some Tags that will work as the climate station altogether.
And one of the LED strips for the lightning,
Put it all together like this and you are ready to move onto the next step.
You can watch the video below to make sure you got it right.
Connect your LED strip into the left slot on the Power Controller Module, the connector should fit there.
2. Flash firmware- Download HARDWARIO Playground,
- Flash firmware to the Core Module
- You will need the firmware accordingly to what LED strip you bought. The number of LEDs at the end of the name is the key.
- Firmware is named: bcf-radio-power-controller-rgbw[NumberOfLEDs]
- How to flash firmware is shown in the documentation.
You need to pair the Core module with the Radio dongle that you are using, follow the instructions below to see how it is done.
- Connect your USB Radio Dongle to your computer.
- Open HARDWARIO Playground
- Click Start Pairing the LED on the dongle should start blinking
- Connect the device that you want to pair into your computer or insert the batteries.
- Wait for the device to appear in the table
- It should add the device with the Alias: power-controller:0
After you did all this you can unplug the device from the computer and plug it into the power socket. The next steps will be done on the computer, so you can leave the device and focus on the NODE-Red.
4. Set up Blynk applicationYou will need to download the Blynk application to your mobile phone, so you can get the Authentication code for the widget, also you can set up more things in that application and control only the lightning with the watches.
After you downloaded it and made the account follow the pictures and you are all set up.
After this you will receive an email with the Auth token, you will need it later.
5. Prepare your watchesYou will need to install the Blynk to your Samsung Gear. It is available in the Galaxy Wearable store.
You can choose standard free version or the Pro version, with Pro you can use more buttons with more different colors, to control more your devices.
.
After you have the app downloaded you can start setting it up. In the next sequence of the pictures, you will see the whole process. Sadly everything needs to type in by hand, the token is probably the worst one :).
You can add more buttons, we will need 4 of them for this project. You will, of course, skip the steps with adding Token, etc.
4. Import flowOpen Node-RED in the Playground or Raspberry Pi and import this flow from the Attachments in the Menu -> Import -> Clipboard.
Set up the Green nodes with the Auth token.
Double click on one of them, select a new Blynk device in the dropdown menu and click the pencil on the right.
Here you can name your device, connect the application to the Blynk server so you always have access to it and you will also need to put the Authentication code there.
Click Add and choose this in every green Blynk node so they are all functioning.
Do not forget to hit "Deploy" in the top right corner to apply the changes.
This flow ensures that you can control the effects, color, and brightness of your LED strip with the Blynk widget
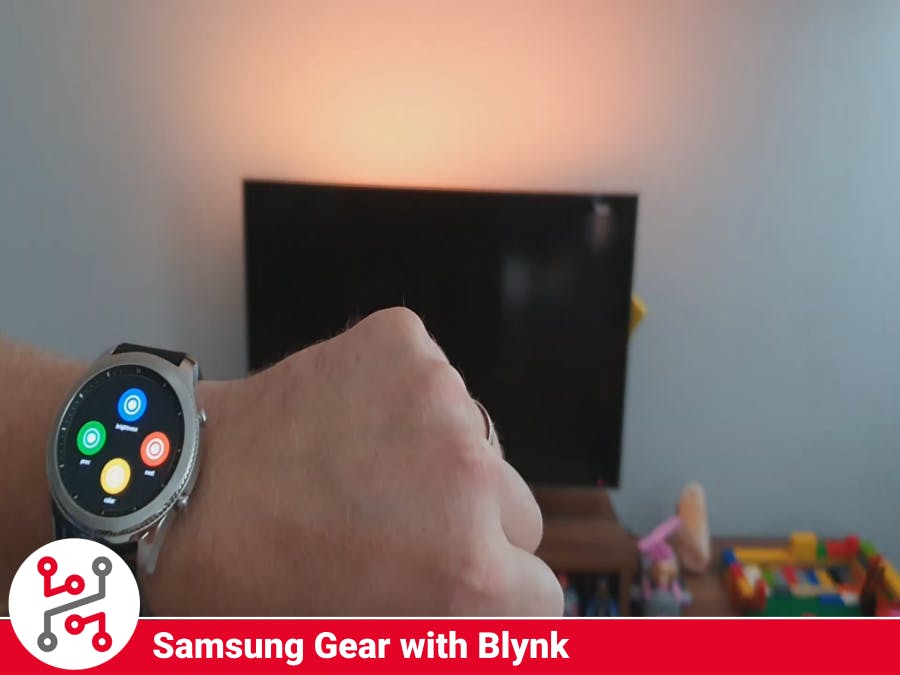
5. Test your devicePut your LED strip on the place where it fits. It can be behind the TV, under the table, etc.
Take your watch and try to scroll through the effects, change brightness and colors. Just try all the functions.
SummaryIf you want to make some pretty home lamp with this solution you can go to my other project that makes a shelf lamp with LED rings.
You can have more LED strips controlled by this solution, you just have to put more output nodes in the Node-RED flow, it is easy.
Have all the rooms synchronized with the color effects, turn all your lights off at the same time, etc.
I hope this project showed you how to work with the Blynk widget on your Samsung watches and you are ready to make some more interesting projects by yourself.
Feel free to ask any questions about this project.
- Visit HARDWARIO page on hackster.io for more interesting projects or go directly to their website
- Go to HARDWARIO documentation to learn more about their modules and other possibilities of the platform.
- Try more firmware from HARDWARIO Playground or write your own, it is easy to start.
- Because everything is Open source you can get all firmware on GitHub, get some inspiration and try to make your own applications.
- Get your own HARDWARIO Hub to replace your computer in this project so you have always access to your applications.
- Check out more applications that can be used with HARDWARIO IoT Kit in Integrations section.


Comments