
Hardware components | ||||||
 |
| × | 1 | |||
 |
| × | 1 | |||
 |
| × | 1 | |||
 |
| × | 1 | |||
 |
| × | 1 | |||
 |
| × | 1 | |||
 |
| × | 4 | |||
 |
| × | 1 | |||
 |
| × | 2 | |||
 |
| × | 1 | |||
 |
| × | 1 | |||
| × | 1 | ||||
| × | 1 | ||||
 |
| × | 1 | |||
 |
| × | 1 | |||
Software apps and online services | ||||||
 |
| |||||
Hand tools and fabrication machines | ||||||
 |
| |||||
 |
| |||||
 |
| |||||
| ||||||
The exact time that the coronavirus stays alive on surfaces is still unknown according to the World Health Organization. There are many factors that affect that number, but there is no doubt that the threat of infection is possible.
Elevators carry millions of people on a daily basis, add that to the fact that most elevator spaces are small in area and most are operated with buttons; you’d realize that it could be one of the most dangerous means by which covid-19 spreads.
My idea is simple; an Arduino device that disinfects the space including the buttons before and after each lift.
Solution overview:I assumed that most elevators are dark inside when they are on standby, lights go on when they are called, and back off when there is no one inside again. And so, I used an Arduino Nano as a controller with a light sensor to detect the light state, and a servo motor as an output actuator to spray disinfectants in the general area of the elevator, and far enough from the buttons to disinfect but not cause any electrical issues. The device runs on batteries and can be universally installed.
A minimum viable product was manufactured to validate its effectiveness.
The wiring:The project is powered by 4 AA sized batteries with a total voltage of 6V. The battery pack powers the Arduino and the servo motor directly. I strongly suggest using the attached gerber to manufacture a reliable PCB. You can also solder the circuit on a perfboard, but keep in mind that the circuit must fit into the casing and it will be a very tight fit! The board dimensions must not exceed 58mm*38mm.
The wiring is as follows:
- Battery pack + (red) is connected through a switch to Vin pin of the Arduino, and to the + (red wire) of the servo.
- Battery pack GND (black) to Arduino GND, and to the GND (black wire) of the servo.
- Arduino D9 to servo pulse signal (yellow wire).
- 10kohm resistor from A0 pin to Arduino 5v.
- Photoresistor between Arduino A0 and GND.
- 100uf+ capacitor between the terminals of the battery pack.
Note: If your servo is "twitching", you can add a decoupling capacitor between Arduino D9 and GND. You can also wrap the servo leads around a ferric core, there are plenty of tutorials on that topic. You probably wouldn't need to take any of these measures, but I am trying to keep this tutorial as extensive as possible.
Perfboard option:
I have added images generated using fritzing as guides for replicating my perfboard circuit. It is based on the wiring discussed in the previous section.
Use the "top view" to place your components.
Be careful to install the photoresistor on the bottom layer!
It would be best if you use the exact same layout that I've used to avoid any routing issues, and to make sure that the photoresistor aligns properly with the hole in the cover (this will be discussed in step 7 in the assembly section).
Note: The board in the real images has an extra four pin connector for software serial. I used a Bluetooth module to read real-time light sensor values, but you don't need to go through the process again.
PCB option:
Send the attached gerber file to a PCB manufacturer, and you can use the board silkscreen (the wording on the PCB) to place your components.
The file was made using EasyEDA.
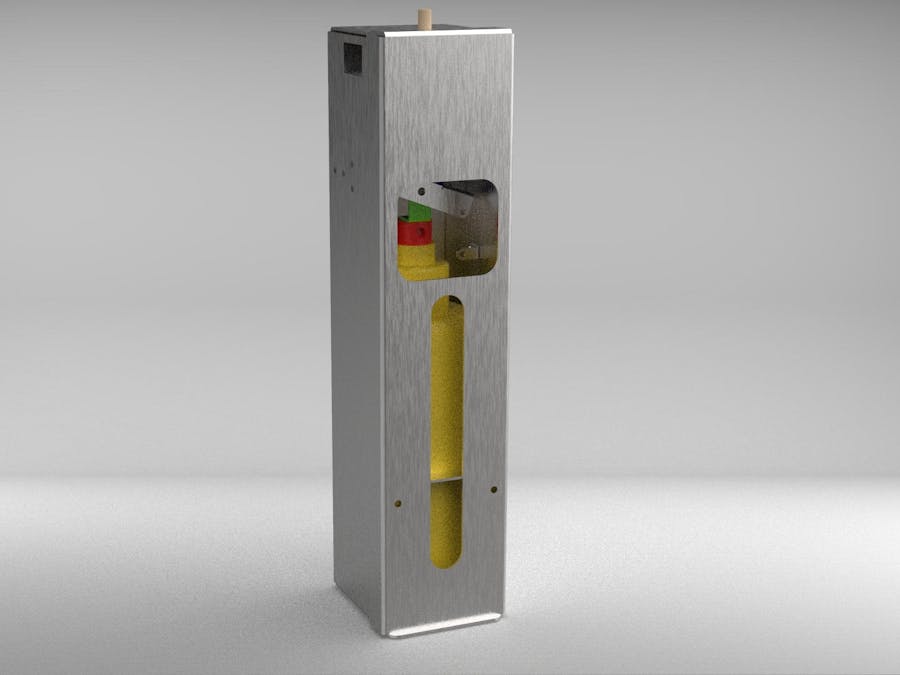
Manufacturing the parts:The casing and mechanism are made up of 1.2mm stainless steel sheet metal. I have chosen this manufacturing method because of its convenience for mass production compared to 3d printing for example.
I have added the DXF files for laser cutting and a pdf document (Sheet metal DXF and PDF.zip). Refere to the pdf, to create correct bends. Be extra careful to the bending direction. I got a couple wrong; I will share them so that you can learn from my mistakes.
Themetallic parts:
There are nine metallic parts in total. The following images demonstrate the mistakes that I've made in manufacturing two of the parts. Learn from them!
I used 3mm bolts, nuts, and thread lock in some cases to hold everything together.
Step 1:
Bolt the TowerPro MG90S servo to the bracket. Then fix it to the inner right side of the enclosure.
Step 2:
Put together the mechanism and fix it to the inner left side of the enclosure as shown:
I used thread lock to keep the bolts loose enough to move freely.
Step 3:
Add the spring
Check the design notes to help yourself in selecting a correct spring. The spring stiffness depends on the force needed to press the spray cap.
Step 4:
You can now add a bottle to make sure that everything fits well
Step 5:
Prepare the battery pack. Add the connectors and place it inside the product as shown:
Please note that I didn't install the wrongly bent part. Yours would fit between the pack and the mechanism. There are two holes for bolts on the left side.
Step 6:
Add the power switch on the side
Step 7:
Connect the servo and the switch to the board. Align the light sensor to the hole in the top side of the product. If you have manufactured the PCB, you can use 3mm spacers along with bolts and nuts to fix the board in place. Otherwise, you can glue it in place. Be careful to properly isolate the bottom of the board so that it doesn't short out with the metallic chassis.
Step 8:
Screw the bottle holder onto the front cover and slide it in place. There is a slot in the top and bottom of the enclosure, the cover slides right into both.
The code is well commented, stable, and simple. You can change the light intensity setpoint, the press and release angles, the number of sprays, and other parameters. I have commented out the code for the Bluetooth module, but it is there if you need it.
//elevator sanitization by Jad Halabi
//This program is designed to work with an arduino nano and the intended mechanism
//************************
///////////////declaration///////////////
//libraries
  #include <Servo.h>
//  #include <SoftwareSerial.h>//for debugging
//pins and objects
  const int lightsensor_pin = A0; //light sensor pin
  Servo press_servo;  //attach servo object
 //SoftwareSerial bluetooth(2, 3); // RX, TX
//user parameter variables
  const int light_setpoint = 900; //trigger light intensity
  const int pressing_angel = 50;  //angel in degree
  const int release_angel = 100; //angel where the arm just presses the sprayer tip
  const int presses_per_cycle = 2;  //number of presses in one cycle
  const int delay_press = 700;
  const int delay_release = 700;
  const int delay_system = 500;//sampling rate
//counter and control variables
  int i = 1; //toggle variable
  int light_intensity = 0;  //where sensor reading is stored

void setup()
{
//Serial.begin(9600); //begin serial communication on hardware pins
//bluetooth.begin(38400);//begin serial communication with bluetooth device
  press_servo.attach(9);  //attaches digital pin 9 to the servo
  press_servo.write(release_angel);
  pinMode(lightsensor_pin, INPUT);
}

void loop()
{
  light_intensity = analogRead(lightsensor_pin);//read sensor measurment and store it in variable
//Serial.print("intensity:");Serial.println(analogRead(lightsensor_pin));
//Serial.print("i=");Serial.println(i);
//bluetooth.print("intensity:");bluetooth.println(analogRead(lightsensor_pin));
//bluetooth.print("i=");bluetooth.println(i);
  if(light_intensity >= light_setpoint && i==0) //light has just turned on
  {
    i = 1; //indicates that last light state is on
    spray();// perform spraying cycle before anyone enters the elevator
  }
  if(light_intensity <light_setpoint && i == 1)//lights are off, we should spray
  {
    i = 0;//indicates that last light state is off
    spray();//perform spraying cycle
  }
delay(delay_system);
}
void spray()
{
  for (int i = 0; i < presses_per_cycle ; i++)
  {
    press_servo.write(pressing_angel); // sets the servo position according to the scaled value
    delay(delay_press);
    press_servo.write(release_angel);
    delay(delay_release);
  }
}Use double sided tape to properly secure the project inside the elevator. Install it facing the operating buttons so it would work effectively.
Remove the servo arm and turn on the device. The servo will turn to the resting angle. Install the arm in a position just touching the mechanism part.
Design notesThe mechanism is designed to intensify the pressing force. The used servo motor isn't very powerful, so it is better to add a tension spring as discussed. The spring assists in pressing and serves to keep the "pressing" part in contact with the sprayer tip. I have attached a study for the pushing force with and without a spring. You can use a rubber band and vary its tension to tune your device without the hassle of calculation.
Future plansI am working on minimizing the power consumption, and to replace the Arduino Nano with an Attiny ic.
I hope you enjoy this documentation as much as I enjoyed making it.


Comments