
Hardware components | ||||||
_ztBMuBhMHo.jpg?auto=compress%2Cformat&w=48&h=48&fit=fill&bg=ffffff) |
| × | 1 | |||
 |
| × | 1 | |||
| × | 1 | ||||
 |
| × | 1 | |||
Hand tools and fabrication machines | ||||||
 |
| |||||
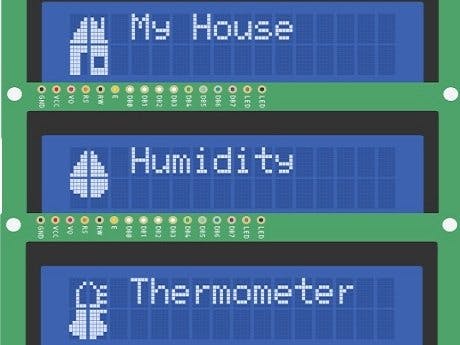
This project may assist all those with Arduino Weather Stations to update Weather Icons (Or other Icons) on the LCD 16X2 or 20X4 etc
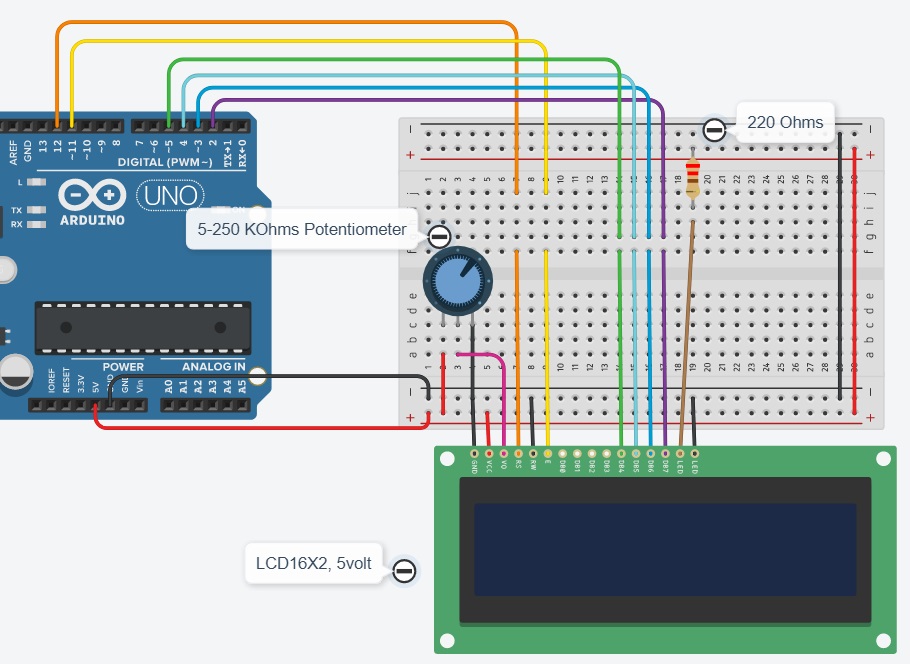
Build your Circuit,
Create your Arduino Code (Examples is provided)
For More info on how the LCD screen work, go to
https://www.engineersgarage.com/arduino/making-custom-characters-on-lcd-using-arduino/
To assist you to create Binary Code for your Icons, USE
https://maxpromer.github.io/LCD-Character-Creator/
The 16 x 2 LCD Screen Consist of A Matrics of order 2X16. Each Block in this Matrics contains 8x5 dots or a Sub Matrics. Each of this dots needs to be switch on or of to generate a Icon.
My Examples uses 4 Blocks. It can use 4x8x5=16x10=160 dots (pixels)
Here is an animation of a rain storm and cup anemometer (measuring wind speed)

/*
  LiquidCrystal Library - Hello World

 Demonstrates the use a 16x2 LCD display.  The LiquidCrystal
 library works with all LCD displays that are compatible with the
 Hitachi HD44780 driver. There are many of them out there, and you
 can usually tell them by the 16-pin interface.

 This sketch display Icons suitable for Weather Stations, House, Thermometer, Hygrow Meter (Humidity)
 on (Row0, Col0), --- (Row1,Col1)

The memory on the LCD Display is very small and not to many
custom characters (I think it is 2) can be displayed simultaneously


 More info on custom icons at:
 https://www.engineersgarage.com/arduino/making-custom-characters-on-lcd-using-arduino/

  The circuit:
 * LCD RS pin to digital pin 12
 * LCD Enable pin to digital pin 11
 * LCD D4 pin to digital pin 5
 * LCD D5 pin to digital pin 4
 * LCD D6 pin to digital pin 3
 * LCD D7 pin to digital pin 2
 * LCD R/W pin to ground
 * LCD VSS pin to ground
 * LCD VCC pin to 5V
 * 10K resistor:
 * ends to +5V and ground
 * wiper to LCD VO pin (pin 3)


 This example code is in the public domain.

 http://www.arduino.cc/en/Tutorial/LiquidCrystal
 */

// include the library code:
#include <LiquidCrystal.h>

//defining House Icon
byte housechar1[8]={B00000, B00001, B00011, B00011, //Row 0, Col 0
                  B00111, B01111, B01111, B11111,};
byte housechar2[8]={B11111, B11111, B11100, B11100, //Row 1, Col 0
                  B11100, B11100, B11100, B11100,};
byte housechar3[8]={B00000, B10010, B11010, B11010, //ROW 0, Col 1
                  B11110, B11110, B11110, B11111,};
byte housechar4[8]={B11111, B11111, B11111, B10001, //Row 1, Col 1
                    B10001, B10001, B11111, B11111,};
//Definining Termometer Icon
byte tempchar1[8]={B00000, B00001, B00010, B00100, //Row 0, Col 2
                  B00100, B00100, B00100, B00111,};
byte tempchar2[8]={B00111, B00111, B00111, B01111, //Row 1, Col 2
                  B11111, B11111, B01111, B00011,};
byte tempchar3[8]={B00000, B10000, B01011, B00100, //ROW 0, Col 3
                  B00111, B00100, B00111, B11100,};
byte tempchar4[8]={B11111, B11100, B11100, B11110, //Row 1, Col 3
                  B11111, B11111, B11110, B11000,};

//Defining Humidity Icon
byte humchar1[8]={B00000, B00001, B00011, B00011,
                  B00111, B01111, B01111, B11111,};
byte humchar2[8]={B11111, B11111, B11111, B01111,
                  B00011, B00000, B00000, B00000,};
byte humchar3[8]={B00000, B10000, B11000, B11000,
                  B11100, B11110, B11110, B11111,};
byte humchar4[8]={B11111, B11111, B11111, B11110,
                  B11100, B00000, B00000, B00000,};

// initialize the LCD library with the numbers of the interface pins
LiquidCrystal lcd(12, 11, 5, 4, 3, 2);

//It seems like the LCD does not have enought
//memory to create all characters at ones

void setup() {
  // set up the LCD's number of columns and rows:
  Serial.begin(9600);
  lcd.begin(16, 2);
  // Print a message to the LCD.
  lcd.print("Weather Icons");
  lcd.setCursor(0,1);
  lcd.print("..In Development");
  delay(5000);
  lcd.clear();
}

void loop() {
  lcd.clear();
  delay(1000);
  lcd.createChar(1,housechar1);
  lcd.createChar(2,housechar2);
  lcd.createChar(3,housechar3);
  lcd.createChar(4,housechar4);
  lcd.setCursor(0,0);
  lcd.write(1);
  lcd.setCursor(0,1);
  lcd.write(2);
  lcd.setCursor(1,0);
  lcd.write(3);
  lcd.setCursor(1,1);
  lcd.write(4);
  lcd.setCursor(3,0);
  lcd.print("My House");
  delay(5000);

  lcd.clear();
  delay(1000);
  lcd.createChar(1,tempchar1);
  lcd.createChar(2,tempchar2);
  lcd.createChar(3,tempchar3);
  lcd.createChar(4,tempchar4);
  lcd.setCursor(0,0);
  lcd.write(1);
  lcd.setCursor(0,1);
  lcd.write(2);
  lcd.setCursor(1,0);
  lcd.write(3);
  lcd.setCursor(1,1);
  lcd.write(4);
  lcd.setCursor(3,0);
  lcd.print("Thermometer");
  delay(5000);

  lcd.clear();
  delay(1000);
  lcd.createChar(1,humchar1);
  lcd.createChar(2,humchar2);
  lcd.createChar(3,humchar3);
  lcd.createChar(4,humchar4);
  lcd.setCursor(0,0);
  lcd.write(1);
  lcd.setCursor(0,1);
  lcd.write(2);
  lcd.setCursor(1,0);
  lcd.write(3);
  lcd.setCursor(1,1);
  lcd.write(4);
  lcd.setCursor(3,0);
  lcd.print("Humidity");
  delay(5000);
}
/*
  LiquidCrystal Library - Hello World

 Demonstrates the use a 16x2 LCD display.  The LiquidCrystal
 library works with all LCD displays that are compatible with the
 Hitachi HD44780 driver. There are many of them out there, and you
 can usually tell them by the 16-pin interface.

 This sketch display a barameter gauge icon
 on (Row0, Col0), --- (Row1,Col1)

 More info on custom icons at:
 https://www.engineersgarage.com/arduino/making-custom-characters-on-lcd-using-arduino/

  The circuit:
 * LCD RS pin to digital pin 12
 * LCD Enable pin to digital pin 11
 * LCD D4 pin to digital pin 5
 * LCD D5 pin to digital pin 4
 * LCD D6 pin to digital pin 3
 * LCD D7 pin to digital pin 2
 * LCD R/W pin to ground
 * LCD VSS pin to ground
 * LCD VCC pin to 5V
 * 10K resistor:
 * ends to +5V and ground
 * wiper to LCD VO pin (pin 3)


 This example code is in the public domain.

 http://www.arduino.cc/en/Tutorial/LiquidCrystal
 */

// include the library code:
#include <LiquidCrystal.h>

//defining rain Icon
byte rainChar1[] = {
  B01110,
  B11110,
  B11111,
  B01101,
  B00001,
  B10010,
  B10010,
  B00100
};

byte rainChar2[] = {
  B00100,
  B01001,
  B01001,
  B10010,
  B10010,
  B00100,
  B00100,
  B01001
};

byte rainChar3[] = {
  B01110,
  B01111,
  B11111,
  B11111,
  B11110,
  B11001,
  B01001,
  B10010
};

byte rainChar4[] = {
  B10010,
  B00100,
  B00100,
  B01001,
  B01001,
  B10010,
  B10010,
  B00100
};


// initialize the LCD library with the numbers of the interface pins
LiquidCrystal lcd(12, 11, 5, 4, 3, 2);

void setup() {
  // set up the LCD's number of columns and rows:
  lcd.begin(16, 2);
  // Print a message to the LCD.
  lcd.print("Weather Icons");
  //creating all the characters
  lcd.createChar(1 , rainChar1); //Numbering should start at 1, not 0
  lcd.createChar(2 , rainChar2);
  lcd.createChar(3 , rainChar3);
  lcd.createChar(4 , rainChar4);
  delay(3000);
}

void loop() {
  lcd.clear();
  lcd.print("Raingauge");
  delay(3000);
  lcd.clear();
  lcd.setCursor(0,0);
  lcd.write(1);
  lcd.setCursor(0,1);
  lcd.write(2);
  lcd.setCursor(1,0);
  lcd.write(3);
  lcd.setCursor(1,1);
  lcd.write(4);
  delay (3000);
}
/*
  LiquidCrystal Library - Hello World

 Demonstrates the use a 16x2 LCD display.  The LiquidCrystal
 library works with all LCD displays that are compatible with the
 Hitachi HD44780 driver. There are many of them out there, and you
 can usually tell them by the 16-pin interface.

 This sketch display a Rain Storm Animation
 on (Row0, Col0), --- (Row1,Col1)

 More info on custom icons at:
 https://www.engineersgarage.com/arduino/making-custom-characters-on-lcd-using-arduino/
 A useful tool to generate code for your visualisation is
 https://maxpromer.github.io/LCD-Character-Creator/

  The circuit:
 * LCD RS pin to digital pin 12
 * LCD Enable pin to digital pin 11
 * LCD D4 pin to digital pin 5
 * LCD D5 pin to digital pin 4
 * LCD D6 pin to digital pin 3
 * LCD D7 pin to digital pin 2
 * LCD R/W pin to ground
 * LCD VSS pin to ground
 * LCD VCC pin to 5V
 * 10K resistor:
 * ends to +5V and ground
 * wiper to LCD VO pin (pin 3)


 This example code is in the public domain.

 http://www.arduino.cc/en/Tutorial/LiquidCrystal
 */

// include the library code:
#include <LiquidCrystal.h>

//defining rain Icon
byte rainChar1[] = {
  B01110,
  B11110,
  B11111,
  B01101,
  B00001,
  B10010,
  B10010,
  B00100
};

byte rainChar2[] = {
  B00100,
  B01001,
  B01001,
  B10010,
  B10010,
  B00100,
  B00100,
  B01001
};

byte rainChar3[] = {
  B01110,
  B01111,
  B11111,
  B11111,
  B11110,
  B11001,
  B01001,
  B10010
};

byte rainChar4[] = {
  B10010,
  B00100,
  B00100,
  B01001,
  B01001,
  B10010,
  B10010,
  B00100
};


byte rainCharA[] = {
  B01110,
  B11110,
  B11111,
  B01100,
  B10001,
  B00010,
  B10010,
  B00100
};

byte rainCharB[] = {
  B00100,
  B01000,
  B01001,
  B10010,
  B10010,
  B00100,
  B00100,
  B01001
};

byte rainCharC[] = {
  B01110,
  B01111,
  B11111,
  B11111,
  B11110,
  B11000,
  B01001,
  B10010
};

byte rainCharD[] = {
  B10010,
  B00000,
  B00100,
  B00100,
  B01001,
  B01001,
  B10010,
  B10010
};


// initialize the LCD library with the numbers of the interface pins
LiquidCrystal lcd(12, 11, 5, 4, 3, 2);

void setup() {
  // set up the LCD's number of columns and rows:
  lcd.begin(16, 2);
  // Print a message to the LCD.
  lcd.print("Weather Icons");
  //creating all the characters
  lcd.createChar(1 , rainChar1); //Numbering should start at 1, not 0
  lcd.createChar(2 , rainChar2);
  lcd.createChar(3 , rainChar3);
  lcd.createChar(4 , rainChar4);
  lcd.createChar(5 , rainCharA);
  lcd.createChar(6 , rainCharB);
  lcd.createChar(7 , rainCharC);
  lcd.createChar(8 , rainCharD);
  delay(3000);
}

void loop() {
  lcd.clear();
  lcd.setCursor(0,0);
  lcd.write(1);
  lcd.setCursor(0,1);
  lcd.write(2);
  lcd.setCursor(1,0);
  lcd.write(3);
  lcd.setCursor(1,1);
  lcd.write(4);
  lcd.setCursor(3,0);
  lcd.print("Rain");
  lcd.setCursor(3,3);
  lcd.print("Animation");
  delay (500);
  lcd.clear();
  lcd.setCursor(0,0);
  lcd.write(5);
  lcd.setCursor(0,1);
  lcd.write(6);
  lcd.setCursor(1,0);
  lcd.write(7);
  lcd.setCursor(1,1);
  lcd.write(8);
  lcd.setCursor(3,0);
  lcd.print("Rain");
  lcd.setCursor(3,3);
  lcd.print("Animation");
  delay (500);
}
/*
  LiquidCrystal Library

 Demonstrates the use a 16x2 LCD display.  The LiquidCrystal
 library works with all LCD displays that are compatible with the
 Hitachi HD44780 driver. There are many of them out there, and you
 can usually tell them by the 16-pin interface.

 This sketch display a Animated Anemometer
 on (Row0, Col0), --- (Row1,Col1)

 More info on custom icons at:
 https://www.engineersgarage.com/arduino/making-custom-characters-on-lcd-using-arduino/

 A useful tool to generate code for your visualisation is
 https://maxpromer.github.io/LCD-Character-Creator/


  The circuit:
 * LCD RS pin to digital pin 12
 * LCD Enable pin to digital pin 11
 * LCD D4 pin to digital pin 5
 * LCD D5 pin to digital pin 4
 * LCD D6 pin to digital pin 3
 * LCD D7 pin to digital pin 2
 * LCD R/W pin to ground
 * LCD VSS pin to ground
 * LCD VCC pin to 5V
 * 10K resistor:
 * ends to +5V and ground
 * wiper to LCD VO pin (pin 3)


 This example code is in the public domain.

 http://www.arduino.cc/en/Tutorial/LiquidCrystal
 */

// include the library code:
#include <LiquidCrystal.h>

//defining cup Anemometer
// First Frame
byte wind1[] = {
  B00000,
  B00000,
  B00000,
  B00011,
  B00111,
  B00111,
  B00111,
  B00011
};

byte wind2[] = {
  B11111,
  B11111,
  B01110,
  B00000,
  B00000,
  B00000,
  B00000,
  B00000
};

byte wind3[] = {
  B00000,
  B00000,
  B00000,
  B00000,
  B00000,
  B01110,
  B11111,
  B11111
};

byte wind4[] = {
  B11000,
  B11100,
  B11100,
  B11100,
  B11000,
  B00000,
  B00000,
  B00000,
};


// Second Frame
byte wind5[] = {
  B00000,
  B00000,
  B00000,
  B00000,
  B01000,
  B11100,
  B11110,
  B01111
};

byte wind6[] = {
  B00001,
  B00011,
  B00111,
  B01110,
  B00000,
  B00000,
  B00000,
  B00000
};

byte wind7[] = {
  B00000,
  B00000,
  B00000,
  B00000,
  B00010,
  B00111,
  B01111,
  B11110
};

byte wind8[] = {
  B11110,
  B01111,
  B00111,
  B00010,
  B00000,
  B00000,
  B00000,
  B00000
};

// initialize the LCD library with the numbers of the interface pins
LiquidCrystal lcd(12, 11, 5, 4, 3, 2);

void setup() {
  // set up the LCD's number of columns and rows:
  lcd.begin(16, 2);
  // Print a message to the LCD.
  lcd.print("Weather Icons");
  //creating all the characters
  lcd.createChar(1 , wind1); //Numbering should start at 1, not 0
  lcd.createChar(2 , wind2);
  lcd.createChar(3 , wind3);
  lcd.createChar(4 , wind4);
  lcd.createChar(5 , wind5);
  lcd.createChar(6 , wind6);
  lcd.createChar(7 , wind7);
  lcd.createChar(8 , wind8);
  delay(3000);
}

void loop() {
  lcd.clear();
  lcd.setCursor(0,0);
  lcd.write(1);
  lcd.setCursor(0,1);
  lcd.write(2);
  lcd.setCursor(1,0);
  lcd.write(3);
  lcd.setCursor(1,1);
  lcd.write(4);
  lcd.setCursor(3,0);
  lcd.print("Anemometer");
  lcd.setCursor(3,3);
  lcd.print("Animation");
  delay (150);
  lcd.clear();
  lcd.setCursor(0,0);
  lcd.write(5);
  lcd.setCursor(0,1);
  lcd.write(6);
  lcd.setCursor(1,0);
  lcd.write(7);
  lcd.setCursor(1,1);
  lcd.write(8);
  lcd.setCursor(3,0);
  lcd.print("Anemometer");
  lcd.setCursor(3,3);
  lcd.print("Animation");
  delay (150);
}


Comments