
Hardware components | ||||||
_ztBMuBhMHo.jpg?auto=compress%2Cformat&w=48&h=48&fit=fill&bg=ffffff) |
| × | 1 | |||
| × | 1 | ||||
| × | 4 | ||||
| × | 4 | ||||
| × | 4 | ||||
Software apps and online services | ||||||
 |
| |||||
 |
| |||||
Hand tools and fabrication machines | ||||||
 |
| |||||
 |
| |||||
 |
| |||||
 |
| |||||
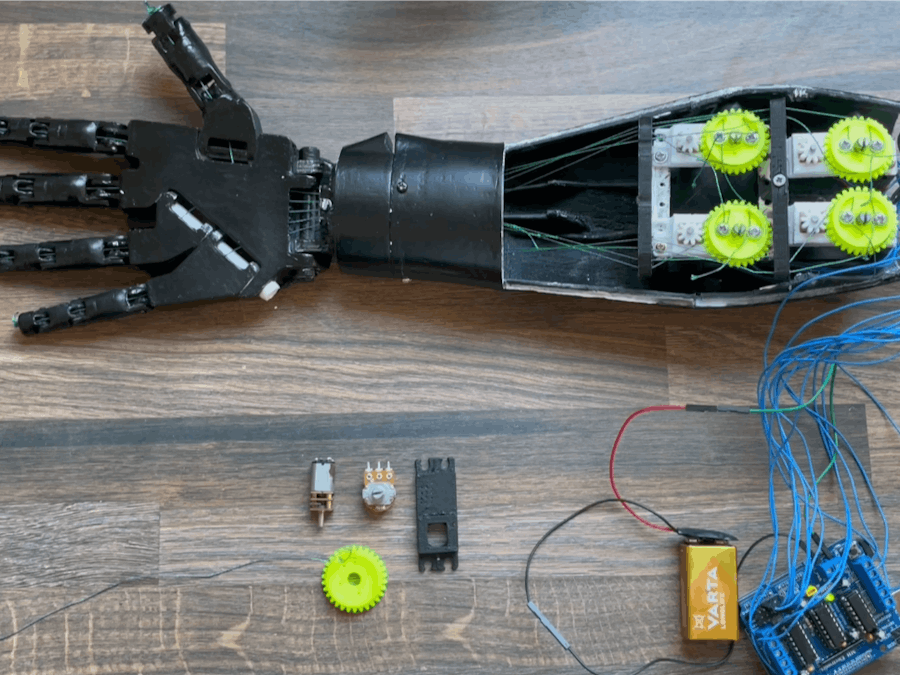
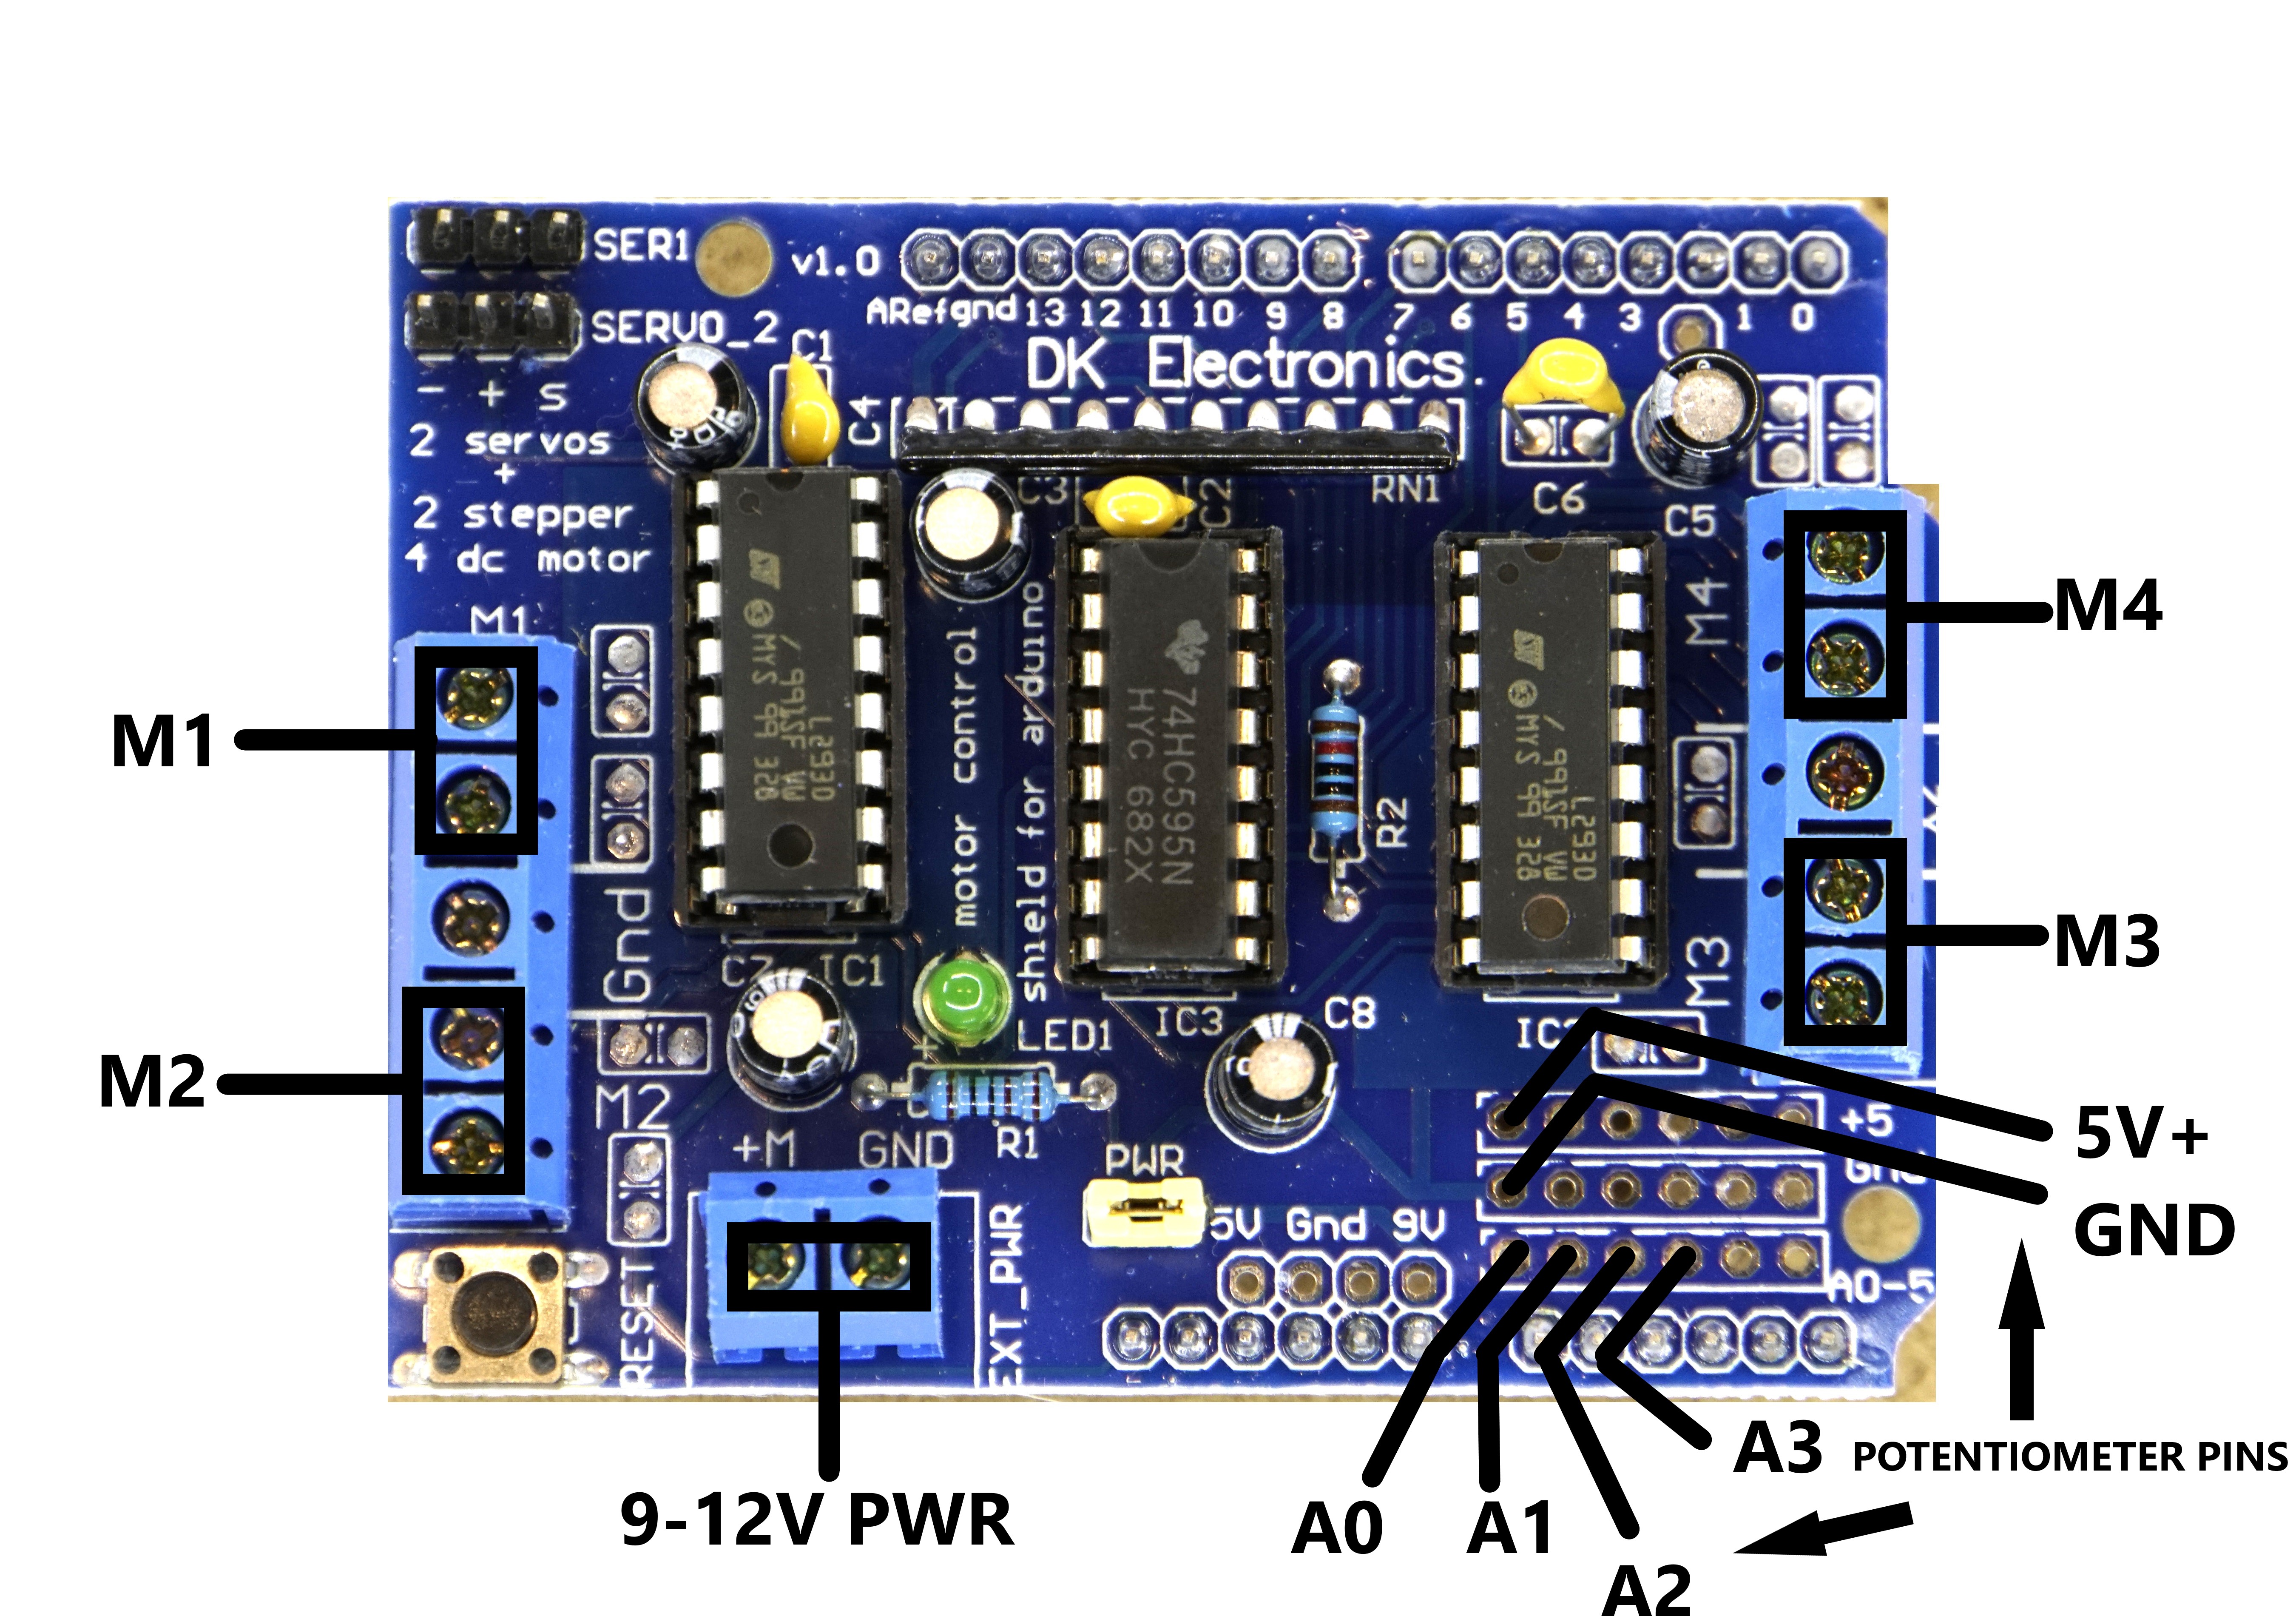
Circuit Connections
- Connect the potentiometers to analog input pins of the L293D Shield or Arduino board. The pins are A0, A1, A2, and A3, with the positive and ground wires connected together to 5V+ and GND pins.
- Connect the N20 DC motors to the Adafruit Motor Shield.
- Ensure proper power supply connections for both the Arduino and the motor driver.
- Connect the Arduino board to your computer via USB for serial communication.
Arduino Code
- Download the Arduino IDE from the official website and install it on your computer.
- Copy the provided Arduino code into a new sketch in the Arduino IDE.
- Connect your Arduino board to the computer and upload the code to the board.
- Open the Serial Monitor in the Arduino IDE to view debugging information and motor control feedback.
Python GUI (for controlling finger joints) - Copy the provided Python script into a new Python file on your computer ( I use Visual Studio).
- Run the Python script to launch the GUI for controlling the robotic finger joints.
Usage Instructions - Power on the Arduino board and ensure the circuit connections are secure.
- Launch the Python GUI script on your computer.
- Select the appropriate serial port from the dropdown menu in the GUI and click "Connect."
- Use the vertical sliders in the GUI to control the positions of individual finger joints.
- Observe the real-time feedback in the GUI and adjust as needed for precise control.
- Experiment with different joint positions and observe how the motors respond to commands.
- Use the Serial Monitor in the Arduino IDE for debugging and monitoring motor performance.
Introduction
My journey into robotic arm control began with a single DC motor, a potentiometer, and an Arduino. After months of research and experimentation, I found inspiration in an unlikely source - the temperature regulation system of everyday appliances like water heaters. This insight led me to develop a closed-loop control system for DC motors using potentiometers and microcontrollers, which I previously documented on Hackster.io: DC Motor Position Control Project. With my initial concept refined and enhanced, I set out to scale this solution for a multi-jointed robotic arm.
Project Commentary: Envisioning a Modular Control System
In the early stages of my project, I conceptualized a servo-like mechanism that could be enhanced with pulleys or well-designed gears. The initial setup involved a DC motor and a potentiometer, serving as a proof of concept for a more sophisticated design. This phase focused on demonstrating the potential of the system rather than perfecting its components.These guides are instrumental, and it is the code and minimal parts that truly shape the project. Fine-tuning such as lining tension, gear precision, and exact positioning were adjustable in the code, allowing for future calibration and improvements.This commentary reflects the project's inception, where the primary goal was to establish a viable concept. It underscores the iterative nature of innovation, where early ideas lay the groundwork for more refined solutions.
The Software Gap
While plenty of online resources existed for the mechanical aspects of integrating N20 DC motors into robotic arms, I struggled to find complete software solutions that addressed my specific needs. This software gap presented a significant hurdle in my project, pushing me to innovate and develop my own custom control system.
Mastering Single Motor Control
My initial focus was on controlling a single DC motor with a potentiometer, using the Arduino to interpret and respond to position feedback. I employed AI tools to generate helpful comments and explanations, making my code more user-friendly and understandable.
The Challenge of Scaling Up
While AI assistance was helpful for my single-motor setup, scaling the solution for a full robotic arm posed new challenges. I ultimately shifted towards manual array-based coding to ensure efficient and scalable control for multiple DC motors simultaneously. Despite considering AI for adapting the code to control four DC motors via the L293D shield, I found myself starting from scratch, creating an array of items without AI assistance. This manual approach proved more effective, though time-consuming.
With my new code in place for four DC motor position control, I turned my attention to creating a user interface for controlling the arm via a laptop or other device. After experimenting with HC-05 and Wi-Fi modules, I discovered the ease of using Python to create a GUI using existing libraries. I first explored Simple Firmata but soon realized I would need to rewrite the entire Adafruit library to control the shield. Once again, I turned to AI for assistance, and it helped me develop a Python-based GUI with Tkinter, using pyserial for communication with the Arduino board. This allowed for intuitive individual finger joint control via sliders (virtual potentiometers) and a visual representation of the hand position.
Building the Inmoov Robotic Arm
Overcoming these obstacles paved the way for integrating my control system into a complete Inmoov robotic arm. The Python-based GUI with Tkinter and pyserial enabled intuitive control of individual finger joints, while AI optimized my Python code for smooth communication with the Arduino. The Arduino itself ran a proportional control algorithm that calculated positional errors and drove the motors via the L293D motor shield.
The Power of 3D Printing and Open Source
3D printing played a crucial role in creating custom gears and a precisely fitted housing for my electronics and motor assembly. Inspired by open collaboration, I am sharing my code, 3D models, and valuable lessons learned with the maker community.
Why My Project Is Unique
This project demonstrates the power of combining readily available components in innovative ways. By repurposing N20 DC motors and developing a custom control system, I have created a highly precise yet cost-effective alternative to expensive servo-driven robotic arms. This opens doors for greater accessibility and innovation in my robotic projects.
Inspiration
I hope it inspires others to see the potential in everyday objects, embrace the challenges of creative problem-solving, and contribute to the power of open-source innovation.


Comments