Sergio Verastegui
Published

Space Heater IOT Project

Feeling cold? Using this project will power on a heater when the temperature in your room gets below your desired comfort setting.

IntermediateFull instructions provided7 hours1,297
Space Heater IOT Project

Things used in this project

Hardware components

Lasko Heater
×1
Photon
Particle Photon
×2
temperature sensor TMP 100
×1
Particle Photon 12C Shield
×1
IC2 Cable
×1
Breadboard (generic)
×1
Arduino Relay
×1

Software apps and online services

Mobicle
ControlEverything.com Mobicle
SmartThings service
IFTTT SmartThings service

Story

Read more

Schematics

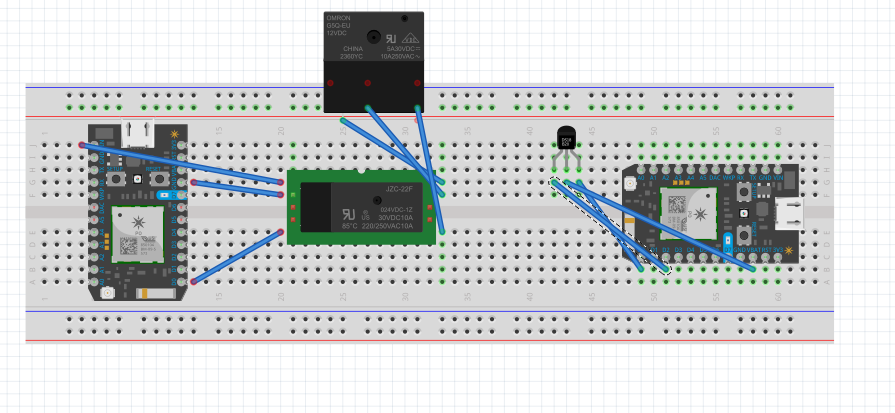
Circuit diagram

This is for both particles
The left particle is the heater control via 10A relay to the heater which is represented by the black box
The right particle is the temperature sensor control.

Code

TMP100 Library for Particle

C/C++
// Distributed with a free-will license.
// Use it any way you want, profit or free, provided it fits in the licenses of its associated works.
// TMP100
// This code is designed to work with the TMP100_I2CS I2C Mini Module available from ControlEverything.com.
// https://www.controleverything.com/content/Temperature?sku=TMP100_I2CS#tabs-0-product_tabset-2

#include <application.h>
#include <spark_wiring_i2c.h>

// TMP100 I2C address is 0x4F(79)
#define Addr 0x4F

double cTemp = 0.0, fTemp = 0.0;
void setup()
{
  // Set variable
  Particle.variable("i2cdevice", "TMP100");
  Particle.variable("cTemp", cTemp);
  

  // Initialise I2C communication as MASTER
  Wire.begin();
  // Initialise Serial communication, set baud rate = 9600
  Serial.begin(9600);

  // Start I2C Transmission
  Wire.beginTransmission(Addr);
  // Select configuration register
  Wire.write(0x01);
  // Set continuous conversion, comparator mode, 12-bit resolution
  Wire.write(0x60);
  // Stop I2C Transmission
  Wire.endTransmission();
  delay(300);
}

void loop()
{
  unsigned int data[2];

  // Start I2C Transmission
  Wire.beginTransmission(Addr);
  // Select data register
  Wire.write(0x00);
  // Stop I2C Transmission
  Wire.endTransmission();

  // Request 2 bytes of data
  Wire.requestFrom(Addr, 2);

  // Read 2 bytes of data
  // cTemp msb, cTemp lsb
  if (Wire.available() == 2)
  {
    data[0] = Wire.read();
    data[1] = Wire.read();
  }

  // Convert the data
  cTemp = (((data[0] * 256) + (data[1] & 0xF0)) / 16) * 0.0625;
  fTemp = cTemp * 1.8 + 32;

  // Output data to dashboard
  Particle.publish("Temperature in Celsius : ", String(cTemp));
  Particle.publish("Temperature in Fahrenheit : ", String(fTemp));
  delay(1000);
}

Code for web controlled switch

C/C++
The code uses the particle as a switch for an LED, we just in turn used it as a switch for our heater.
// -----------------------------------
// Controlling LEDs over the Internet
// -----------------------------------

// First, let's create our "shorthand" for the pins
// Same as in the Blink an LED example:
// led1 is D0, led2 is D7

int led1 = D0;
int led2 = D7;

// Last time, we only needed to declare pins in the setup function.
// This time, we are also going to register our Particle function

void setup()
{

   // Here's the pin configuration, same as last time
   pinMode(led1, OUTPUT);
   pinMode(led2, OUTPUT);

   // We are also going to declare a Particle.function so that we can turn the LED on and off from the cloud.
   Particle.function("led",ledToggle);
   // This is saying that when we ask the cloud for the function "led", it will employ the function ledToggle() from this app.

   // For good measure, let's also make sure both LEDs are off when we start:
   digitalWrite(led1, LOW);
   digitalWrite(led2, LOW);

}


// Last time, we wanted to continously blink the LED on and off
// Since we're waiting for input through the cloud this time,
// we don't actually need to put anything in the loop

void loop()
{
   // Nothing to do here
}

// We're going to have a super cool function now that gets called when a matching API request is sent
// This is the ledToggle function we registered to the "led" Particle.function earlier.


int ledToggle(String command) {
    /* Particle.functions always take a string as an argument and return an integer.
    Since we can pass a string, it means that we can give the program commands on how the function should be used.
    In this case, telling the function "on" will turn the LED on and telling it "off" will turn the LED off.
    Then, the function returns a value to us to let us know what happened.
    In this case, it will return 1 for the LEDs turning on, 0 for the LEDs turning off,
    and -1 if we received a totally bogus command that didn't do anything to the LEDs.
    */

    if (command=="on") {
        digitalWrite(led1,HIGH);
        digitalWrite(led2,HIGH);
        return 1;
    }
    else if (command=="off") {
        digitalWrite(led1,LOW);
        digitalWrite(led2,LOW);
        return 0;
    }
    else {
        return -1;
    }
}

Credits

Isaac Wheeler and Sergio Verastegui

Comments