The Hacker
Published © MIT

VisitionX

VisitionX: AI smart glasses with fingerprint security and Google integration for intelligent, secure, hands-free living.

BeginnerProtipOver 4166666666666 days388
VisitionX

Things used in this project

Hardware components

Microphone Amplifier Breakout
Adafruit Microphone Amplifier Breakout
×1
Arduino Nano R3
Arduino Nano R3
×1
Battery, 3.7 V
Battery, 3.7 V
×1
TP4056
×1
OLED Display, Blue on Black
×1
ESP32 Camera Module Development Board
M5Stack ESP32 Camera Module Development Board
×1
Maple ESP32 Mini
AnalogLamb Maple ESP32 Mini
×1
SparkFun ESP32 Thing
×1
PiFi DAC: I2S Interface HIFI DAC+ Sound Card For Raspberry PI
Itead PiFi DAC: I2S Interface HIFI DAC+ Sound Card For Raspberry PI
×1
Speaker, Buzzer
Speaker, Buzzer
×1
Microphone, Omnidirectional
×1

Software apps and online services

Arduino IDE
Arduino IDE

Hand tools and fabrication machines

Stripping & Cutting Tool, 28-7 AWG / 0.08-10mm² Capacity Flexible & Solid Conductors

Story

Read more

Custom parts and enclosures

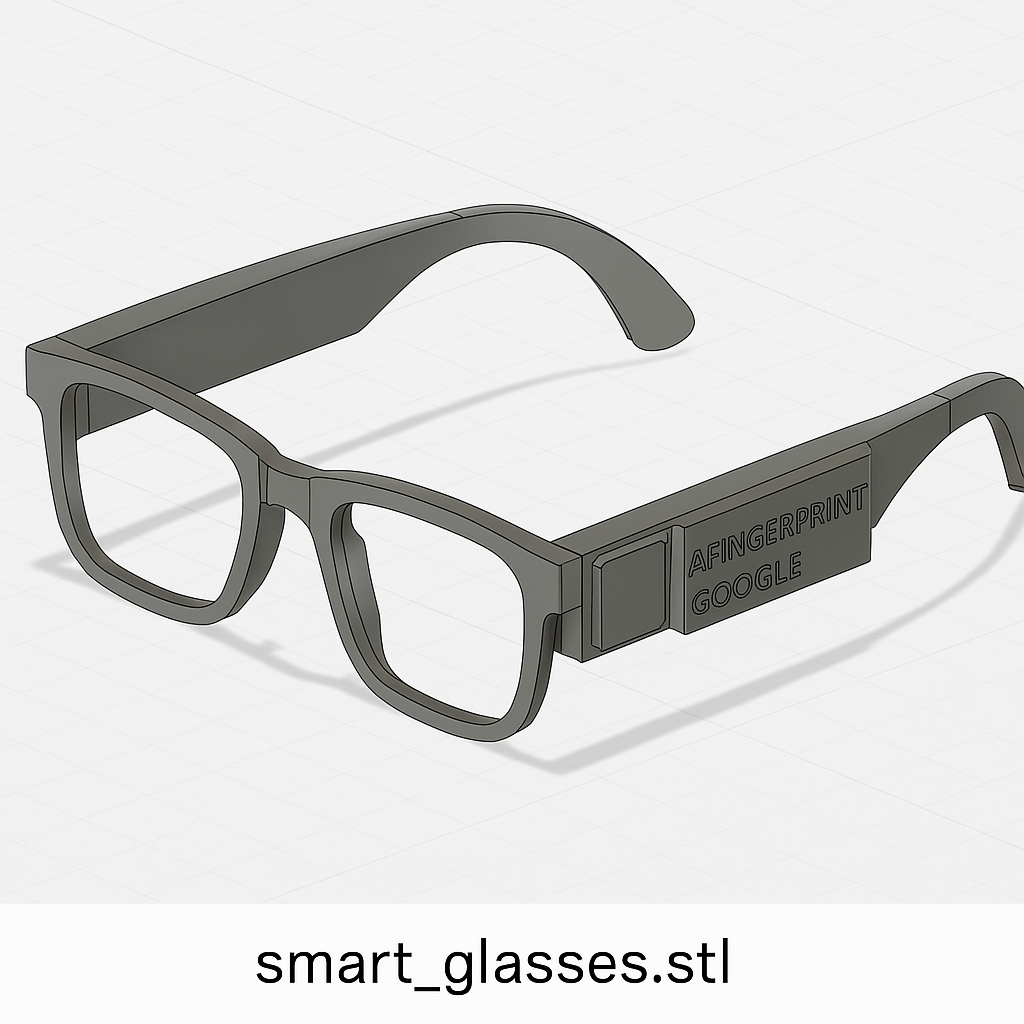
CAD - Enclosures and custom parts

This section includes the 3D design and physical structure of the VisitionX smart glasses. Using CAD (Computer-Aided Design) software, we created custom enclosures to hold electronic components like the fingerprint sensor, microcontroller, battery, and camera inside a lightweight, wearable frame.

How to Use It:

1. Open the 3D model using a CAD tool like Fusion 360, Tinkercad, or Blender.


2. Customize the frame to fit your components (e.g., Arduino Nano, fingerprint sensor, tiny display).


3. Export the model as an STL file for 3D printing.


4. Print using PLA or PETG filament for a durable but lightweight structure.


5. Assemble components into the printed frame using small screws, glue, or press-fit designs.

Schematics

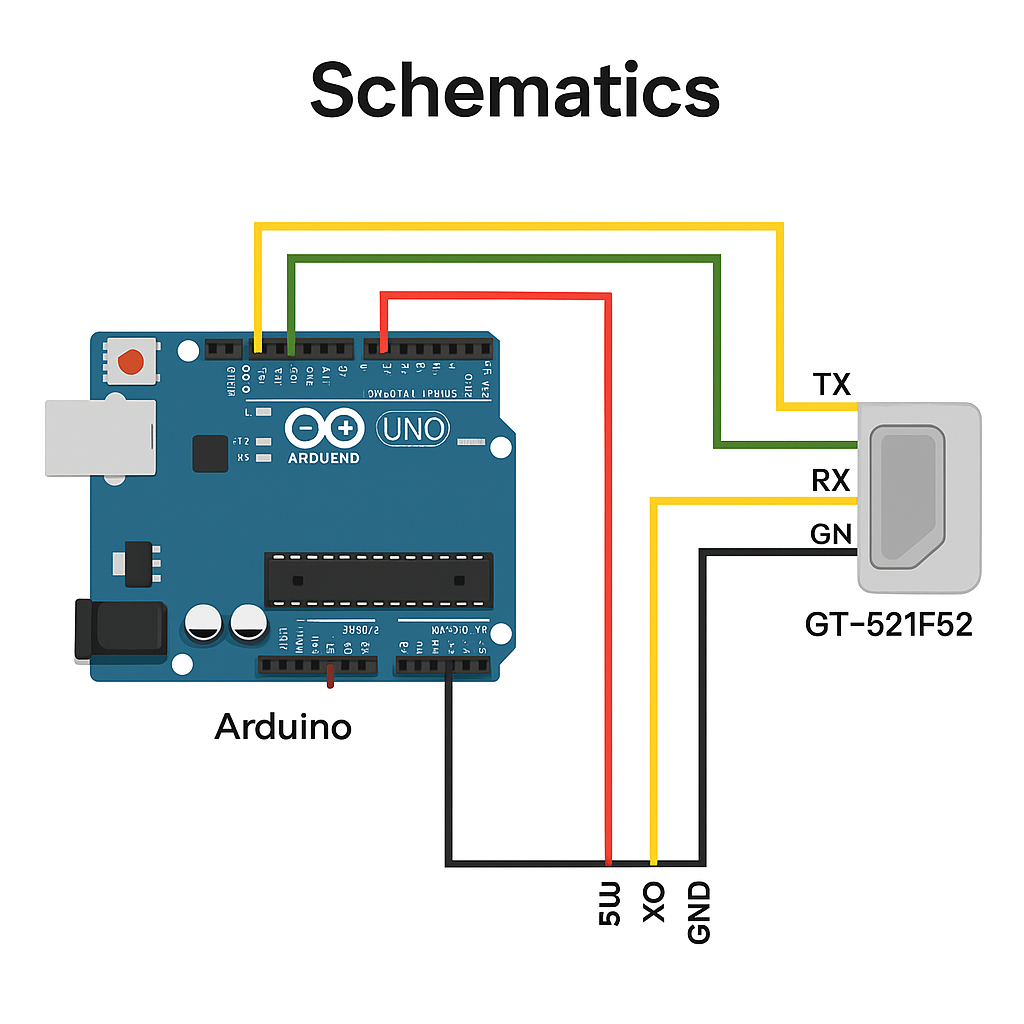
System Schematic: VisitionX Smart Glasses Architecture

This is the schematic diagram for the VisitionX smart glasses. It shows how all the electronic components—like the fingerprint scanner, microcontroller (Arduino/ESP32), power supply, and communication pins—are connected. The design ensures secure biometric access and supports AI and Google integration features.


---


1. Follow the wiring layout shown in the diagram to connect the fingerprint sensor to the microcontroller using the correct pins (TX, RX, VCC, GND).


2. Connect any additional modules (e.g., Bluetooth, camera, display) according to the schematic if you're expanding functionality.


3. Use the code provided to upload to your microcontroller using the Arduino IDE or your chosen platform.


4. Power the system, place your finger on the sensor, and watch the device identify users through the secure biometric system.


5. Optional: Connect the device to your AI system or Google services for voice commands and smart actions.

Code

Fingerprint Scanner Code (C/C++ for Arduino or STM32)

C/C++
This Arduino program connects to a fingerprint sensor and continuously checks for fingerprints. When a finger is placed on the sensor:

1. It captures an image of the fingerprint.


2. It converts the image into digital data.


3. It searches the stored fingerprints to find a match.


4. If a match is found, it displays the ID number.


5. If no match is found, it shows a “No match found” message.


The code uses the Adafruit Fingerprint library and communicates with the sensor via software serial on pins 2 and 3.
// Include the Adafruit fingerprint sensor library
#include <Adafruit_Fingerprint.h>
#include <SoftwareSerial.h>

// Create a software serial connection (pins 2 = RX, 3 = TX)
SoftwareSerial mySerial(2, 3); 

// Initialize the fingerprint sensor with the software serial
Adafruit_Fingerprint finger = Adafruit_Fingerprint(&mySerial);

void setup() {
  // Start the serial monitor at 9600 bps for debugging
  Serial.begin(9600);
  // Start the software serial at 57600 bps for the fingerprint module
  mySerial.begin(57600);

  // Start the fingerprint sensor
  finger.begin(57600);

  // Check if the fingerprint sensor is connected and working
  if (finger.verifyPassword()) {
    Serial.println("Fingerprint sensor detected!");
  } else {
    Serial.println("Fingerprint sensor not found!");
    while (1); // Stop if sensor not found
  }
}

void loop() {
  // Continuously try to get a fingerprint ID
  getFingerprintID();
  delay(50); // Small delay for stability
}

// Function to capture and identify fingerprint
uint8_t getFingerprintID() {
  // Step 1: Capture an image of the fingerprint
  uint8_t p = finger.getImage();
  if (p != FINGERPRINT_OK) return p;

  // Step 2: Convert the image to a template
  p = finger.image2Tz();
  if (p != FINGERPRINT_OK) return p;

  // Step 3: Search the template against stored fingerprints
  p = finger.fingerSearch();

  // Step 4: Check result
  if (p == FINGERPRINT_OK) {
    Serial.print("Found ID #"); 
    Serial.println(finger.fingerID); // Print the matched fingerprint ID
  } else {
    Serial.println("No match found"); // No match in database
  }

  return p;
}// Include the Adafruit fingerprint sensor library
#include <Adafruit_Fingerprint.h>
#include <SoftwareSerial.h>

// Create a software serial connection (pins 2 = RX, 3 = TX)
SoftwareSerial mySerial(2, 3); 

// Initialize the fingerprint sensor with the software serial
Adafruit_Fingerprint finger = Adafruit_Fingerprint(&mySerial);

void setup() {
  // Start the serial monitor at 9600 bps for debugging
  Serial.begin(9600);
  // Start the software serial at 57600 bps for the fingerprint module
  mySerial.begin(57600);

  // Start the fingerprint sensor
  finger.begin(57600);

  // Check if the fingerprint sensor is connected and working
  if (finger.verifyPassword()) {
    Serial.println("Fingerprint sensor detected!");
  } else {
    Serial.println("Fingerprint sensor not found!");
    while (1); // Stop if sensor not found
  }
}

void loop() {
  // Continuously try to get a fingerprint ID
  getFingerprintID();
  delay(50); // Small delay for stability
}

// Function to capture and identify fingerprint
uint8_t getFingerprintID() {
  // Step 1: Capture an image of the fingerprint
  uint8_t p = finger.getImage();
  if (p != FINGERPRINT_OK) return p;

  // Step 2: Convert the image to a template
  p = finger.image2Tz();
  if (p != FINGERPRINT_OK) return p;

  // Step 3: Search the template against stored fingerprints
  p = finger.fingerSearch();

  // Step 4: Check result
  if (p == FINGERPRINT_OK) {
    Serial.print("Found ID #"); 
    Serial.println(finger.fingerID); // Print the matched fingerprint ID
  } else {
    Serial.println("No match found"); // No match in database
  }

  return p;
}

Credits

The Hacker
1 project • 0 followers

Comments