
Hardware components | ||||||
_ztBMuBhMHo.jpg?auto=compress%2Cformat&w=48&h=48&fit=fill&bg=ffffff) |
| × | 1 | |||
 |
| × | 1 | |||
 |
| × | 1 | |||
 |
| × | 1 | |||
 |
| × | 2 | |||
| × | 1 | ||||
 |
| × | 1 | |||
 |
| × | 1 | |||
 |
| × | 1 | |||
 |
| × | 1 | |||
If you are new to Arduino, you can get started with:
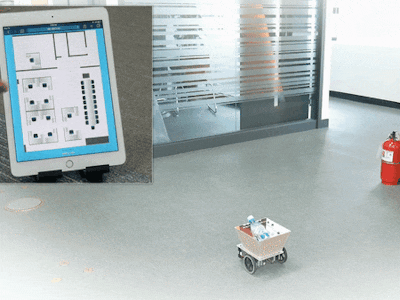
The IdeaThe main idea was to control a step motor-based robot by drawing route on web-based map, making the robot carry your goods to destination just by touching your finger on mobile screen.
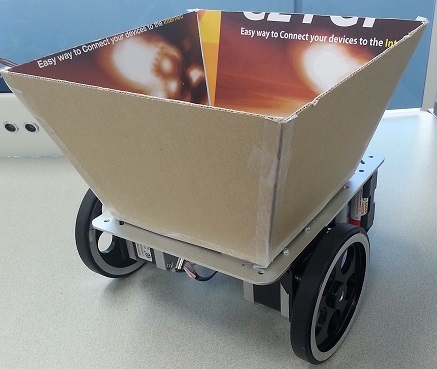
In this project, I make a simple car without using feedback sensor. Therefore, position error is accumulated over time.
This project may inspire someone to make a perfect carrier robot by using some kind of feedback sensors to correct position error. This will be more convenient if it is combined with a routing algorithm such as Dijkstra algorithm.
Wiring- Stack PHPoC Shield or PHPoC WiFi Shield on Arduino
- Stack Two Stepper Motor Controllers PES-2604 on PHPoC Shield or PHPoC WiFi Shield
- Connect stepper motors to terminal block of Stepper Motor Controller PES-2605
- Bipolar stepper motor
- Unipolar stepper motor: there are two ways to connect a unipolar stepper motor to terminal block of PES-2605. User can choose one of them.
- Set expansion ID for each step motor controllers are 13 and 14 via DIP switch on expansion board.You can refer to below table to set expansion ID.
- Connect limit switch to SW#0 of digital input port of both step motor controllers
We need an image of office's map. The map's size must have the same aspect ratio as real size.
Tip: drawing map will be more exact in term of aspect ratio if it is drawn based on then floor bricks.
Map image is scaled to fit the mobile screen. When finger touch on web-based map:
- The XY coordinate (in pixel) is rescaled to image's coordinate, and then is sent to Arduino as target position.Arduino converts the pixel coordinate to real coordinate (in millimeter).Code:
/* convert pixel to millimeter */targetX = (long)(targetX / RATIO_PIX_PER_MM);targetY = (long)(targetY / RATIO_PIX_PER_MM);- Arduino calculates the direction (rotated angle) and distance based on: current position, previous direction and target positionCode:
/* calculate the rotating angle */vectorX = targetX - preX;vectorY = targetY - preY;dist = sqrt(vectorX * vectorX + vectorY * vectorY);vectorX /= dist;vectorY /= dist;cosinAngle = (preVectorX * vectorX + preVectorY * vectorY); /* based on dot product between two vectors */angle = acos(cosinAngle) * 180 / PI;- Arduino converts the rotated angle to number of step the motor has to move and send command to step motor controller to move the motor.Code:
stepMove = (angle * TRACK) / ((FULL_STEP_ANGLE / stepMode) * WHEEL_RADIUS) / 2;dir = preVectorX * vectorY - preVectorY * vectorX; /* direction of rotation: clockwise or counter-clockwise */WHEEL_RADIUS is radius of wheel.
- Arduino converts the distance to number of step the motor has to move and send command to step motor controller to move the motor.Code:
stepMove = dist / WHEEL_PERIMETER * (FULL_STEP_NUM * stepMode);targetStepRight += stepMove;targetStepLeft -= stepMove;WHEEL_PERIMETER is perimeter of wheel
Limit Switch
A limit switch is placed at the head of car to make motor stop automatically when meeting obstacles.
Initial Position of CarInitial position is position of car when Arduino boots or resets. It must be the same among: real position (where you put your car), position setting in Arduino Code and Web User Interface code
In my setting, I set my car at position (16th brick, 22th brick) (see below image)
In Arduino code (line 54, 55)
//initial positionpreX = 16 * BRICK_REAL_WIDTH;preY = 22 * BRICK_REAL_HEIGHT;
In Web User Interface (line 47. 48)//initial position//initial positiontouchImageX = 16 * IMAGE_WIDTH / 25.0;touchImageY = 22 * IMAGE_HEIGHT / 34.0;
Arduino Code
This is arduino code, which run in infinite loop
Web User Interface - remote_car.php
remote_car.php is a file that contains Web User Interface. It needs to be stored on PHPoC [WiFi] Shield. In order to upload the file to PHPoC [WiFi] Shield, please do the following steps:
- Copy the below code and save it into remote_car.php file.
- Install PHPoC Debugger
- Connect PHPoC Debugger to PHPoC [WiFi] Shield via micro-USB cable according to this instruction.Note that Arduino must be powered.
- Upload remote_car.php file to PHPoC [WiFi] Shield according to this instruction
- Upload map.png to to PHPoC [WiFi] Shield
- Config network information for PHPoC shield or PHPoC WiFi shield
- Install PHPoC Library
- Install PHPoC Expansion Library
- Compile and upload code to Arduino
- Upload web user interface to PHPoC [WiFi] shield
- Open Serial Monitor and copy IP address of PHPoC Shield
- Access Web User Interface via Web Browser: http://ip_address_of_shield/remote_car.php
- Control car by point position on the map


Comments