

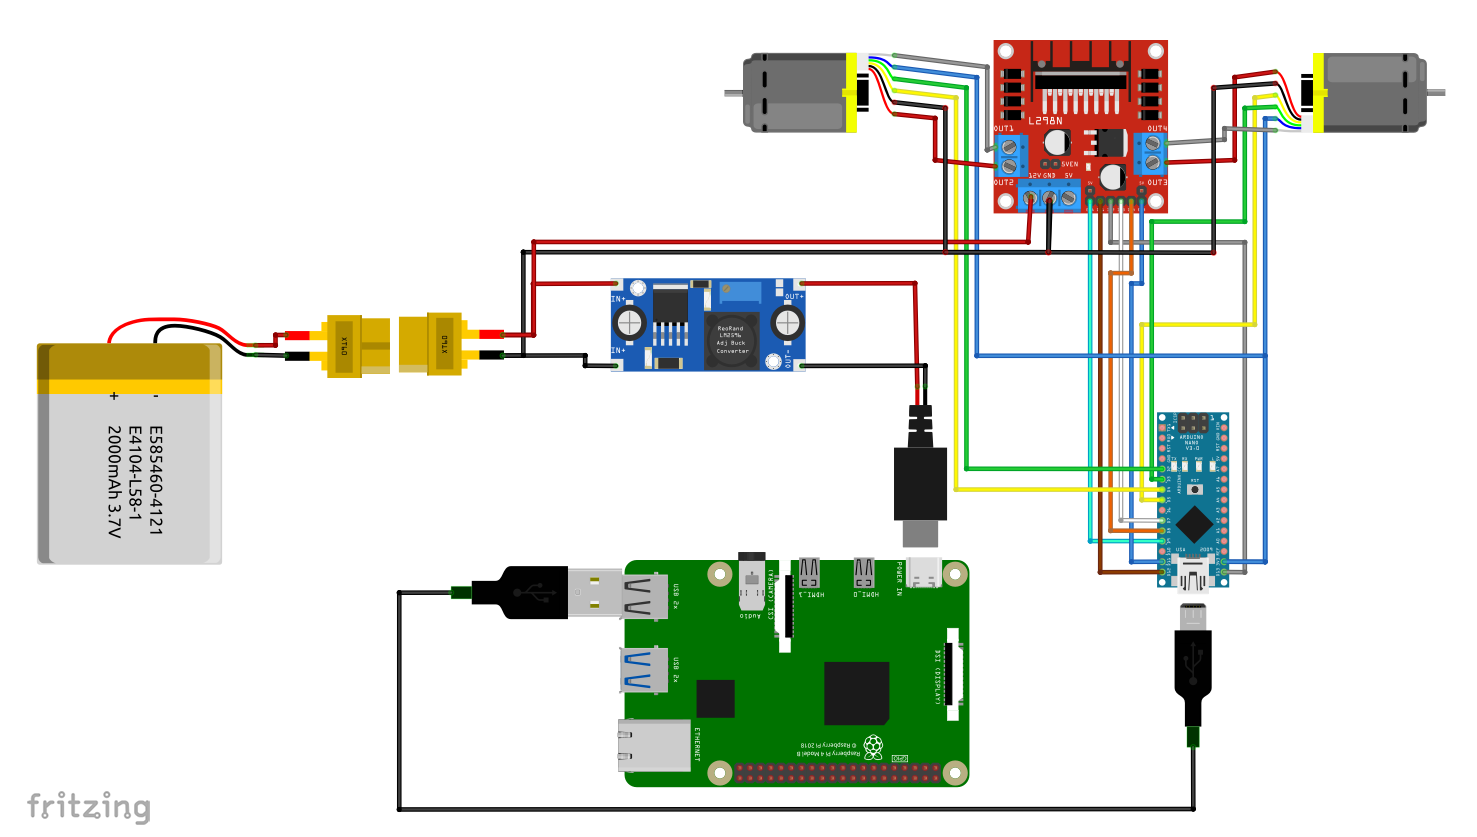
Hardware components | ||||||
| × | 1 | ||||
| × | 1 | ||||
Software apps and online services | ||||||
 |
| |||||
| ||||||
| ||||||
Hand tools and fabrication machines | ||||||
| ||||||
In a modern hospital of the future, the most undesirable work is probably that of the nurses - cleaning the floors, taking out the garbage, and disinfecting the patients' rooms. This tiring and repetitive work is essential for maintaining hygiene and preventing infections, but few people want such tasks. For that reason, I am thinking of coming up with a prototype of a self-driving robot that can solve this problem, more exactly to replace the nurses' work.
Initial configurationsStep 1: Installing Ubuntu on Virtual Machine
First of all, to build this robot, we need to install Ubuntu on a Virtual Machine. This will allow you to use Ubuntu without changing the current Operating System of your PC (Windows o macOS).
If you already have installed Ubuntu on you're PC then you can skip to the next step in witch we will install ROS 2 on you're machine.
Step 1.1: Installing Oracle VM VirtualBox
The Virtual Machine used for this project is Oracle VM VirtualBox, however you can use any other Virtual Machine that is available on the internet and handy for you.
Here you have a step by step guide on how to install the Oracle VM VirtualBox for you're specific operating system (Windows or MacOS).
Step 1.2: Configure the Virtual Machine
Download the ISO of Ubuntu 22.04 from the official website and once the download is finished, you can proceed with the configuration and installation of the Virtual Machine.
a. In Oracle VM VirtualBox creates a new virtual machine by clicking on "New".
b. Select a name for the virtual machine in the "Name" section, then indicate the path to the Ubuntu 22.04 ISO and click "Next".
c. Choose a username and password to be used for logging into You're_name_here once the installation process is complete. Then click "Next".
d. Allocates part of the RAM memory and indicates the number of CPUs of your PC to be allocated for the simulation of the Operating System in the Virtual Machine. These values depend on the technical specifications of your PC, but remain within the limits recommended by the Virtual Machine. Then click "Next".
e. Decide how much space you will allocate on your hard disk to be used by the operating system you are going to simulate in the virtual machine. I recommend allocating at least 25 GB of memory for the virtual machine to install all the necessary components. Then click "Next".
f. Check that all Virtual Machine settings are correct, then click 'Finish'.
Step 1.3: Install Ubuntu
Now you can proceed with the installation of Ubuntu on your Virtual Machine.
a. Select the Virtual Machine you just created, then click on “Start”
b. When booting Ubuntu on the Virtual Machine for the first time, the installation process will automatically start. Wait until it is completed, it may take a while.
c. Once the installation is completed, you can start using Ubuntu 22.04 within your Virtual Machine
Step 2: Installing ROS 2
For this project, I used the ROS 2 Humble version, but the other versions are compatible too.
First of all, after you log in to your account in Ubuntu, open the Firefox web browser or another one and paste this link: Ubuntu (Debian packages) — ROS 2 Documentation: Humble documentation
After that, open a new terminal with Ctrl+Alt+T and copy-paste the commands that you'll see on the link above and you will install the ROS 2 Humble version on you're machine.
Note: If the terminal is not working on you're machine please watch this video.Configure the Development Environment
Step 3.1: Installing Visual Studio Code
Go on this link on you're machine (in this case on you're account on Ubuntu): Download Visual Studio Code - Mac, Linux, Windows and then install this IDE by clicking the box that you see marked with yellow in this picture.
After the download is complete, go to the folder where the file is downloaded and install Visual Studio Code.
Once you have installed VS Code, open it and choose the extension tab to download some extensions:
- C++
- Python
- CMake
- XML
- ROS
Now, open a new terminal, and type the command below, to install a better version of the terminal called Terminator:
sudo apt-get install terminatorFrom this point, every time you open a new terminal, the Terminator version will appear (this allows us to have more than one terminal in the same window).
Step 3.2: Installing needed ROS 2 packages
On this point we need to install some ROS 2 packages that this project can work. In this way, you have to open a new terminal and copy and paste each of the following commands line by line:
sudo apt-get install ros-humble-ros2-controllers
sudo apt-get install ros-humble-xacro
sudo apt-get install ros-humble-gazebo-ros
sudo apt-get install ros-humble-gazebo-ros-pkgs
sudo apt-get install ros-humble-ros2-control
sudo apt-get install ros-humble-gazebo-ros2-control
sudo apt-get install ros-humble-joint-state-publisher-gui
sudo apt-get install ros-humble-turtlesim
sudo apt-get install ros-humble-robot-localization
sudo apt-get install ros-humble-joy
sudo apt-get install ros-humble-joy-teleop
sudo apt-get install ros-humble-tf-transformations
sudo apt-get install ros-humble-plotjuggler
sudo apt-get install ros-humble-plotjuggler-ros
And some packages for Python:
sudo apt-get install python3-pip
pip install transforms3The robot is built from several components. For each individual component of the robot, we will build a packet that will communicate with the other components in order to activate the movement of the robot. These packages will be integrated in a workspace, which is actually a folder that will contain all the hardware components of the robot.
So let's built the workspace.
First of all open a new terminal and type the following command to build the workspace:
mkdir -p bumperbot_ws/srcInstead of the name bumperbot_ws, you can put any name you want.
Now if you type the command
lsyou'll see that the folder with you're specific name was created.
In the src folder will be the packages that contains all the functionabilitis of the robot.
And then you have to go on the bumperbot_ws with
cd bumperbot_ws/and here you have to type the command
colcon buildwitch will convert the script developed in Python for the robot components into an executable files that can be executed as normal applications in our system.
Now go into the src folder with the command
cd src/and here we will create a package with the following comand
ros2 pkg create --build-type ament-python bumperbot_py_examplesNow for the packages created by us to be recognized by ROS 2 and so we can use them, we must open a new terminal with Ctrl+Shift+O and here we will have to type the next commands witch will make our packages for our workspace available
cd bumperbot_es/install/
. setup.bash
This is just an example of how to create a package and make it available, but I have already created all the packages necessary for the robot and all the source code that will make our robot move. In this way, you have to follow the next process to bring all of my work onto your machine.
Step 4.1: Bring my workspace onto you're machine
a. Installing Git
If you don't have already git installed, you have to install it using this two commands on terminal:
sudo apt-get update
sudo apt-get install git
b. Clone repository
Open the terminal an go to the folder in witch you want to clone my repository. After that, type the next command on the terminal:
git clone https://github.com/SamiIonesi/UV-disinfection-robot.gitNow you have cloned my repository with all the software needed for the robot.
Put the robot in motionFirst of all, go to this link and download all the necessary STL models for the simulation of the robot.
The RTL_Robot folder should have this files:
and models folder should have this folders:
Then open a new terminal with Ctrl+Alt+T, go to the workspace with the command
cd bumperbot_ws/and here you have to build the workspace with the command
colcon buildas you can see in this picture:
Then open a new terminal window with Ctrl+Shift+O and type the following commands:
. install/setup.bash
ros2 launch bumperbot_description gazebo.launch.py
and will open the Gazebo simulation.
After that you have to open another terminal window with Ctrl+Shift+O and here type these commands:
. install/setup.bash
ros2 launch bumperbot_controller controller.launch.py
Now connect the joystick to the PC via an USB cable or with the bluetooth and then open a new terminal window with Ctrl+Shift+T and type these commands:
. install/setup.bash
ros2 launch bumperbot_controller joystick_teleop.launch.py
In the final step go the Gazebo simulation application and the robot should move like in this video below:
This is just the simulation part of the robot in Gazebo.


Comments