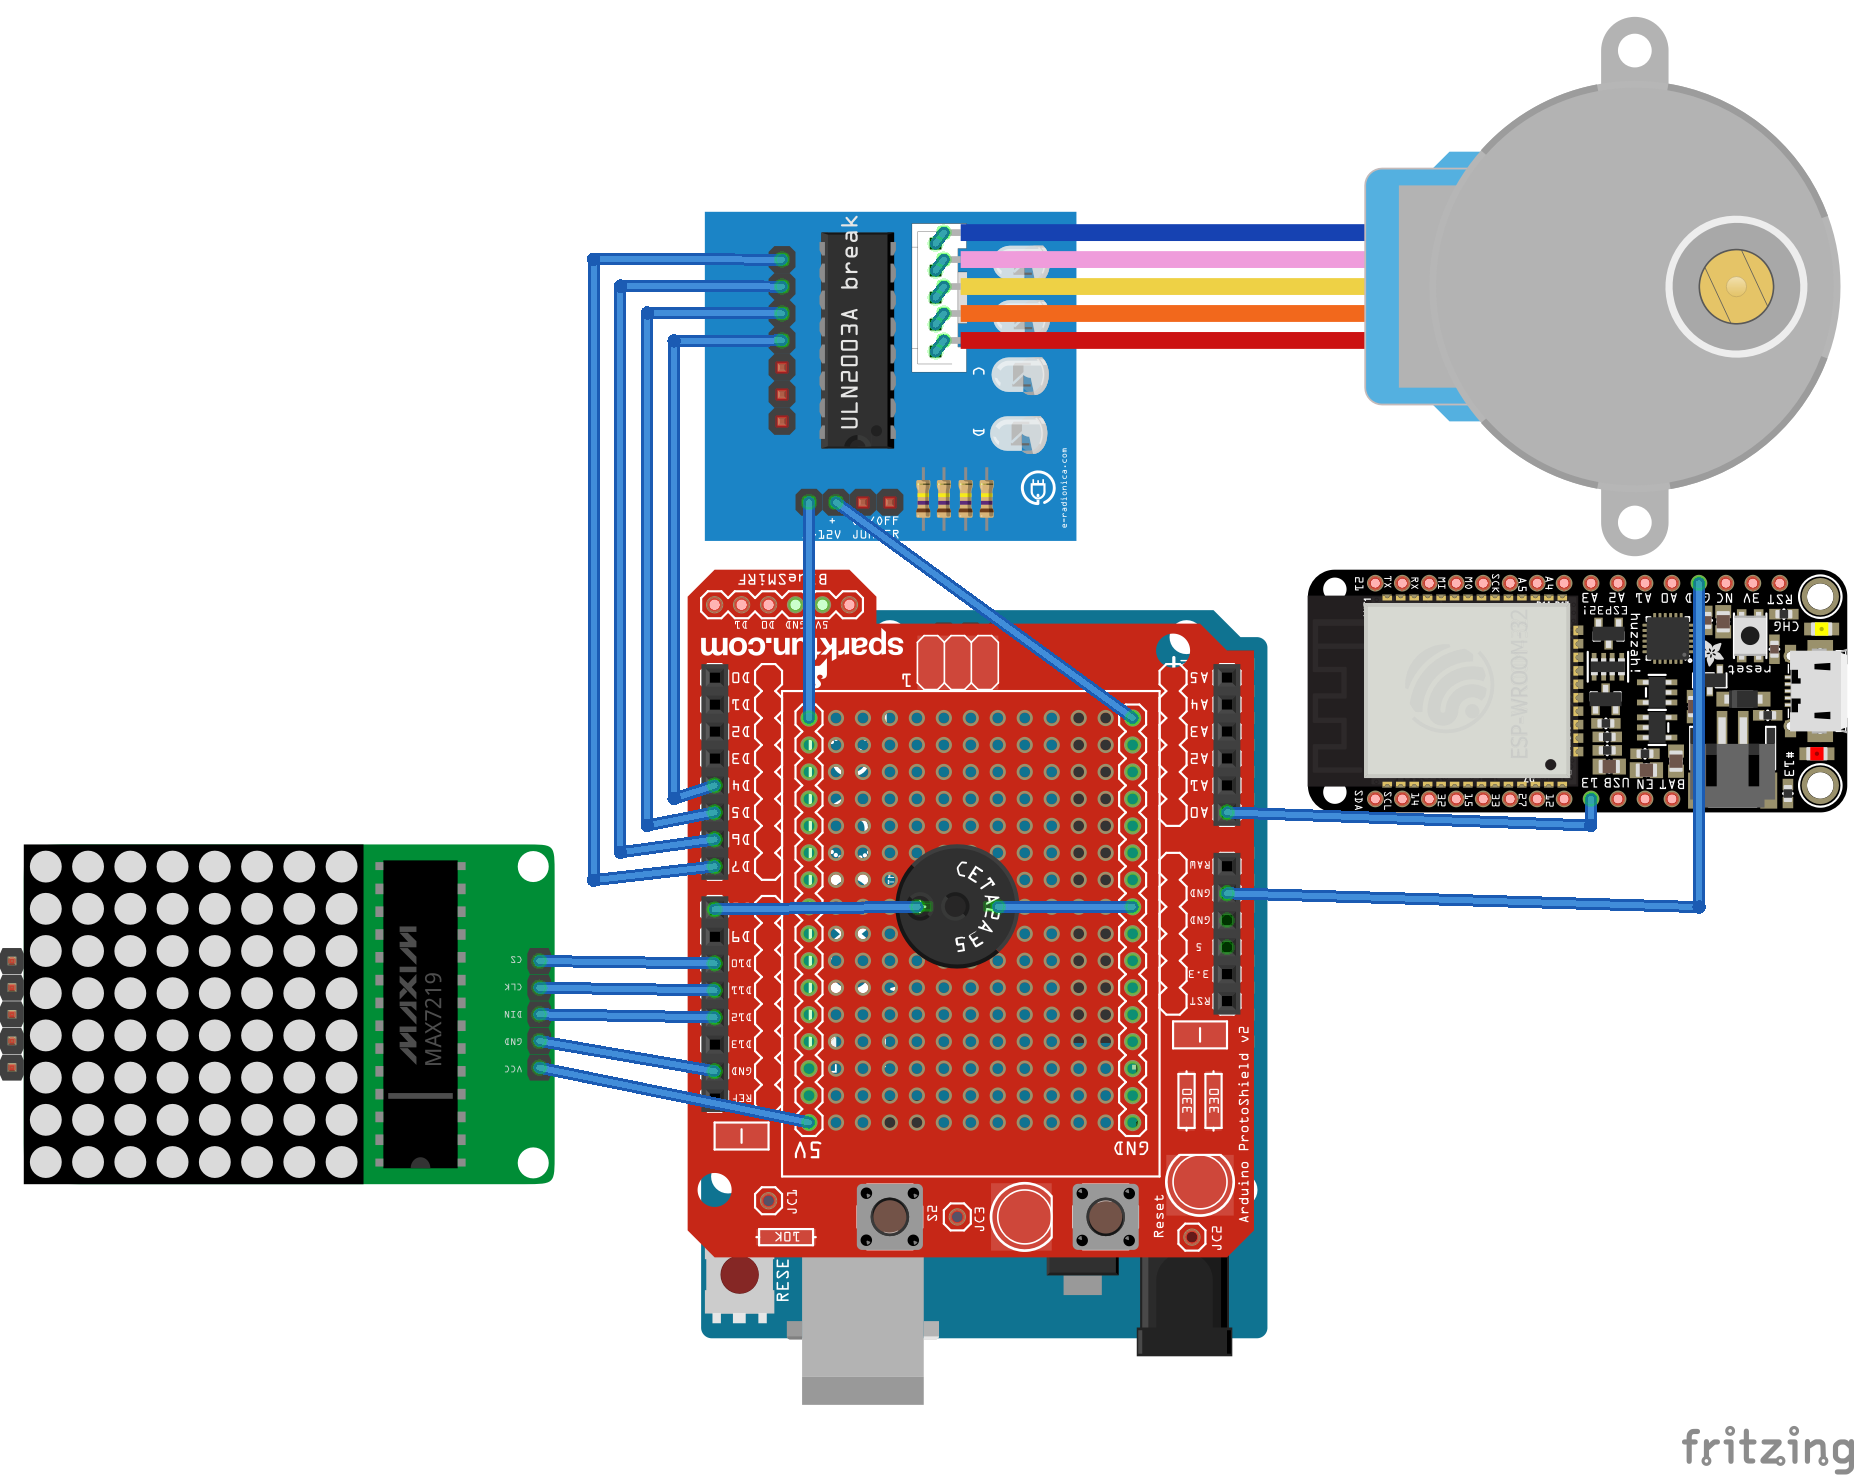
#include <Stepper.h>
#include "LedControl.h"
#include "pitches.h"
const int stepsPerRevolution = 1024;
Stepper myStepper(stepsPerRevolution, 4, 5, 6, 7);

LedControl lc=LedControl(12,10,11,1);


int melody[] = {
  NOTE_C5, NOTE_D5, NOTE_E5, NOTE_F5, NOTE_G5, NOTE_A5, NOTE_B5, NOTE_C6};

/* we always wait a bit between updates of the display */
unsigned long delaytime1=500;
unsigned long delaytime2=50;

void setup() {
  // initialize serial communication at 9600 bits per second:
  Serial.begin(9600);
  pinMode(LED_BUILTIN, OUTPUT);
  digitalWrite(LED_BUILTIN, LOW);
  myStepper.setSpeed(12);
  // initialize the serial port:
   /*
   The MAX72XX is in power-saving mode on startup,
   we have to do a wakeup call
   */
  lc.shutdown(0,false);
  /* Set the brightness to a medium values */
  lc.setIntensity(0,8);
  /* and clear the display */
  lc.clearDisplay(0);
}

// the loop routine runs over and over again forever:
void loop() {
  // read the input on analog pin 0:
  int sensorValue = analogRead(A0);
  // print out the value you read:
  Serial.println(sensorValue);

  if (sensorValue > 450){
    tone(8, melody[7], 3000);
    digitalWrite(LED_BUILTIN, HIGH);
    LEDsON();
    myStepper.step(stepsPerRevolution);
    delay(500);

    LEDsOFF();
    myStepper.step(-stepsPerRevolution);
    delay(500);


  }
  else{
    digitalWrite(LED_BUILTIN, LOW);
  }
  delay(200);
   // delay in between reads for stability
}

void LEDsON() {
  /* here is the data for the characters */
  byte a[8]={B11111111,B11111111,B11111111,B11111111,B11111111,B11111111,B11111111,B11111111};


  /* now display them one by one with a small delay */
  lc.setRow(0,0,a[0]);
  lc.setRow(0,1,a[1]);
  lc.setRow(0,2,a[2]);
  lc.setRow(0,3,a[3]);
  lc.setRow(0,4,a[4]);
  lc.setRow(0,5,a[5]);
  lc.setRow(0,6,a[6]);
  lc.setRow(0,7,a[7]);

}

void LEDsOFF() {
  /* here is the data for the characters */
  byte a[8]={B00000000,B00000000,B00000000,B00000000,B00000000,B00000000,B00000000,B00000000};


  /* now display them one by one with a small delay */
  lc.setRow(0,0,a[0]);
  lc.setRow(0,1,a[1]);
  lc.setRow(0,2,a[2]);
  lc.setRow(0,3,a[3]);
  lc.setRow(0,4,a[4]);
  lc.setRow(0,5,a[5]);
  lc.setRow(0,6,a[6]);
  lc.setRow(0,7,a[7]);

}

_ztBMuBhMHo.jpg?auto=compress%2Cformat&w=48&h=48&fit=fill&bg=ffffff)


_lM74tfBjjy.png?auto=compress%2Cformat&w=40&h=40&fit=min&dpr=2)


_lM74tfBjjy.png?auto=compress%2Cformat&w=60&h=60&fit=min&dpr=2)


_3u05Tpwasz.png?auto=compress%2Cformat&w=40&h=40&fit=fillmax&bg=fff&dpr=2)

Comments