


Hardware components | ||||||
 |
| × | 1 | |||
 |
| × | 1 | |||
| × | 1 | ||||
 |
| × | 1 | |||
 |
| × | 3 | |||
 |
| × | 4 | |||
 |
| × | 1 | |||
 |
| × | 1 | |||
 |
| × | 1 | |||
 |
| × | 1 | |||
 |
| × | 2 | |||
Software apps and online services | ||||||
| ||||||
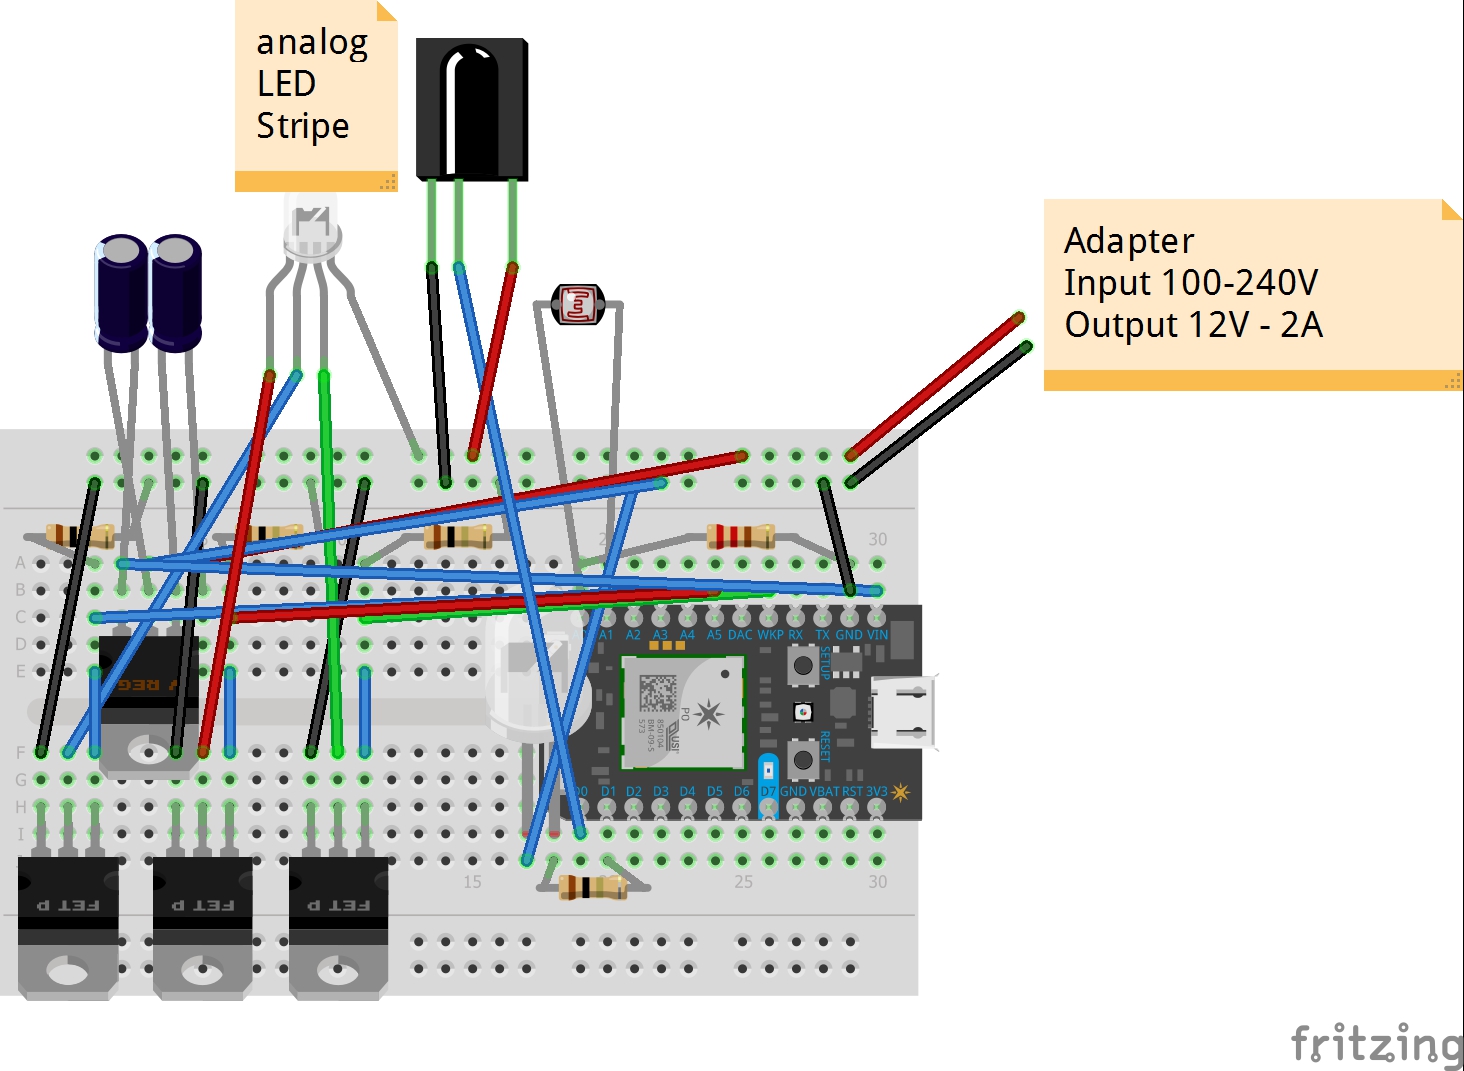
I started with a commercial analog RGB set including remote controller from the hardware store and I have this with a relay on and off. The noise of the relay annoyed my partner and so the solution had to be further developed: today I supply my photon with a 5V voltage via electronic components (the voltage regulator) and I have saved so a power supply. The noise of the Relay is gone and over Blynk I can also manually switch the light on my mobile phone on and off.
The analog LED strip I have installed below the bed and the PIR sensor peaks with the photo sensor something. The circuit can be installed wherever light is required by a movement. A corresponding power supply with an output of 12V is required.
Update 04.07.2017: Check Version 1.1!I have optimized the code and developed further towards Blynk services. After all, you have different needs for the threshold and light duration than me. The thresholds are initially hard-coded, but can be changed to your requirements using slide controllers within the Blynk app.
int light_threshold = 100;
int delayColorFade = 15;
Here is what you need to do:
- Download Blynk app here
- Scan this QR code
- Enjoy my app!
You need 1600 Blynk-Energy Points.
I wish you every success in the reconstruction and safe escort at night!
Conclusion:
Like my description? You will find more under my account. Follow me to be notified when I publish new projects! Here is my Paypal link. You can also send me sensors, which I like to look at sometimes.
Update 19.10.2017: Check Version 1.2!I have expand the code and developed further towards Blynk services.
Add a second ZERGBA-Blynk-Widget to set/change the DEFAULT RGB-Values in the smartphone app instead of bright white.
// This #include statement was automatically added by the Particle IDE.
#include <blynk.h>

int inputPin = D0;              // choose the input pin (for PIR sensor)
int ledPin = D1;                // LED Pin
int pirState = LOW;             // we start, assuming no motion detected
int val = 0;                    // variable for reading the pin status
int boardLed = D7;              // photon onBoard LED
int calibrateTime = 10000;      // wait for the thingy to calibrate
float light_threshold = 4;      // brightness to decide its time for more light in %
int analogvalue;                // Here we are declaring the integer variable analogvalue, which we will use later to store the value of the photoresistor.
int photoresistor = A0;         // This is where your photoresistor is plugged in. The other side goes to the "power" pin (below).
int photopower = A1;            // This is the other end of your photoresistor. The other side is plugged into the "photoresistor" pin (above).
                                // The reason we have plugged one side into an analog pin instead of to "power" is because we want a very steady voltage to be sent to the photoresistor.
                                // That way, when we read the value from the other side of the photoresistor, we can accurately calculate a voltage drop.


#define REDPIN A5
#define GREENPIN WKP
#define BLUEPIN A4
#define FADESPEED 5     // make this higher to slow down


char auth[] = "<<your blync auth-code here>>";

void setup() {

  // Start Blynk
  Blynk.begin(auth);

  pinMode(photoresistor,INPUT);  // Our photoresistor pin is input (reading the photoresistor)
  pinMode(photopower,OUTPUT);    // The pin powering the photoresistor is output (sending out consistent power)
                                 // Next, write one pin of the photoresistor to be the maximum possible, so that we can use this for power.
  digitalWrite(photopower,HIGH);

    // We are going to declare a Particle.variable() here so that we can access the value of the photoresistor from the cloud.
  Particle.variable("PIR-Motion", &analogvalue, INT);
    // This is saying that when we ask the cloud for "analogvalue", this will reference the variable analogvalue in this app, which is an integer variable.


  pinMode(REDPIN, OUTPUT);
  pinMode(GREENPIN, OUTPUT);
  pinMode(BLUEPIN, OUTPUT);

  pinMode(boardLed,OUTPUT); // on-board LED
  pinMode( ledPin, OUTPUT );
  pinMode(inputPin, INPUT);     // declare sensor as input

     // Now flash the D7 LED on and off
  digitalWrite(boardLed,HIGH); // Start der Kallibrierung mit D7 on
  Particle.publish("PIR-Motion","now online",100,PRIVATE);
  digitalWrite(boardLed,LOW); // Start der Kallibrierung mit D7 off

}

void loop() {

  // Start Blynk
  Blynk.run();

  // check to see what the value of the photoresistor is and store it in the int variable analogvalue
  analogvalue = analogRead(photoresistor);
  delay(100);

  // if the sensor is calibrated
  if ( calibrated() )
  {
  // get the data from the sensor
    readTheSensor();

    // report it out, if the state has changed
    reportTheData();
  }
}


void readTheSensor() {
  val = digitalRead(inputPin);
}


bool calibrated() {
  return millis() - calibrateTime > 0;
}


void reportTheData() {

  // if the sensor reads high
  // or there is now motion
  if (val == HIGH) {

    // the current state is no motion
    // i.e. it's just changed
    // announce this change by publishing an eent
    if (pirState == LOW) {
      // we have just turned on
      Particle.publish("PIR Motion", "Motion detected", PRIVATE);

      pirState = HIGH;
      setLED( pirState );

        if (analogvalue < light_threshold) {
              //Particle.publish("PIR Motion", String(light), PRIVATE);
              Particle.publish("PIR Motion", String(analogvalue), PRIVATE);
              //Blynk.virtualWrite(V1, String(analogvalue));
              //Blynk.virtualWrite(V1, String(light));
              Particle.publish("PIR Motion", String(light_threshold), PRIVATE);
              Particle.publish("PIR Motion", "LED Streifen an", PRIVATE);

                ColorFade();

        } else {
            Particle.publish("PIR Motion", String(analogvalue), PRIVATE);
            //Particle.publish("PIR Motion", String(light), PRIVATE);
            //Blynk.virtualWrite(V2, String(analogvalue));
            //Blynk.virtualWrite(V2, String(light));
        }

    }
  } else {
    if (pirState == HIGH) {
      // we have just turned of
      // Update the current state
      pirState = LOW;
      setLED( pirState );
    }
  }
}


void setLED( int state )
{
  digitalWrite( ledPin, state );
}


void ColorFade() {

  // LED Stripe on
  analogWrite(REDPIN, 18);
  analogWrite(BLUEPIN, 0);
  analogWrite(GREENPIN, 16);
  delay(7000); // 7 sec on

  /* Fading is off - use this as option
  int r, g, b;

  // fade from blue to violet
  for (r = 0; r < 256; r++) {
    analogWrite(REDPIN, r);
    delay(FADESPEED);
  }
  // fade from violet to red
  for (b = 255; b > 0; b--) {
    analogWrite(BLUEPIN, b);
    delay(FADESPEED);
  }
  // fade from red to yellow
  for (g = 0; g < 256; g++) {
    analogWrite(GREENPIN, g);
    delay(FADESPEED);
  }
  // fade from yellow to green
  for (r = 255; r > 0; r--) {
    analogWrite(REDPIN, r);
    delay(FADESPEED);
  }
  // fade from green to teal
  for (b = 0; b < 256; b++) {
    analogWrite(BLUEPIN, b);
    delay(FADESPEED);
  }
  // fade from teal to blue
  for (g = 255; g > 0; g--) {
    analogWrite(GREENPIN, g);
    delay(FADESPEED);
  }
  */

  // LED Stripe off
  analogWrite(REDPIN, 0);
  analogWrite(BLUEPIN, 0);
  analogWrite(GREENPIN, 0);


}
Version 1.1
C/C++// Ingo Lohs, Version 1.1 - 04.07.2017 - works with Particle Photon v0.6.2
// myled-mosefet-blynk.ino
// https://www.hackster.io/ingo-lohs/mypir-sensor-activate-analog-rgb-stripe-controlled-by-photon-2e8240
// This #include statement was automatically added by the Particle IDE.
#include <blynk.h>
int inputPin = D0; // choose the input pin (for PIR sensor)
int ledPin = D1; // LED Pin
int pirState = LOW; // we start, assuming no motion detected
int val = 0; // variable for reading the pin status
int boardLed = D7; // photon onBoard LED
int calibrateTime = 10000; // wait for the thingy to calibrate
int light_threshold = 100; // brightness as analog value to decide its time for more light as analog value
int analogvalue; // Here we are declaring the integer variable analogvalue, which we will use later to store the value of the photoresistor.
int photoresistor = A0; // This is where your photoresistor is plugged in. The other side goes to the "power" pin (below).
int photopower = A1; // This is the other end of your photoresistor. The other side is plugged into the "photoresistor" pin (above).
// The reason we have plugged one side into an analog pin instead of to "power" is because we want a very steady voltage to be sent to the photoresistor.
// That way, when we read the value from the other side of the photoresistor, we can accurately calculate a voltage drop.
unsigned long lastmillis = 0; // time for iteration the loop
#define REDPIN A5
#define GREENPIN WKP
#define BLUEPIN A4
// #define FADESPEED 5 // make this higher to slow down - used in function ColorFade as Option
int delayColorFade = 15; // presents the value in seconds
char auth[] = "<<your blync auth-code here>>";
// *********
BLYNK_WRITE(V4) // Blynk app WRITES Slider widget
{
light_threshold = param.asInt();
Serial.println("******************************");
Serial.print(light_threshold);
Serial.println(" analog value = new Threshold for Light");
Serial.println("******************************");
}
// *********
void update_light_threshold()
{
Blynk.virtualWrite(V3, light_threshold);
}
// *********
BLYNK_WRITE(V2) // Blynk app WRITES Slider widget
{
delayColorFade = param.asInt(); // macht aus den Blynk-Werten millisekunden
Serial.println("******************************");
Serial.print(delayColorFade);
Serial.println(" milli-sec = new Delay for Function ColorFade");
Serial.println("******************************");
}
// *********
void update_delayColorFade()
{
Blynk.virtualWrite(V1, delayColorFade);
}
// *********
BLYNK_WRITE(V0)
{
// The param can contain multiple values, in such case:
int red = param[0].asInt();
int green = param[1].asInt();
int blue = param[2].asInt();
analogWrite(REDPIN, red);
analogWrite(GREENPIN, green);
analogWrite(BLUEPIN, blue);
}
// *********
void setup() {
Serial.begin(9600);
Blynk.begin(auth); // Start Blynk
pinMode(photoresistor,INPUT); // Our photoresistor pin is input (reading the photoresistor)
pinMode(photopower,OUTPUT); // The pin powering the photoresistor is output (sending out consistent power)
digitalWrite(photopower,HIGH); // Next, write one pin of the photoresistor to be the maximum possible, so that we can use this for power.
pinMode(REDPIN, OUTPUT);
pinMode(GREENPIN, OUTPUT);
pinMode(BLUEPIN, OUTPUT);
pinMode(boardLed,OUTPUT); // on-board LED
pinMode(ledPin, OUTPUT ); // control PIR LED
pinMode(inputPin, INPUT); // declare sensor as input
digitalWrite(boardLed,HIGH); // Now flash the D7 LED on and off
Particle.publish("PIR-Motion", "now online", PRIVATE); // informs user via Particle Cloud
digitalWrite(boardLed,LOW);
}
// *********
void loop() {
Blynk.run();
// if the sensor is calibrated
if (calibrated())
{
if ((millis() - lastmillis) > 1000) {
lastmillis = millis();
readTheSensor();
reportTheData();
update_delayColorFade();
update_light_threshold();
}
}
}
// *********
void readTheSensor() {
// check the PIR-Sensor
val = digitalRead(inputPin);
// check to see what the value of the photoresistor is and store it in the int variable analogvalue
analogvalue = analogRead(photoresistor);
Blynk.virtualWrite(V5, analogvalue);
}
// *********
bool calibrated() {
return millis() - calibrateTime > 0;
}
// *********
void reportTheData() {
// if the sensor reads high
// or there is now motion
if (val == HIGH) {
// the current state is no motion
// i.e. it's just changed
// announce this change by publishing an eent
if (pirState == LOW) {
// we have just turned on
Particle.publish("PIR Motion", "Motion detected", PRIVATE);
pirState = HIGH;
setLED( pirState );
if (analogvalue /*light*/ <= light_threshold) {
Particle.publish("PIR Motion", String(analogvalue), PRIVATE);
Particle.publish("PIR Motion", String(light_threshold), PRIVATE);
Particle.publish("PIR Motion", "LED Streifen an", PRIVATE);
ColorFade();
} else {
Particle.publish("PIR Motion", String(analogvalue), PRIVATE);
}
}
} else {
if (pirState == HIGH) {
// we have just turned of
// Update the current state
pirState = LOW;
setLED( pirState );
}
}
}
// *********
void setLED( int state )
{
digitalWrite(ledPin, state);
}
// *********
void ColorFade() {
// LED Streifen anschalten
analogWrite(REDPIN, 255);
analogWrite(BLUEPIN, 255);
analogWrite(GREENPIN, 255);
delay(delayColorFade * 1000); // 15 Sekunden bleibt Licht per Default an bzw. solange, wie über den Blynk Slider eingestellt wurde
/* Fading ist ausgeschaltet
int r, g, b;
// fade from blue to violet
for (r = 0; r < 256; r++) {
analogWrite(REDPIN, r);
delay(FADESPEED);
}
// fade from violet to red
for (b = 255; b > 0; b--) {
analogWrite(BLUEPIN, b);
delay(FADESPEED);
}
// fade from red to yellow
for (g = 0; g < 256; g++) {
analogWrite(GREENPIN, g);
delay(FADESPEED);
}
// fade from yellow to green
for (r = 255; r > 0; r--) {
analogWrite(REDPIN, r);
delay(FADESPEED);
}
// fade from green to teal
for (b = 0; b < 256; b++) {
analogWrite(BLUEPIN, b);
delay(FADESPEED);
}
// fade from teal to blue
for (g = 255; g > 0; g--) {
analogWrite(GREENPIN, g);
delay(FADESPEED);
}
*/
// LED Streifen ausschalten
analogWrite(REDPIN, 0);
analogWrite(BLUEPIN, 0);
analogWrite(GREENPIN, 0);
}
Version 1.2
C/C++// Ingo Lohs, Version 1.2 - 19.10.2017 - works with Particle Photon v0.6.2
// myled-mosefet-blynk.ino
// https://www.hackster.io/ingo-lohs/mypir-sensor-activate-analog-rgb-stripe-controlled-by-photon-2e8240
// This #include statement was automatically added by the Particle IDE.
#include <blynk.h>
// Change von Version 1.1 > 1.2:
// Änderung der Default-RGB-Werte via zweites Zergba (zusätzliches Blynk-Widget) gebunden an V6, um dynamisch die Default-RGB-Werte abändern zu könnnen ohne erneut den Code flashen zu müssen
int inputPin = D0; // choose the input pin (for PIR sensor)
int ledPin = D1; // LED Pin
int pirState = LOW; // we start, assuming no motion detected
int val = 0; // variable for reading the pin status
int boardLed = D7; // photon onBoard LED
int calibrateTime = 10000; // wait for the thingy to calibrate
int light_threshold = 100; // brightness as analog value to decide its time for more light as analog value
int analogvalue; // Here we are declaring the integer variable analogvalue, which we will use later to store the value of the photoresistor.
int photoresistor = A0; // This is where your photoresistor is plugged in. The other side goes to the "power" pin (below).
int photopower = A1; // This is the other end of your photoresistor. The other side is plugged into the "photoresistor" pin (above).
// The reason we have plugged one side into an analog pin instead of to "power" is because we want a very steady voltage to be sent to the photoresistor.
// That way, when we read the value from the other side of the photoresistor, we can accurately calculate a voltage drop.
unsigned long lastmillis = 0; // time for iteration the loop
int red;
int green;
int blue;
#define REDPIN A5
#define GREENPIN WKP
#define BLUEPIN A4
// #define FADESPEED 5 // make this higher to slow down - used in function ColorFade as Option
int delayColorFade = 15; // presents the value in seconds
char auth[] = "<<your blync auth-code here>>";
// *********
BLYNK_WRITE(V4) // Blynk app WRITES Slider widget
{
light_threshold = param.asInt();
Serial.println("******************************");
Serial.print(light_threshold);
Serial.println(" analog value = new Threshold for Light");
Serial.println("******************************");
}
// *********
void update_light_threshold()
{
Blynk.virtualWrite(V3, light_threshold);
}
// *********
BLYNK_WRITE(V2) // Blynk app WRITES Slider widget
{
delayColorFade = param.asInt(); // macht aus den Blynk-Werten millisekunden
Serial.println("******************************");
Serial.print(delayColorFade);
Serial.println(" milli-sec = new Delay for Function ColorFade");
Serial.println("******************************");
}
// *********
void update_delayColorFade()
{
Blynk.virtualWrite(V1, delayColorFade);
}
// *********
BLYNK_WRITE(V0)
{
// The param can contain multiple values, in such case:
int red = param[0].asInt();
int green = param[1].asInt();
int blue = param[2].asInt();
analogWrite(REDPIN, red);
analogWrite(GREENPIN, green);
analogWrite(BLUEPIN, blue);
}
// *********
BLYNK_WRITE(V6)
{
// The param can contain multiple values, in such case:
red = param[0].asInt();
green = param[1].asInt();
blue = param[2].asInt();
}
// *********
void setup() {
Serial.begin(9600);
Blynk.begin(auth); // Start Blynk
pinMode(photoresistor,INPUT); // Our photoresistor pin is input (reading the photoresistor)
pinMode(photopower,OUTPUT); // The pin powering the photoresistor is output (sending out consistent power)
digitalWrite(photopower,HIGH); // Next, write one pin of the photoresistor to be the maximum possible, so that we can use this for power.
pinMode(REDPIN, OUTPUT);
pinMode(GREENPIN, OUTPUT);
pinMode(BLUEPIN, OUTPUT);
pinMode(boardLed,OUTPUT); // on-board LED
pinMode(ledPin, OUTPUT ); // control PIR LED
pinMode(inputPin, INPUT); // declare sensor as input
digitalWrite(boardLed,HIGH); // Now flash the D7 LED on and off
Particle.publish("PIR-Motion", "now online", PRIVATE); // informs user via Particle Cloud
digitalWrite(boardLed,LOW);
}
// *********
void loop() {
Blynk.run();
// if the sensor is calibrated
if (calibrated())
{
if ((millis() - lastmillis) > 1000) {
lastmillis = millis();
readTheSensor();
reportTheData();
update_delayColorFade();
update_light_threshold();
}
}
}
// *********
void readTheSensor() {
// check the PIR-Sensor
val = digitalRead(inputPin);
// check to see what the value of the photoresistor is and store it in the int variable analogvalue
analogvalue = analogRead(photoresistor);
Blynk.virtualWrite(V5, analogvalue);
}
// *********
bool calibrated() {
return millis() - calibrateTime > 0;
}
// *********
void reportTheData() {
// if the sensor reads high
// or there is now motion
if (val == HIGH) {
// the current state is no motion
// i.e. it's just changed
// announce this change by publishing an eent
if (pirState == LOW) {
// we have just turned on
Particle.publish("PIR Motion", "Motion detected", PRIVATE);
pirState = HIGH;
setLED( pirState );
if (analogvalue /*light*/ <= light_threshold) {
Particle.publish("PIR Motion", String(analogvalue), PRIVATE);
Particle.publish("PIR Motion", String(light_threshold), PRIVATE);
Particle.publish("PIR Motion", "LED Streifen an", PRIVATE);
ColorFade();
} else {
Particle.publish("PIR Motion", String(analogvalue), PRIVATE);
}
}
} else {
if (pirState == HIGH) {
// we have just turned of
// Update the current state
pirState = LOW;
setLED( pirState );
}
}
}
// *********
void setLED( int state )
{
digitalWrite(ledPin, state);
}
// *********
void ColorFade() {
// LED Streifen anschalten
analogWrite(REDPIN, red);
analogWrite(GREENPIN, green);
analogWrite(BLUEPIN, blue);
delay(delayColorFade * 1000); // 15 Sekunden bleibt Licht per Default an bzw. solange, wie über den Blynk Slider eingestellt wurde
/* Fading ist ausgeschaltet
int r, g, b;
// fade from blue to violet
for (r = 0; r < 256; r++) {
analogWrite(REDPIN, r);
delay(FADESPEED);
}
// fade from violet to red
for (b = 255; b > 0; b--) {
analogWrite(BLUEPIN, b);
delay(FADESPEED);
}
// fade from red to yellow
for (g = 0; g < 256; g++) {
analogWrite(GREENPIN, g);
delay(FADESPEED);
}
// fade from yellow to green
for (r = 255; r > 0; r--) {
analogWrite(REDPIN, r);
delay(FADESPEED);
}
// fade from green to teal
for (b = 0; b < 256; b++) {
analogWrite(BLUEPIN, b);
delay(FADESPEED);
}
// fade from teal to blue
for (g = 255; g > 0; g--) {
analogWrite(GREENPIN, g);
delay(FADESPEED);
}
*/
// LED Streifen ausschalten
analogWrite(REDPIN, 0);
analogWrite(BLUEPIN, 0);
analogWrite(GREENPIN, 0);
}


Comments