
Why an introduction, if there is already an introduction to the Pixy camera here at hackster.io? Thx to hackster-user Joe.
My introduction
- The differences between the products are listed.
- Shows the setup steps of the Pixy Camera version 2, which appeared recently on the market: both the accessories and the camera itself are not backwards compatible with the Pixy.
- The control by means of Arduino and Particle Photon are shown.
Pixy2 is
- smaller, faster and more capable than the original Pixy.
- Like its predecessor, Pixy2 can learn to detect objects that you teach it,just by pressing a button.
- Additionally, Pixy2 has new algorithms that detect and track lines for use with line-following robots. The new algorithms can detect intersections and “road signs” as well. The road signs can tell your robot what to do, such as turn left, turn right, slow down, etc.
- And Pixy2 does all of this at 60 frames-per-second, so your robot can be fast, too.
Source: https://pixycam.com
Are these reasons enough to continue reading?
What do you get?You get small cardboard boxes in smartphone width with everything that is needed: this of course includes the camera itself, MicroUSB cable (you can exchange it for another, but be careful not to lose power in length: the stepper motors will otherwise be compromised), fixing screws if you have not ordered the Pan/Tilt Kit and also a broadband cable to dock it on an Arduino.
Already now I advise you to order the not quite cheap Pan/Tilt-Kit, because the 2 DoF-mode (Degree of Freedom) further motion options by using 2 servo-motors in your projects. Here are in addition to the 2 motors, fixation materials and prefabricated templates with holes to find.
With the note "Go Here!" You will be directed to the setup routine: www.pixycam.com/start
Prepare yourself and your environmentReserve an evening and a beer: do not drink the beer at the beginning, but stay cool. On the one hand, the firmware is constantly evolving and you should import an update to it and in the case of the Pan / Tilt Kit your dexterity is still needed.If the set runs after assembly, then you also need a colored object: the straw-colored beer is the perfect choice.
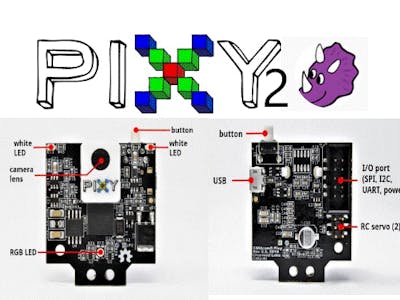
Pixy2 has 2 additional lights, so that a use in the dark is possible.
Very bright LEDs:
For teaching, as much light as possible is recommended. A readjustment is possible via the "Settings" via Pixymon. This is especially necessary if you want to try the use with laser light.
Setup process - Pixy v2 onlyFollow www.pixycam.com/start and choose your Desktop OS: Install Pixymon.
I used MacOS for the setup and recommend to extend the security settings so that applications outside of the app store can be installed by unknown developers (check your Security-Options). Otherwise there are problems with the firmware update with the access rights. Here you can manage yourself with a complete firmware download, which is then flashed via Pixymon import to the ROM of the camera.
Check section Pixy2 firmware.
The camera should be recognized by Pixymon and output a picture of your environment. Otherwise you have forum and support available.
Pixymon's Windows 10 installation process went smoothly: just the installation of Charmlabs' USB driver needed to be confirmed.
Setup process - Pan/Tilt kitIt took me just over an hour to follow the illustrated English instructions for mounting the Pan / Tilt Kit. Ok, I had to translate some things first and document them for myself, but 30 minutes are certainly necessary even for experienced hands.
Contrary to the recommendation, I first put together the kit and then trained an object (my beer). The order is basically irrelevant, but you have a previous success with the camera, unless you have a kit.
Training the camThe reason to use Pixy in the project goes beyond the simple taking of an image: with its algorithms, Pixy is able to be "trained" on color codes (CCs). Sounds difficult, but it is not: with the help of the single button the training mode is activated and terminated. While Pixy "recognizes" an object (you see many small pixels within the Pixymon program) you can learn the object by repeatedly pressing the buttons. Even after a PowerOff, the values are saved and Pixy is ready to use.
The field of application demonstrates this video and the diverse projects.
Instead of the beer, I have decided to change the example: with the help of small figures from the game "Halma" the detection effect is better illustrated. On picture one you recognize that a green figure is too far in the background and only in the next picture has slipped into the focus of detection:
Pixy2 should detect this piece in the background, if you tried adjusting the Signature Tuning sliders in PixyMon: https://docs.pixycam.com/wiki/doku.php?id=wiki:v2:some_tips_on_generating_color_signatures_2
I am in the stage to upload the Arduino-Libraries to the Particle Builder. At the moment I can't upload: https://community.particle.io/t/cant-upload-a-new-library/44951
Update 09.11.2018: You will find the published Library "Camera_Pixy2".
PIN-Definitions for SPI to the photon via 10 PINs IDC Pixy2 cable to 6 PINs ICSP Arduino translation:
- VIN : MISO = A4 > cable red colored line
- MOSI = A5 : SCK = A3 > cable grey colored line
- GND : (RST - nothing) > cable grey colored line
Particle-User can use this Example.
The import into the Arduino IDE is simple: Download the Lib-package and ZIP the files. Via Import you make examples and library available.
Here same sample screenshots from the examples with serial-monitor output:
A servo test example is also available:
In the video both power cables are recognizable: for the Arduino, as well as MicroUSB for Pixy2. This is not necessary, but one of them is enough. For the image output at the Pixymon, however, the Pixy2 is to be supplied with power.
FAQ1. Pixy2 and/or Pixymon is not downwards compatible - why? Can the user use a earlier version from Pixymon with Pixy2?
> Pixy2 is not downwards compatible with Pixy because we made significant changes between versions. This way, the user can continue to use original Pixy and Pixy2 side by side.
2. Is there a bundle from Pixy2 + Pan/Tilt-Kit available?
> We might consider offering a discount on both items, thanks for the suggestion.
3. Why can I not be addressed directly by Mac via USB Pixy2, for inclusion in FaceTime or photo booth or Skype applications? Why is pixymon absolutely necessary?
> Pixy is not designed to be used as a webcam. It is for robotics applications. It does not have a standard USB HID interface for this reason.
4. Are the two Pan/Tilt Ground-Workpeaces available for download as STL files for my own 3D printing?
- Not from Pixycam.com, but 4 products at the moment at Thingiverse from other users available (11/2018)
Have you already equipped your own robot or the Robot Car Kit v3 by Elegoo with the Pixy2?
Pixycam.com will offer a Christmas deal through there Amazon stores, it will just show up on the product page: https://www.amazon.de/Charmed-Pixy2-Vision-Sensor-Objektverfolgungskamera/dp/B07D1CLYD2/


Comments