
Hardware components | ||||||
 |
| × | 1 | |||
| × | 1 | ||||
| × | 1 | ||||
| × | 1 | ||||
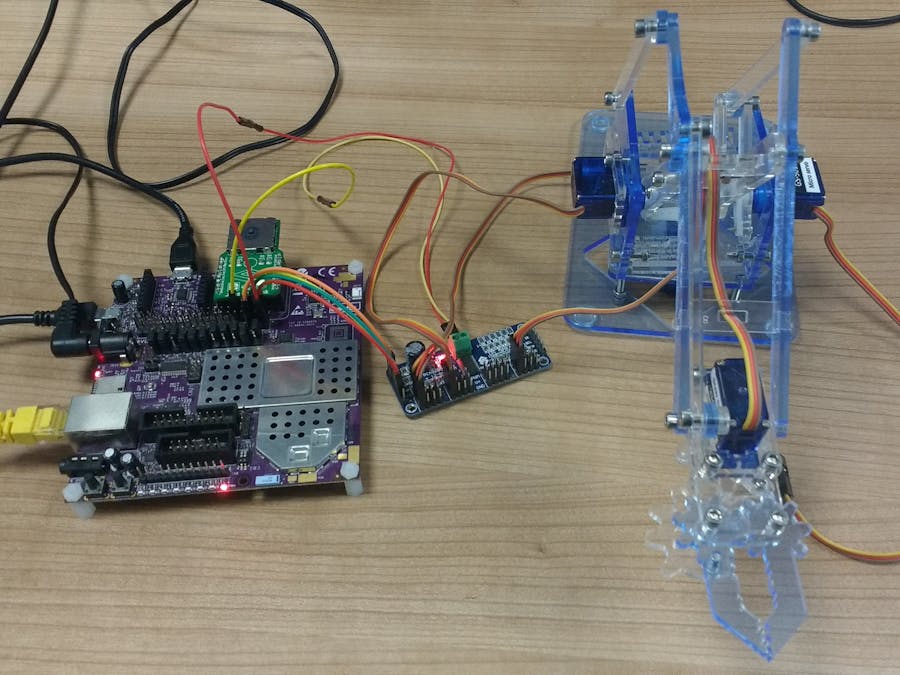
The aim of the project is to control the servos used in the MeArm robotic arm using the Creator Ci40 and a joystick click connected to a 6LoWPAN clicker.
Running the robot arm using the joystick click locally on the boardIntroduction
The aim of this section is to control the robot arm using the joystick click when the joystick click is connected directly to the board.
Instructions
The first step is to connect the Creator Ci40 to a power source, a computer over USB, a USB drive containing openwrt from which to boot and the network via Ethernet. To connect to the board over serial:
$ ls /dev/ttyU*
/dev/ttyUSB[x]
Will appear if the device is plugged in:
sudo miniterm.py /dev/ttyUSB
[x] -b 115200
Press enter: # run usbboot
openwrt will now boot. After new timestamps stop appearing, press enter. The openwrt logo should be displayed, along with a terminal to issue commands on the Creator Ci40.
If there are any problems booting, first try pressing the reset button on the board. You will then need to press any key to prevent automatic rebooting before the run usbboot command.
The next step is to compile the code:
- Follow the instructions found in the
LetMeCreate Readmeto integrate the library withopenwrt.
- To transfer the files to a USB:
df
- The USB appears as
/dev/sdbx. If necessary, unplug the USB and rundfagain to see which device disappears
umount /dev/sdb[x]
sudo mkfs.ext4 /dev/sdb[x]
This formats the USB as ext4 format, which is used by the CreatorBoard. Check if the USB is empty. If not, re-enter these commands: sudo nautilus.
This opens a root file explorer. Copy the contents of /path/to/openwrt/bin/pistachio/openwrt-pistachio-marduk-marduk-cc2520-rootfs to the root folder of the USB sync.
Now, download the files in the servo_control repository:
$ git clone https://github.com/MatthewRFennell/servo_control.git
(Note: alternatively, you may download the zip file)
Follow the instructions found in the Readme to move the server files to the correct location, update the make list and compile the code.
Now you must copy the compiled program to the Creator Ci40 - this is done using scp to copy the files over the network:
On the board, run ifconfig to get the IP address to transfer the files to.
Now, on the computer:
scp/path/to/openwrt/bin/pistachio/packages/custom/letmecreate_0.1_pistachio.ipk root@IP ADDRESS:~/
(Note: change the IP address and path to the openwrt folder as required)
If required, type yes to transfer the files to the board.
Now that the updated LetMeCreate package is on the board, it needs to be installed:
opkg install ~/letmecreate_0.1_pistachio.ipk
- The robot arm program should now be found in
/usr/bin/letmecreate_examples/
Now the code is installed on the board, the next step is to connect the shield to the board to allow for communication between the Creator Ci40 and the servos. Writing to the servos is done using the I2C protocol, and the Raspberry Pi interface on the Creator Ci40 is used for communication between the shield and board. 4 pins are required for communication between the shield and the board:
- A 3V supply to allow for communication between the board and servos: Pin 1 -> VCC
- I2c data transmission: Pin 3 -> SDA
- I2c clock: Pin 5 -> SCL
- Ground: Pin 6 -> GND
This information is also found on page 18 of the Creator Ci40 hardware guide (https://imagination-technologies-cloudfront-assets.s3.amazonaws.com/documentation/ci40/Ci40%20Hardware%20User%20Guide%20v2.pdf)
The next step is to supply power to the servos:
- Pin 2 -> V+
- Pin 9 -> GND
(Note that these V+ and GND pins are on the long side of the shield, not the left or right edge.)
Now you can attach the servos themselves to the board as shown. This is done with the brown wire closest to the edge of the board.
- Left/Right -> Pin 0
- Forward/Backward -> Pin 4
- Claw -> Pin 12
Also connect the joystick click to the second MIKROBUS port on the Creator Ci40 (the Raspberry Pi interface to control the robotic arm is written through the first port)
Now you are ready to run the program. On the Creator Ci40:
# /usr/bin/letmecreate_examples/letmecreate_test_robot_arm
Moving the joystick will move the robotic arm. Pressing the buttons on the board will open and close the claw.
Running the robot arm using the joystick click with a clickerIntroduction
The aim of this section is to control the robot arm using the joystick click when the joystick click is connected to a 6LoWPAN clicker.
Instructions
Compiling, transferring and running the server code is much the same as the local code in section 1, and details can also be found in the servo_control repository.
Now you must copy the compiled program to the Creator Ci40 - this is done using scp to copy the files over the network:
- On the board, run
ifconfigto get the IP address to transfer the files to.
- Now, on the computer:
scp/path/to/openwrt/bin/pistachio/packages/custom/letmecreate_0.1_pistachio.ipk root@IP ADDRESS:~/(Note: change the IP address and path to theopenwrtfolder as required)
- If required, type yes to transfer the files to the board.
Now that the updated LetMeCreate package is on the board, it needs to be installed:
opkg install ~/letmecreate_0.1_pistachio.ipk
- The robot_arm_server program should now be found in
/usr/bin/letmecreate_examples/
Note: running the server program at this point will do nothing.
Now that the server code is up and running, the next step is to compile the client code:
A PICkit 3 is used to program the clicker. As such, the MPLAB X IPE and IDE need to be installed using the instructions at the following links:
Now clone the LetMeCreateIOT library:
Inside LetMeCreateIOT/examples, create a new folder named robot_arm.
From the https://github.com/MatthewRFennell/servo_control.git repository, copy the Makefile and main.c files in clicker/client into the LetMeCreateIOT/examples/robot_arm folder.
Follow the setup instructions for installation and update at the LetMeCreateIOT repository: https://github.com/mtusnio/LetMeCreateIoT/
Now you can compile the client code and run it on the clicker:
LetMeCreateIOT/examples/robot_arm$ make
Plug the PICkit 3 Microchip into the USB port of the computer, and connect the PICkit 3 Microchip to the clicker using the pins on the side with the label “PICkit”. Ensure that the arrow in the PICkit is lined up to the “RST”.
Select the device model (eg. PIC32MX470F512H) and press Apply. The Tool box should now fill. Now click Connect to connect to the clicker.
Now browse to the correct folder with the source code in it (LetMeCreateIOT/examples/robot_arm_client). Select the main.hex file. In Settings, enable advanced mode. In the Power tab, enable “Power Circuit from Tool”.
Click Program.
Now run the server program on the Creator Ci40:
/usr/bin/letmecreate_examples#
/letmecreate_test_robot_arm_server
Moving the joystick will move the robot arm, and pressing the left hand button will toggle the claw being open and closed.
Running a robot arm with a WebappInstall Git and Node.js on the board:
# Opkg install git
# Opkg install node
# Opkg install gcc
Clone the repository somewhere on the board:
# Git clone
servo_control/webapp# make
servo_control/webapp# npm install
Run ifconfig to find the IP address of the board:
servo_control/webapp# npm start
Now, with another device on the same network, open a web browser to access the webpage:


Comments