

Hardware components | ||||||
 |
| × | 1 | |||
| × | 2 | ||||
_ztBMuBhMHo.jpg?auto=compress%2Cformat&w=48&h=48&fit=fill&bg=ffffff) |
| × | 1 | |||
Hand tools and fabrication machines | ||||||
 |
| |||||
The Project:
I started the project with sketches to build my acrylic body. I chose acrylic as my front axle relies on a relatively frictionless material to rotate freely. As such, I could afford to use a microservo to control this rotation, as the torque applied far surpassed what was necessary for the system.
The body:
Actually creating the body was kind of meticulous, as I have a lot of small pieces and supports for larger pieces.
The body is held together with acrylic glue. The front axle is a rectangular piece with a circle cut in the middle, which acts as the pivot point. That circle piece I then glued in place on the body, so that the axle had a point of rotation. To keep the axle on, I glued a larger piece of acrylic to that circle piece.
I added supports running up the length of the car body to minimize deflection from the load being placed on top of the car.
The axle also has a gear attached to it, which I will activate using a smaller gear and a servo. The crucial piece of knowledge for this design to function was making the gear attached have a radius coming from the point of rotation. I almost overlooked that, thanks to Chris for pointing it out.
This gear was controlled by a microservo, which in turn was controlled by a potentiometer. This was controlled by the "knob" starter code, which I put directly in my DC motor control code.
In the middle of the body I left room for the Arduino, and I made vertical supports so that the Arduino can be placed in and not slide in any direction. There is also a small piece clamping the Arduino to the body, so that the wires don't pull it up and out of position.
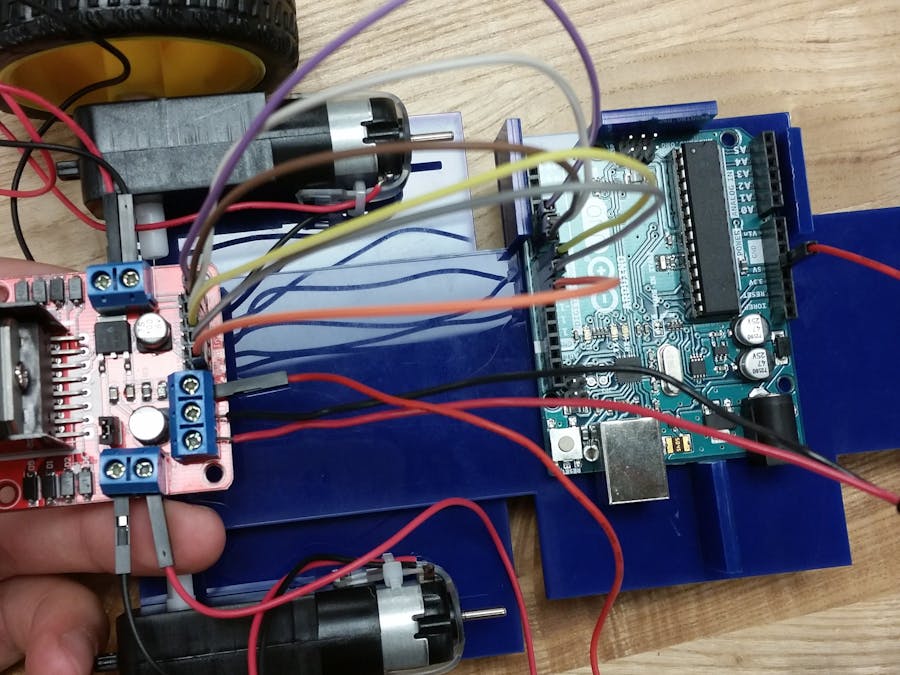
Behind the Arduino is where I placed the battery pack, the L298 H bridge, and both DC motors. I used double sided tape to hold these components down, as it is just strong enough to keep them where I want them to stay, but not strong enough to make the parts immovable. I put the H bridge on top of the battery pack (convenient for wiring purposes), and held it on with a small bit of double sided tape (for the same reason).
The Wiring:
Each DC motor is attached to the 4 out pins of the L298. A battery is attached to VCC, the Arduino power is attached to the 5V input, and the ground is wired to the breadboard (and then to the Arduino ground). There are six female pins on the H bridge, connected from pins 5-10 on the Arduino to enA, in1, in2, in3, in4, and enB, respectively.
The Arduino power is first wired to the breadboard to be split by the components (and then wired to the H bridge from there). The microservo receives this power, and is also connected to D3. The potentiometer is connected to 5V, the ground channel, and to A0 so the computer can interpret its position.
The grounds of every component are wired together on the breadboard, which is finally wired to the Arduino's ground.
Problems I experienced:
The largest issue I am currently dealing with is what seems like a voltage drop on the DC motors when I connect and run code involving the potentiometer as well. When I run just code to control the motors and wired the board accordingly (not including the potentiometer), the motors work perfectly. When I simply add the "Knob" example code to this motor code and wire the potentiometer and servo as described above, the speed of the DC motors drops severely. One of them doesn't even turn on sometimes.
EDIT:
The car works wonderfully! I experienced an issue with the H bridge, as two output pins weren't providing voltage, so I connected the two motors in series momentarily. This obviously cause a voltage drop across the two motors. I did, however, manage to temporarily get a voltage out of the two previously "broken" outputs on the H bridge, so I can bring the motors back to their separate output pins for full voltage across both the motors.

Comments