

Hardware components | ||||||
_ztBMuBhMHo.jpg?auto=compress%2Cformat&w=48&h=48&fit=fill&bg=ffffff) |
| × | 1 | |||
 |
| × | 1 | |||
 |
| × | 1 | |||
 |
| × | 3 | |||
 |
| × | 1 | |||
 |
| × | 1 | |||
| × | 1 | ||||
 |
| × | 1 | |||
 |
| × | 3 | |||
Software apps and online services | ||||||
 |
| |||||
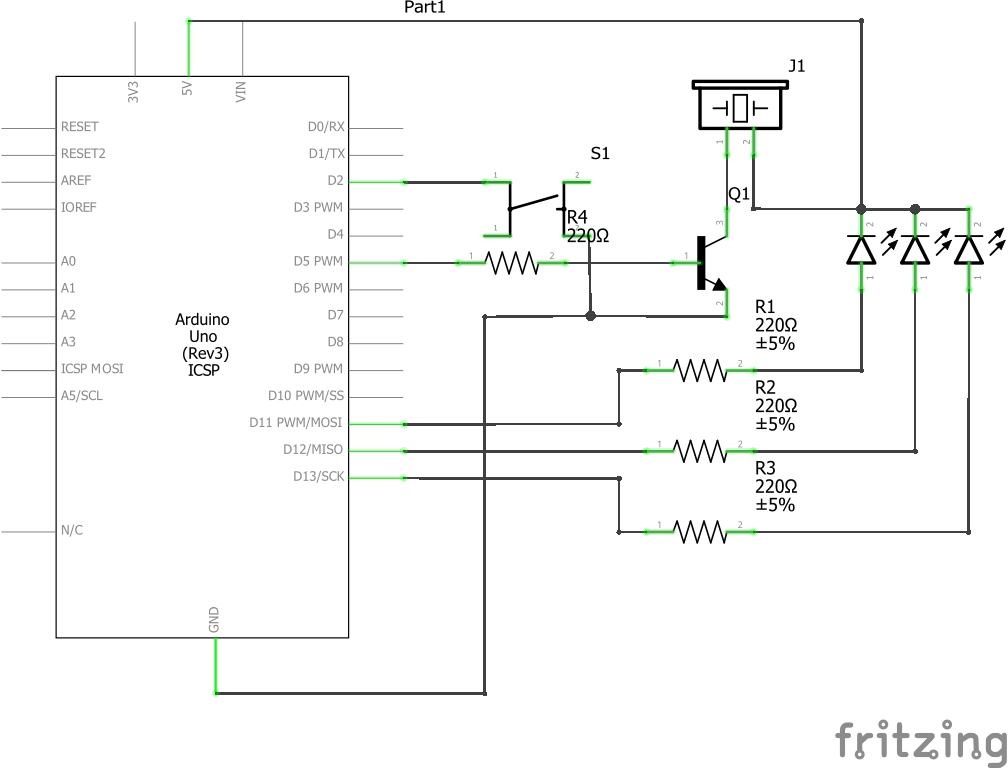
I was in need of an Hour timer that could be started and stopped with a press of a button. When I got to building and coding it I thought that I could do more than a simple hour timer. I cobbled together a timer that has a range from 1 minute to an hour and a half and still only uses 1 button to control it.
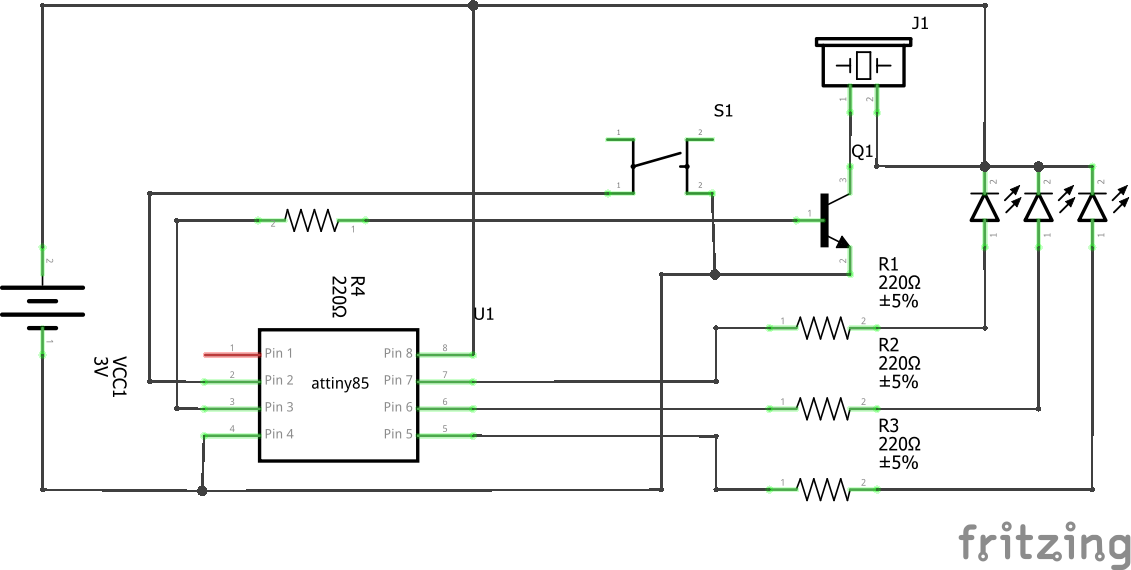
I didn’t want to use an Arduino for the final product but still prototyped it on the Arduino. I used an ATTINY85 for the final product.
Parts Required- 3 x 220 OHM resistors
- 1 x 10k Resistor
- 1 x NPN Transistor
- 3 x LED's
- A Piezo Buzzer
- A Button
- Some Jumper Wires
- A breadboard and
- An Arduino
I've used a lot defines to make the program more readable. The “defines’ don't use any memory other than the actual value itself.
I have also used preprocessor directives so I can use the same sketch on an Arduino and the ATTiny85.
// LOTS OF DEFINES TO KEEP THINGS EASY TO READ AND SAVE SPACE
#define DEVICE ARDUINO      // ARDUINO or ATTINY85
#define COMMON_PIN_ANODE 1  // 1 = Common Anode; 0 = Common Cathode
#define ATTINY85 1
#define ARDUINO 0
#define SWITCH_OFF_LENGTH 3
#if DEVICE
//ATTINY85 INCLUDES & DEFINES
#include <avr/sleep.h>
#include <avr/interrupt.h>
 #define LED1   0
 #define LED2   1
 #define LED3   2
 #define BUTTON 3
 #define BUZZER 4
#else
 #define LED1   11
 #define LED2   12
 #define LED3   13
 #define BUTTON 2
 #define BUZZER 6
#endif
// PROGRAM STATES
#define CHOOSETIMER 1
#define COUNTDOWN   2
#define BUZZ        3
// BUTTON STATES
#define NO_PRESS 0
#define SHORT_PRESS 1
#define LONG_PRESS 2
#define OFF_PRESS 3
The times array holds the seconds that can be selected for the countdown. Feel free to change these to the times you would use most often. Mine are set to 1 min, 5 min, 15 min, 30 min, 45min, 1 hour and 1 hour 30 mins.
 // VARIABLES WOOP!
unsigned long timer = 0;
byte MODE = 2;
byte cdMenu = 1;
int countDown = 45;
int times[] = {0,   60,   300,    900,    1800,   2700,   3600,   5400};
The function Sleep will:
- Beep 3 times when switching off,
- Twice when switching on.
- It will put the ATTINY85 into low power mode or
- Emulate the way the ATTINY will sleep when prototyping on the Arduino.
There are 2 sleep functions, one for the arduino and one for the AtTiny85
#if DEVICE
void sleep () {                         // with compliments of https://bigdanzblog.wordpress.com/2014/08/10/attiny85-wake-from-sleep-on-pin-state-change-code-example/
 delay(500);                           // BUTTON DEBOUNCE (LONG)
 beep(); delay(200);
 beep(); delay(200);
 beep();
 countDown = times[cdMenu];            // RESET TIMER READY FOR WHEN YOU COME BACK FROM SLEEPING
 MODE = COUNTDOWN;                     // GETTING READY FOR WHEN YOU COME BACK FROM SLEEPING
 GIMSK |= _BV(PCIE);                   // Enable Pin Change Interrupts
 PCMSK |= _BV(BUTTON);                 // Use PB3 as interrupt pin
 ADCSRA &= ~_BV(ADEN);                 // ADC off
 set_sleep_mode(SLEEP_MODE_PWR_DOWN);  // replaces above statement
 sleep_enable();                       // Sets the Sleep Enable bit in the MCUCR Register (SE BIT)
 sei();                                // Enable interrupts
 sleep_cpu();                          // sleep
 cli();                                // Disable interrupts
 PCMSK &= ~_BV(BUTTON);                // Turn off PB3 as interrupt pin
 sleep_disable();                      // Clear SE bit
 ADCSRA |= _BV(ADEN);                  // ADC on
 sei();                                // Enable interrupts
 beep(); delay(200);
 beep();
}
ISR(PCINT0_vect) {}
#else
void sleep () {
 delay(500); // BUTTON DEBOUNCE (LONG)
 beep(); delay(200);
 beep(); delay(200);
 beep();
 countDown = times[cdMenu];  // RESET TIMER READY FOR WHEN YOU COME BACK FROM SLEEPING
 MODE = COUNTDOWN;           // GETTING READY FOR WHEN YOU COME BACK FROM SLEEPING
 // EMULATES THE SLEEPING WHEN USING THE ARDUIN (IT SAVES NO POWER)
 while (digitalRead(BUTTON));
 beep(); delay(200);
 beep();
}
#endif
The beep function beeps.
// SELF EXPLANATORY
void beep() {
 digitalWrite(BUZZER, HIGH);
 delay(30);
 digitalWrite(BUZZER, LOW);
}
The “clearDisplay”, “displayTime” and “displayCountDownTime” functions control the 3 LED's on or off states.
I've also included preprocessor directives in these functions to easily choose between whether I’m using common anode or common cathode for the LED's.
// SETS ALL LED's PINS TO LOW OR HIGH DEPENDING ON THE LED's COMMON PIN CONNECTION
void clearDisplay() {
 byte leds = 0;
#if COMMON_PIN_ANODE
 digitalWrite(LED1, !bitRead(leds, 0));
 digitalWrite(LED2, !bitRead(leds, 1));
 digitalWrite(LED3, !bitRead(leds, 2));
#else
 digitalWrite(LED1, bitRead(leds, 0));
 digitalWrite(LED2, bitRead(leds, 1));
 digitalWrite(LED3, bitRead(leds, 2));
#endif
}
// SHOW THE TIME SELECTED
void displayTime() {
 int leds = 0;
 // GET THE INDEX IN THE ARRAY FROM THE countDown VALUE
 for (int t = 0; t < 8; t++) {
   if (countDown >= times[t]) {
     leds = t;
   }
 }
#if COMMON_PIN_ANODE
 digitalWrite(LED1, !bitRead(leds, 0));
 digitalWrite(LED2, !bitRead(leds, 1));
 digitalWrite(LED3, !bitRead(leds, 2));
#else
 digitalWrite(LED1, bitRead(leds, 0));
 digitalWrite(LED2, bitRead(leds, 1));
 digitalWrite(LED3, bitRead(leds, 2));
#endif
}
// SHOW THE CURRENT COUNT DOWN (ROUNDED UP)
void displayCountDownTime() {
 int leds = 0;
 for (int t = 0; t < 8; t++) {
   if (countDown >= times[t]) {
     leds = t + 1;
   }
 }
#if COMMON_PIN_ANODE
 digitalWrite(LED1, !bitRead(leds, 0));
 digitalWrite(LED2, !bitRead(leds, 1));
 digitalWrite(LED3, !bitRead(leds, 2));
#else
 digitalWrite(LED1, bitRead(leds, 0));
 digitalWrite(LED2, bitRead(leds, 1));
 digitalWrite(LED3, bitRead(leds, 2));
#endif
}
The “buttonCheck” function is called on every loop of the Loop function:
- Checks if the button is pressed,
- how long it is pressed and
- returns whether it was pressed quickly, long or extremely long.
This function is the interface between the code and the real world. It plays a huge function in the program and it took a long time to make it feel just right.
 // FINDS OUT THE BUTTON STATES
byte buttonCheck() {
 clearDisplay();
 int butLength = NO_PRESS;
 int mybut = digitalRead(BUTTON);
 if (!mybut) {
   // START TIMING
   unsigned long timerButton = millis() / 10;
   beep();
   // LOOP HERE WHILE THE BUTTON IS DOWN CONTINUING TO TIME
   while (!mybut) {
     mybut = digitalRead(BUTTON);
     // BLINK RANDOMLY WHEN THE TIMER VALUE IS LONGER THAN THE SET VALUE FOR THE SWITCH OFF
     if ((millis() / 10 - timerButton) > (SWITCH_OFF_LENGTH * 100)) {
       digitalWrite(LED1, bitRead(millis() / 100, 0));
       digitalWrite(LED2, bitRead(millis() / 100, 1));
       digitalWrite(LED3, bitRead(millis() / 100, 2));
     }
   }
   clearDisplay();
   // DECIDE WHAT TO RETURN DEPENDING ON HOW LONG THE BUTTON WAS HELD IN
   if ((millis() / 10 - timerButton) > 75) {
     butLength = LONG_PRESS;
   } else {
     butLength = SHORT_PRESS;
   }
   if ((millis() / 10 - timerButton) > (SWITCH_OFF_LENGTH * 100)) {
     butLength = OFF_PRESS;
   }
   delay(50);                    // SORT OF DEBOUNCING THE BUTTON PRESS
 }
 return butLength;
}
I set up the pins in the SETUP function
void setup() {
 pinMode(LED1, OUTPUT);
 pinMode(LED2, OUTPUT);
 pinMode(LED3, OUTPUT);
 pinMode(BUZZER, OUTPUT);
 pinMode(BUTTON, INPUT_PULLUP);
 timer = (millis() / 100);
 clearDisplay();
}
In the Loop function
I check the button state then decide what mode the program should go into. Either choosing the timer value, counting down or switching off. It’s a bit all over the place but it works. When the program has counted down to 0 it buzzes.
void loop() {
 int button = buttonCheck();
 switch (button) {
   case LONG_PRESS:
     // CYCLE THROUGH THE MODES
     MODE++;
     if (MODE >= BUZZ) {
       MODE = CHOOSETIMER;
     }
     break;
   case OFF_PRESS:
     sleep();
     button = NO_PRESS;                 // FORCE THE BUTTON TO NO_PRESS (I CAN'T REMEMBER WHY THOUGH)
     break;
 }
 switch (MODE) {
   case CHOOSETIMER:
     countDown = times[cdMenu];          // SET THE COUNT DOWN TIME FROM THE ARRAY OF TIMES
     if (button == SHORT_PRESS) {        // CYCLE TIMES
       cdMenu++;
       if (cdMenu == 8) {
         cdMenu = 1; // skip 0 value in the array
       }
       countDown = times[cdMenu];
     }
     displayTime();
     break;
   case COUNTDOWN:
     //EVERY SECCOND FLASH YOUR REMAINING TIME (ROUNDING UP) AND COUNT DOWN
     if (((millis() / 100) - timer) >= 10) {
       timer = (millis() / 100);
       displayCountDownTime();
       delay(50);
       clearDisplay();
       countDown--;
     }
     // WHEN THE COUNTDOWN IS UP BUZZ!!!!!
     if (countDown <= 0) {
       MODE = BUZZ;
     }
     break;
   case BUZZ:
     // BUZZ!
     digitalWrite(BUZZER, HIGH);
     // FLASH!
     digitalWrite(LED1, bitRead(millis() / 100, 0));
     digitalWrite(LED2, bitRead(millis() / 100, 1));
     digitalWrite(LED3, bitRead(millis() / 100, 2));
     // SWITCH OFF WHEN THE BUTON IS PRESSED
     if (button == SHORT_PRESS) {
       digitalWrite(BUZZER, LOW);
       clearDisplay();
       sleep();
       button = NO_PRESS;                 // FORCE THE BUTTON TO NO_PRESS (I CAN'T REMEMBER WHY THOUGH)
     }
     break;
 }
}
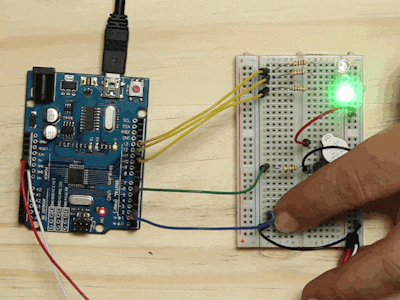
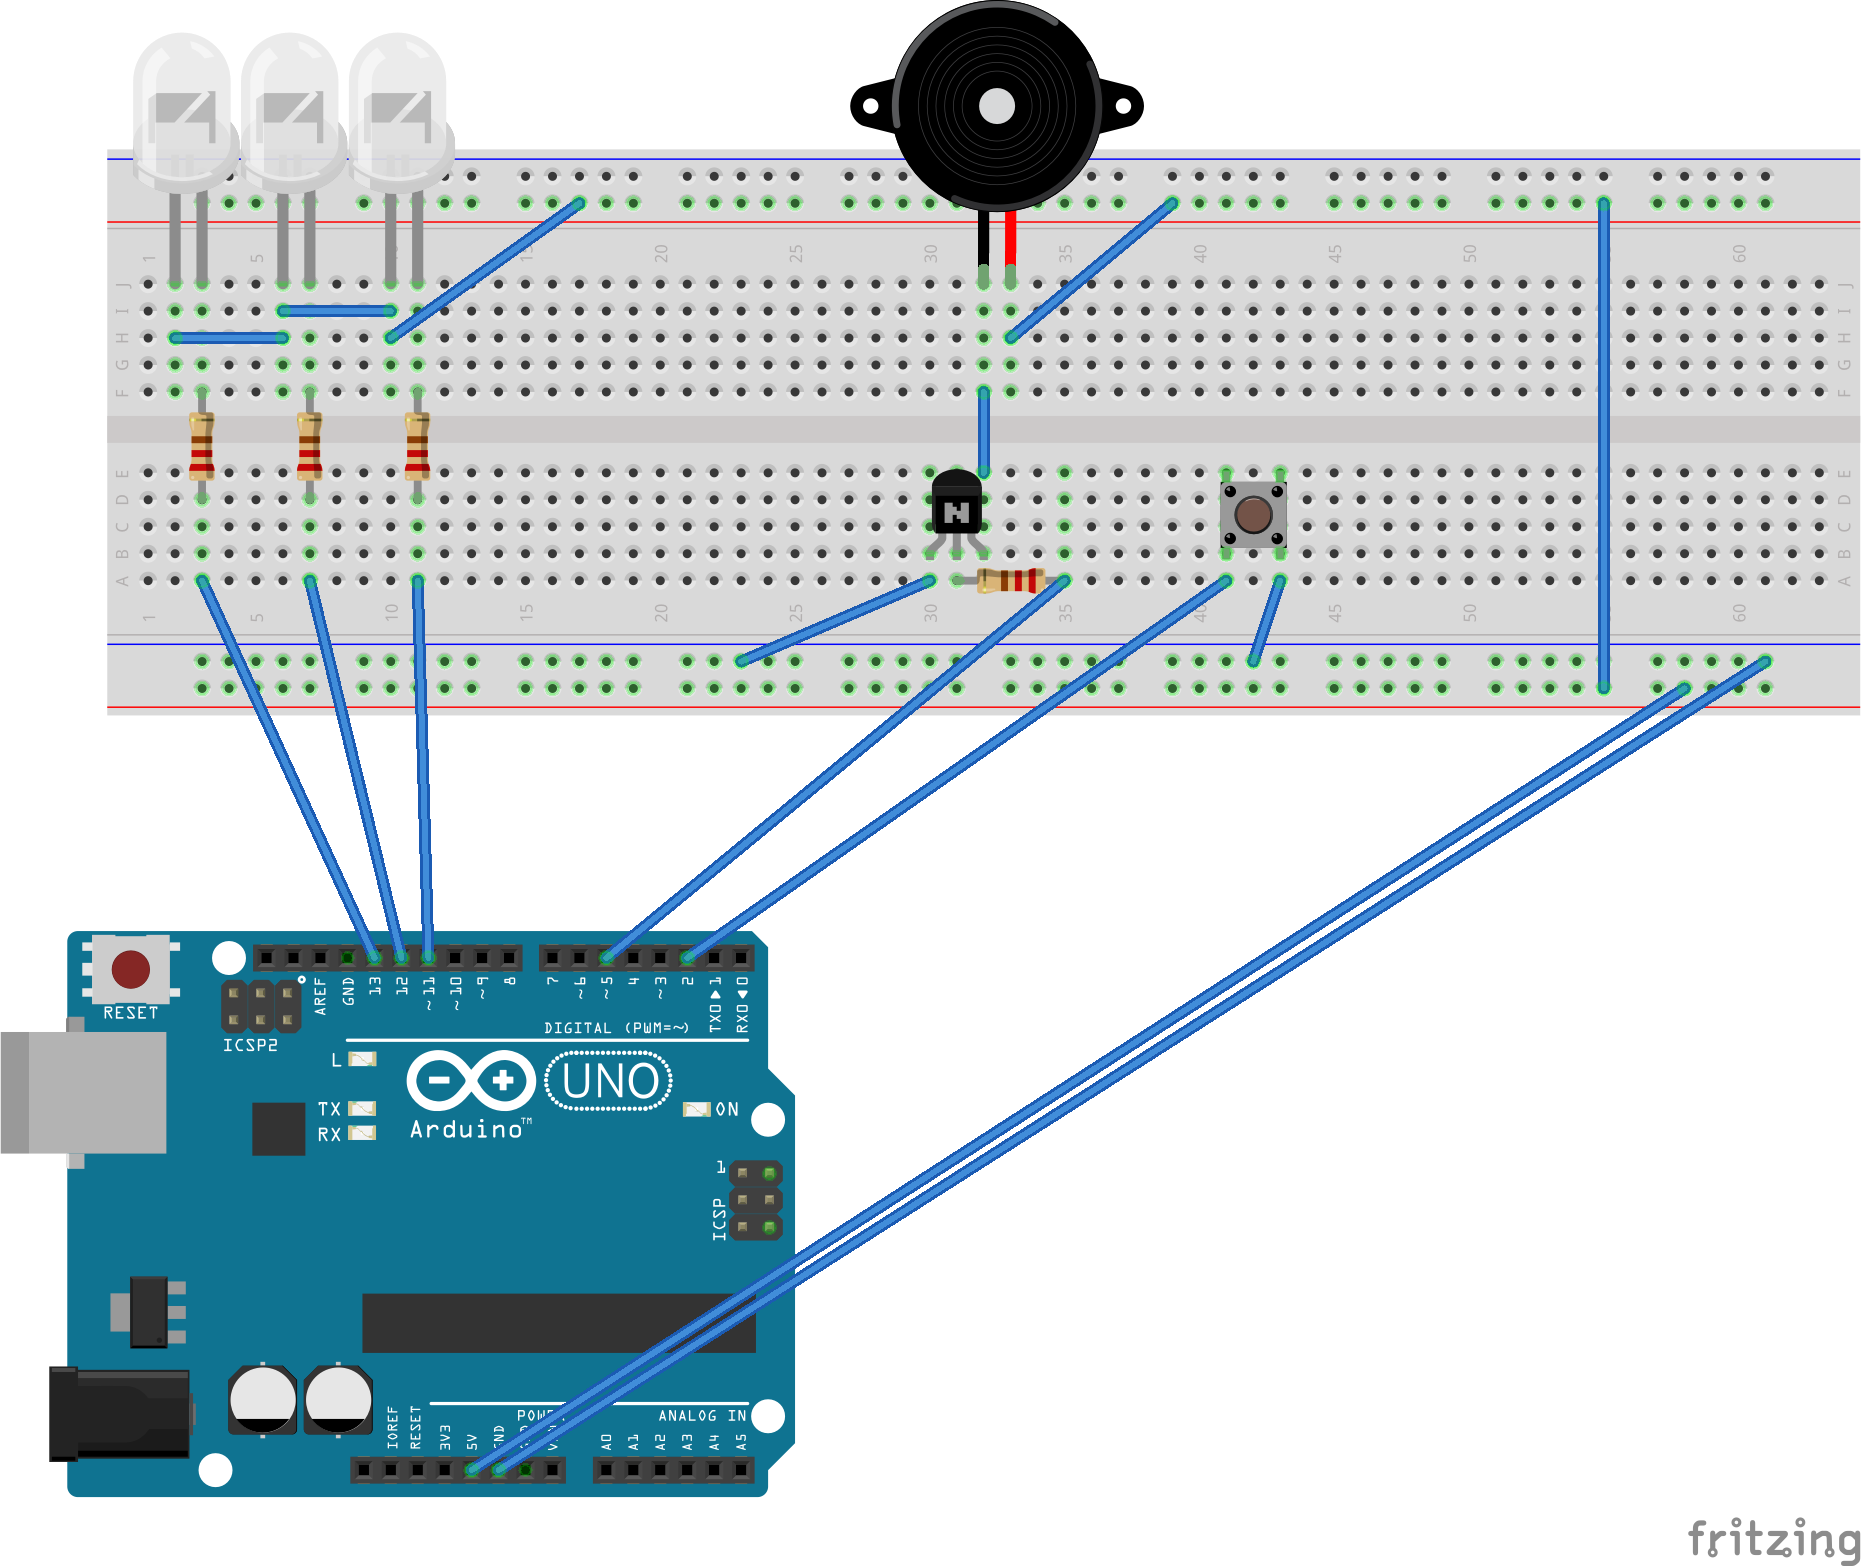
- Connect the 5v to the Positive rail and the ground to the ground rail
- Grab the 3 LED's and connect the anodes to a positive rail and the cathodes to 3 separate terminal strips
- Place resistors between the led's and another 3 terminal strips
- Connect the LED RESISTOR pair to pins 2, 3 and 4
- Place the transistor onto the breadboard
- Place the buzzer between the collector and the positive rail using a jumper wire
- Connect the resistor to the base of the transistor and another terminal strip then to pin 5 of the arduino
- Connect the emitter of the transistor to the ground rail
I'm using a transistor on the buzzer because I have no idea what my buzzer's power consumption is and I don't want to draw too much power from one pin of the arduino.
- Place the button between 2 terminal strips,
- One end of the button goes to pin 6 of the Arduino and
- The other end goes to the ground rail.
When I first power it up the led flashes, this indicates that the timer it is counting down.
- If I hold the button in for more than 75 milliseconds, at least one of the LED's will be on. This means that I can choose the time I need.
- If I give the button a short press he LED's change. The LED's are a 3 digit binary number (1 through to 7 and they correspond to the times array).
- I can select the time I want to countdown by giving the button a long press. This will make the timer start counting down.
- Once the countdown is complete the buzzer will ring, until you press the button. It will then switch off.
- If I tap the button when in "sleep mode" it starts counting down from the start of last selected time.
- If I want to turn it off at any time, I hold the button down for an extremely long time and once the led's flash and I release the button, it will then turn off.
Unless you can read binary the colors make using the timer 100 times easier.
When you use a red, green and blue led covered by a diffuser, you suddenly have 7 colours corresponding to the times in the times array.
Here I also changed the circuit to a common cathode and changed the code accordingly.


Comments