


Hardware components | ||||||
 |
| × | 1 | |||
 |
| × | 1 | |||
 |
| × | 1 | |||
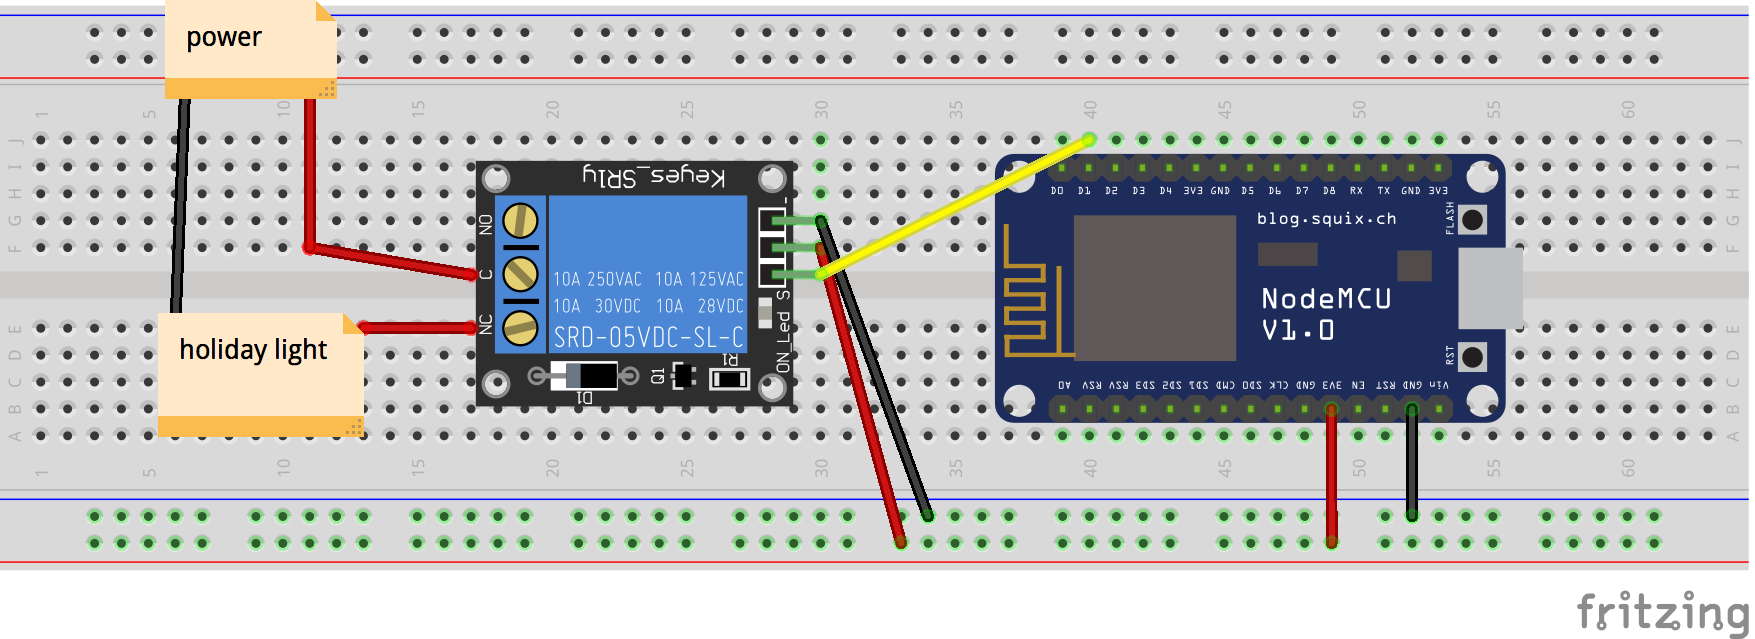
In this project, I will show you how to use Alexa to send commands to NodeMCU, which usually can be used as an entry point or smart plug to drive other home appliance, such as Christmas lights. The following diagram illustrates the over all designs and protocols used.
Let’s setup things backwards: the benefit of doing so is that we can verify each step works before adding another indirection. For example, we should first hook up NodeMCU to a replay and some lights in order to make sure setting the GPIO on HIGH and LOW will turn on and off the light correctly. This means we have the wiring correctly connecting the NodeMCU to the relay and the lights.
Issuing the following Lua commands to NodeMCU will make sure the wiring of relay and lights are OK.
gpio.mode(1, gpio.OUTPUT);
gpio.write(1, gpio.HIGH);
Next, I will use a free MQTT service called CloudMQTT to subscribe and publish message. In this stage, I will make NodeMCU subscribe to CloudMQTT. In order to make sure the connection between NodeMCU and CloudMQTT is configured correctly, I will use a local Javascript as a publisher to test publishing a message; additionally, I will use another Javascript as a subscriber to make sure message indeed notified from the CloudMQTT. The diagram below explains the flow of the work.
First, we establish the communication between two JavaScript clients to make sure the publisher is working as expected. The following JavaScript client will publish to a topic “string light” after connection is made, it will publish either “on” or “off”.
var mqtt = require('mqtt');
var Promise = require('promise');
var mqttpromise = new Promise( function(resolve,reject){
   var mqtt_url = 'm13.cloudmqtt.com';
   var client = mqtt.connect({port:13938,host:mqtt_url,username:"userName",password:"pw"});
   client.on('connect', function() { // When connected
	// publish a message to a topic
	client.publish('string_light', 'on', function() {   // either 'on' or 'off'
	    console.log("Message is published");
	    client.end();
	    resolve('Done Sending');
	});
   });
}) ;
mqttpromise.then(function(result){
 //Do anything after
})
The following JavaScript client will remain connected to the MQTT service and prints out the message once it receives any. It is used to run locally to test the publisher first.
var mqtt = require('mqtt');
var Promise = require('promise');
var mqttpromise = new Promise( function(resolve,reject){
   var mqtt_url = 'm13.cloudmqtt.com';
   var client = mqtt.connect({port:13938,host:mqtt_url,username:"useName",password:"pw"});
   client.subscribe('string_light', function() {
   client.on('message', function(topic, message, packet) {
	console.log("Received '" + message + "' on '" + topic + "'");
   });
 });
}) ;
mqttpromise.then(function(result){
 //Do anything after
})
Over the command line, first start the listener:
> node mqtt_string_light_subscriber.js
In another terminal, start the publisher:
> node mqtt_string_light_publisher.js
> Message is published
Now we should observe the message printed on the subscriber’s terminal:
Received 'on' on 'string_light'
Now we can trust our publisher and MQTT service, then we can program the NodeMCU to subscribe to the service. The following code automatically connects to the WiFi and CloudMqtt and subscribes to the same topic “string\_light”, and if the incoming message is “on”, it will switch the relay on, otherwise switch the relay off.
------------------------
---- controls relay ----
------------------------
function setPort(data)
  if ( string.find(data,"on")~=nil ) then
     gpio.write(1, gpio.HIGH);
  else
     gpio.write(1, gpio.LOW);
  end
end
-------------------------
---- setup wifi ---------
-------------------------
function setupWifi()
    wifi.setmode(wifi.STATION)
    wifi.sta.config("NETGEAR75","wifipw")
        wifi.sta.connect();
         wifi.sta.setip({ip="192.168.1.11",netmask="255.255.255.0",gateway="192.168.1.1"})
    tmr.alarm(1, 1000, 1, function()
         if wifi.sta.getip()== nil then
           print("IP unavaiable, Waiting...")
         else
           tmr.stop(1)
               print("ESP8266 mode is: " .. wifi.getmode())
               print("The module MAC address is: " .. wifi.ap.getmac())
               print("Config done, IP is "..wifi.sta.getip())
              end
          end)
end
-----------------------
------  main ----------
-----------------------
setupWifi();
gpio.mode(0, gpio.OUTPUT);    -- Use D0 as indicator of status
gpio.write(0, gpio.LOW);
gpio.mode(1, gpio.OUTPUT);    -- Use D1 to control the relay
gpio.write(1, gpio.LOW);
---------- mqtt setup -----------
--- CloudMQTT Server info ------
m1 = mqtt.Client("myid", 1200, "userName", "pw");
--- D0 as indicator light ------
m1:on("offline", function(con)
	 print ("offline")
	 gpio.write(0,gpio.LOW)
end)
m1:on("message", function(conn, topic, data)
 print(topic .. ":" )
 if data ~= nil then
   print(data);
   setPort(data);
 end
end)
m1:connect("m13.cloudmqtt.com", 13938, 0,
          function(client)
	      print("connected")
	      m1:subscribe("string_light",0,
			   function(client)
			      print("subscribed")
			      gpio.write(0,gpio.HIGH)
	      end)
	   end,
          function(client, reason) print("failed reason: "..reason) end);
If it starts the publisher again, we should see the light is switched on:
> node mqtt_string_light_publisher.js
> Message is published
Lambda is a service to do micro-task on AWS, and it can be triggered by Alexa, which is a voice-activated user interface. The goal of this project is to use voice to turn the holiday light on. First, create a new Lambda function and use blank as the blue print.
Then, use Alexa skills as the Lambda trigger:
The deployment model of Lambda is to allow the user to pack all the dependencies and upload them as a zip file and deploy in AWS container.
The packaging up of your own code’s dependencies really opens the door of the Lambda, so that it can do basically whatever you want. For example, we want our Javascript code to have the capability of sending MQTT message, therefore we need a MQTT package in our code. No problem! Just do ‘npm install mqtt’, and zip the node\_modules along with your index.js
.
Here is the index.js I deployed on AWS Lambda. It’s modified from an Alexa template combined with MQTT publishing in the lines after “slotvalue”. It passes the slot value, either “on” or anything else, to the CloudMQTT service.
var mqtt = require('mqtt');
var APP_ID = undefined;
var AlexaSkill = require('./AlexaSkill');
var NodeSkill = function () {
   AlexaSkill.call(this, APP_ID);
};
// Extend AlexaSkill
NodeSkill.prototype = Object.create(AlexaSkill.prototype);
NodeSkill.prototype.constructor = NodeSkill;
NodeSkill.prototype.eventHandlers.onSessionStarted = function (sessionStartedRequest, session) {
   console.log("NodeSkill onSessionStarted requestId: " + sessionStartedRequest.requestId
       + ", sessionId: " + session.sessionId);
};
//-------->This is invoked by invocation word
NodeSkill.prototype.eventHandlers.onLaunch = function (launchRequest, session, response) {
   console.log("NodeSkill onLaunch requestId: " + launchRequest.requestId + ", sessionId: " + session.sessionId);
   var speechOutput = "Welcome";
   var repromptText = "I am ready";
   response.ask(speechOutput, repromptText);
};
NodeSkill.prototype.eventHandlers.onSessionEnded = function (sessionEndedRequest, session) {
   console.log("NodeSkill onSessionEnded requestId: " + sessionEndedRequest.requestId
       + ", sessionId: " + session.sessionId);
};
NodeSkill.prototype.intentHandlers = {
   // register custom intent handlers
   "NodeStateIntent": function (intent, session, response) {
       var slot = intent.slots.light;
       var slotValue = slot ? slot.value : "";
       if(slotValue) {
           //-----> publish to cloud mqtt
	    var mqttpromise = new Promise( function(resolve,reject){
		var mqtt_url = 'm13.cloudmqtt.com';
		var client = mqtt.connect({port:13938,host:mqtt_url,username:"userName",password:"pw"});
		client.on('connect', function() { // When connected
		    // publish a message to a topic
		    client.publish('string_light', slotValue, function() {
			console.log("Message is published");
			client.end();
			resolve('Done Sending');
		    });
		});
	    }) ;
         mqttpromise.then(
           function(data) {
             console.log('Function called succesfully:', data);
             var speechOutput = "The light is now " + slotValue;
             response.tellWithCard(speechOutput, "Node Light", speechOutput);
           }, function(err) {
             console.log('An error occurred:', err);
           });
       }
       else {
         response.tell("Sorry, I didn't catch what you saidXX");
       }
   },
   "AMAZON.HelpIntent": function (intent, session, response) {
       var speechOutput = "You can ask me to turn light on or off.";
       response.ask(speechOutput);
   }
};
// Create the handler that responds to the Alexa Request.
exports.handler = function (event, context) {
   // Create an instance of the NodeSkill skill.
   var nodeSkill = new NodeSkill();
   nodeSkill.execute(event, context);
};
AlexaSkill.js: this is just a boiler plate code.
'use strict';
function AlexaSkill(appId) {
   this._appId = appId;
}
AlexaSkill.speechOutputType = {
   PLAIN_TEXT: 'PlainText',
   SSML: 'SSML'
}
AlexaSkill.prototype.requestHandlers = {
   LaunchRequest: function (event, context, response) {
       this.eventHandlers.onLaunch.call(this, event.request, event.session, response);
   },
   IntentRequest: function (event, context, response) {
       this.eventHandlers.onIntent.call(this, event.request, event.session, response);
   },
   SessionEndedRequest: function (event, context) {
       this.eventHandlers.onSessionEnded(event.request, event.session);
       context.succeed();
   }
};
/**
* Override any of the eventHandlers as needed
*/
AlexaSkill.prototype.eventHandlers = {
   /**
    * Called when the session starts.
    * Subclasses could have overriden this function to open any necessary resources.
    */
   onSessionStarted: function (sessionStartedRequest, session) {
   },
   /**
    * Called when the user invokes the skill without specifying what they want.
    * The subclass must override this function and provide feedback to the user.
    */
   onLaunch: function (launchRequest, session, response) {
       throw "onLaunch should be overriden by subclass";
   },
   /**
    * Called when the user specifies an intent.
    */
   onIntent: function (intentRequest, session, response) {
       var intent = intentRequest.intent,
           intentName = intentRequest.intent.name,
           intentHandler = this.intentHandlers[intentName];
       if (intentHandler) {
           console.log('dispatch intent = ' + intentName);
           intentHandler.call(this, intent, session, response);
       } else {
           throw 'Unsupported intent = ' + intentName;
       }
   },
   /**
    * Called when the user ends the session.
    * Subclasses could have overriden this function to close any open resources.
    */
   onSessionEnded: function (sessionEndedRequest, session) {
   }
};
/**
* Subclasses should override the intentHandlers with the functions to handle specific intents.
*/
AlexaSkill.prototype.intentHandlers = {};
AlexaSkill.prototype.execute = function (event, context) {
   try {
       console.log("session applicationId: " + event.session.application.applicationId);
       // Validate that this request originated from authorized source.
       if (this._appId && event.session.application.applicationId !== this._appId) {
           console.log("The applicationIds don't match : " + event.session.application.applicationId + " and "
               + this._appId);
           throw "Invalid applicationId";
       }
       if (!event.session.attributes) {
           event.session.attributes = {};
       }
       if (event.session.new) {
           this.eventHandlers.onSessionStarted(event.request, event.session);
       }
       // Route the request to the proper handler which may have been overriden.
       var requestHandler = this.requestHandlers[event.request.type];
       requestHandler.call(this, event, context, new Response(context, event.session));
   } catch (e) {
       console.log("Unexpected exception " + e);
       context.fail(e);
   }
};
var Response = function (context, session) {
   this._context = context;
   this._session = session;
};
function createSpeechObject(optionsParam) {
   if (optionsParam && optionsParam.type === 'SSML') {
       return {
           type: optionsParam.type,
           ssml: optionsParam.speech
       };
   } else {
       return {
           type: optionsParam.type || 'PlainText',
           text: optionsParam.speech || optionsParam
       }
   }
}
Response.prototype = (function () {
   var buildSpeechletResponse = function (options) {
       var alexaResponse = {
           outputSpeech: createSpeechObject(options.output),
           shouldEndSession: options.shouldEndSession
       };
       if (options.reprompt) {
           alexaResponse.reprompt = {
               outputSpeech: createSpeechObject(options.reprompt)
           };
       }
       if (options.cardTitle && options.cardContent) {
           alexaResponse.card = {
               type: "Simple",
               title: options.cardTitle,
               content: options.cardContent
           };
       }
       var returnResult = {
               version: '1.0',
               response: alexaResponse
       };
       if (options.session && options.session.attributes) {
           returnResult.sessionAttributes = options.session.attributes;
       }
       return returnResult;
   };
   return {
       tell: function (speechOutput) {
           this._context.succeed(buildSpeechletResponse({
               session: this._session,
               output: speechOutput,
               shouldEndSession: true
           }));
       },
       tellWithCard: function (speechOutput, cardTitle, cardContent) {
           this._context.succeed(buildSpeechletResponse({
               session: this._session,
               output: speechOutput,
               cardTitle: cardTitle,
               cardContent: cardContent,
               shouldEndSession: true
           }));
       },
       ask: function (speechOutput, repromptSpeech) {
           this._context.succeed(buildSpeechletResponse({
               session: this._session,
               output: speechOutput,
               reprompt: repromptSpeech,
               shouldEndSession: false
           }));
       },
       askWithCard: function (speechOutput, repromptSpeech, cardTitle, cardContent) {
           this._context.succeed(buildSpeechletResponse({
               session: this._session,
               output: speechOutput,
               reprompt: repromptSpeech,
               cardTitle: cardTitle,
               cardContent: cardContent,
               shouldEndSession: false
           }));
       }
   };
})();
module.exports = AlexaSkill;
Now we have Lambda all the way to the holiday lights set up. This part will also need to be tested to verify that all the hooks are connected before moving to the Alexa configuration. Fortunately, AWS offers user some template XML to simulate the data that Alexa will be passing onto the Lambda. Here is the sample XML.
Here is the test data modified from a template test data. Notice that each XML key is mapped to the variable within the Javascript.
{
 "session": {
   "new": false,
   "sessionId": "amzn1.echo-api.session.[unique-value-here]",
   "attributes": {},
   "user": {
     "userId": "amzn1.ask.account.[unique-value-here]"
   },
   "application": {
     "applicationId": "amzn1.ask.skill.[unique-value-here]"
   }
 },
 "version": "1.0",
 "request": {
   "locale": "en-US",
   "timestamp": "2016-10-27T21:06:28Z",
   "type": "IntentRequest",
   "requestId": "amzn1.echo-api.request.[unique-value-here]",
   "intent": {
     "slots": {
       "light": {
         "name": "light",
         "value": "on"
       }
     },
     "name": "NodeStateIntent"
   }
 },
 "context": {
   "AudioPlayer": {
     "playerActivity": "IDLE"
   },
   "System": {
     "device": {
       "supportedInterfaces": {
         "AudioPlayer": {}
       }
     },
     "application": {
       "applicationId": "amzn1.ask.skill.[unique-value-here]"
     },
     "user": {
       "userId": "amzn1.ask.account.[unique-value-here]"
     }
   }
 }
If we change the value of intent.slots.value, it should be able to control the light in real time. That’s the indication that the Lambda is working fine so that we can move to the Alexa part.
First log into Amazon Developer Portal, I guess one will probably have to register at the developer porter using the same name that used when shopping at Amazon, so that the Alexa purchased will be able to pick up the skills that the same account creates. (but I never tested otherwise).
Here are the setps to connect the Alexa to the Lambda:
Choose an interaction word that is unique and easy to say and hear:
Interaction model is the core of Alexa configuration:
Intent Schema:
{
 "intents": [
   {
     "intent": "ParticleStateIntent",
     "slots": [
       {
         "name": "light",
         "type": "LIST_OF_STATES"
       }
     ]
   },
   {
     "intent": "AMAZON.HelpIntent"
   }
 ]
}
LIST_OF_STATE:
on
off
Sample Utterances:
NodeStateIntent light {light}
Then configuration with Lambda:
If it does not have a physical device, you can test the voice UI over web browser:
Finally, enable the skills at your alexa.amazon.com
There are lots of tight coupling between the Alexa and Lambda and here is what is happening in-between. When everything is hooked up, user says “Alexa holiday light” and ” light on”. “Holiday light” is the invocation word that will trigger this skill set. "Light XXX" will be the sample utterance that points the execution path to the NodeStateIntent and will further parse out the slot value, which is on, and will send all these information to the Lambda.


Comments