


Hardware components | ||||||
 |
| × | 1 | |||
| × | 1 | ||||
 |
| × | 6 | |||
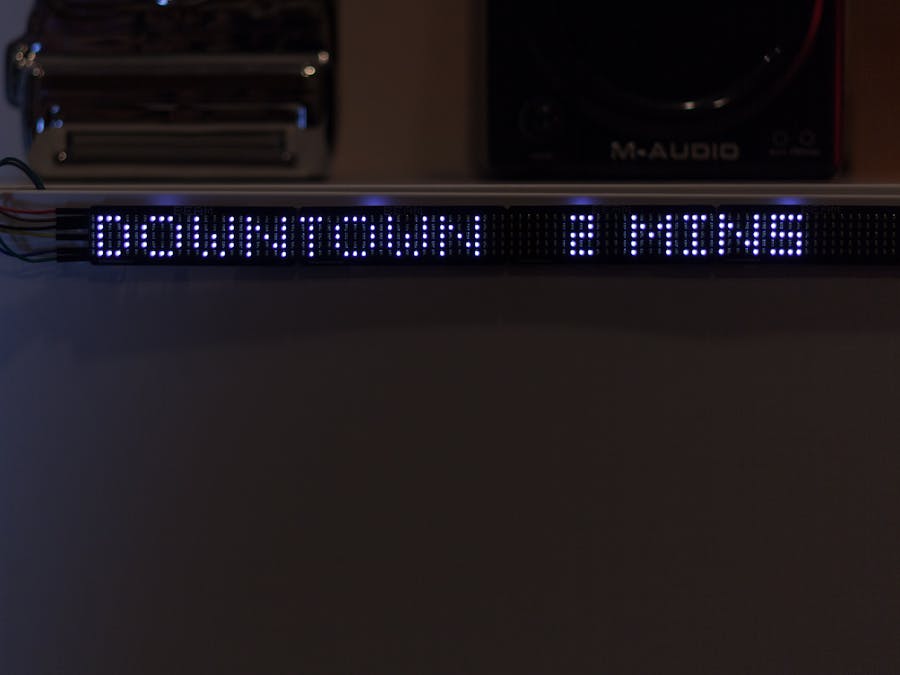
We're going to build a scrolling LED display for bus schedules with Beam! You may have seen one of these at your subway station or bus stop. You can build one for the home to help you know exactly how much time you have left -- especially if you tend to hit the snooze alarm in the morning like us! Let's get started.
What is Beam?Beam is a beautiful LED matrix — 120 LEDs that displays scrolling text, animations, or custom lighting effects. Beam can be used to build a connected notification center or bike light with your own animations. It's compatible with Arduino, Particle and more.
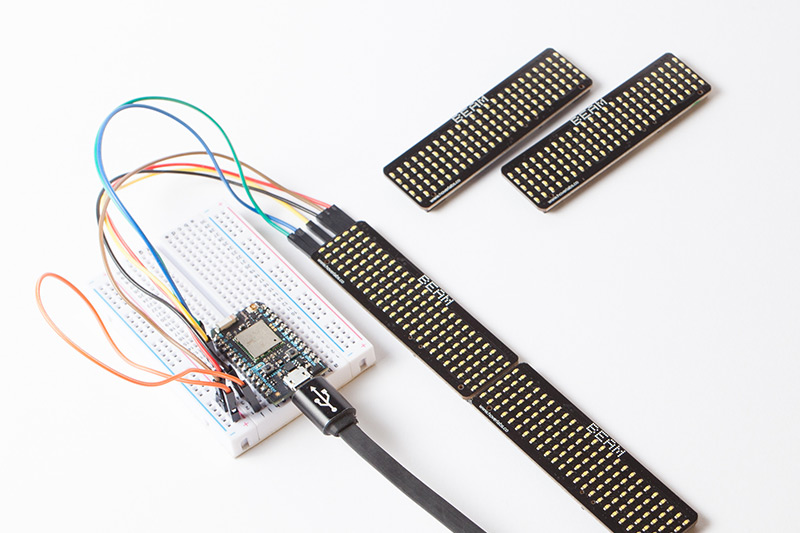
Beams can be daisy chained easily— up to four Beams in a row. Go from a single 5 x 24 grid to a 5 x 96 grid of480 LEDs. Dual side connectors lets you easily snap together beams without any soldering.
Beam aims to take the fuss away from complicated LED grids and messy libraries. It's very simple to display scrolling text with just a single line. With just a few lines of code, you can build an IFTTT connected notification center, a ticker tape, a bike light and more.
It's ultra-slim display for any project. Simply plug in wires into the side connectors and you're ready to go. No breadboard required. The super-bright LEDs can shine through any translucent material. Upgrade your projects from basic seven-segment displays and take them to the next level.
On the backside of the Beam PCB, there are two female connectors on each end. Both connectors are identical and either one can be used to connect to the your host microcontroller.
HOST_V+: Connect to either 5V or 3.3V depending on your microcontroller. For example, if using the Arduino UNO, this pin should be tied to 5V since it is a 5V platform. The Particle Photon is a 3.3V platform, so this pin should be tied to 3.3V instead.
3.3V: Connect to the 3.3V pin on your host microcontroller
GND: Connect to ground pin.
SYNC: No need to connect this pin to your microcontroller. It's used when chaining multiple Beams in a row.
RESET: Connect to any Digital pin on your microcontroller.
IRQ: Not used at the moment. Leave unconnected.
SCL: Connect to SCL pin on your microcontroller
SDA: Connect to SDA pin on your microcontroller.
For this example, we're using the Translink Open API that's available for Vancouver. Go to https://developer.translink.ca/ and sign up for a free account. Your city probably will probably have their own API - a popular one for the US is NextBus.
The easiest way is to use Google Maps. In this example, we searched from MEC Vancouver to BC Place. When you display the details of the Bus Directions, the bus stop ID will show up underneath the Bus Number and Route. In this case, the bus stop ID is 50482.
In the Particle CLI, register your webhook with the following code.
particle webhook GET bus_info "http://api.translink.ca/rttiapi/v1/stops/59837/estimates?apikey=AAAAAAAAAAAAAAAAAA&count=1&routeNo=003"
Make sure to replace the apikey in the string above with the one you received after signing up for the API.
Click on the image to the right for more details. For more info on webhooks, click here: Particle Webhooks.
Download the library and navigate to the /examples/transit folder.
A few notes on the code:
The following subscribe method registers a callback called gotBusData to our webhook.
Particle.subscribe("hook-response/bus_info", gotBusData, MY_DEVICES);
In the gotBusData callback function, we try to extract the relevant info and print the string to Beam.
void gotBusData(const char *name, const char *data) {
   String str = String(data);
   String leaveStr = tryExtractString(str, "<ExpectedLeaveTime>", "</ExpectedLeaveTime>");
   String destinationStr = tryExtractString(str, "<Destination>", "</Destination>");
   String countdownStr = tryExtractString(str, "<ExpectedCountdown>", "</ExpectedCountdown>");
   String routeStr = tryExtractString(str, "<RouteNo>", "</RouteNo>");
   if (routeStr != NULL) {
       Serial.println("Route No: " + routeStr);
   }
   if (destinationStr != NULL) {
       Serial.println("Going to: " + destinationStr);
   }
   if (countdownStr != NULL) {
       Serial.println("Leaving in: " + countdownStr + String("Mins"));
   }
   if (routeStr !=NULL){
       String beamString =String(routeStr + " " + destinationStr + " " + coun    tdownStr + " MINS");
       beamString.toUpperCase();
       Serial.println(beamString);
       char buf[1024];
       beamString.toCharArray(buf, 1024);
       b.begin();
       b.print(buf);
       b.setSpeed(5);
       b.play();
   }
}
The core of the Beam library is in the following calls to print text to Beam.
b.begin();
b.print(buf);
b.setSpeed(5);
b.play();
Finally, we call the publish method in our main loop every 60 seconds. This is to ensure we don't reach our limit for the daily API calls allowed.
Particle.publish("bus_info");
delay(30000);
Before you hit upload, here are a few things to watch out for.
- If using one Beam, set the slider switch on the back to setting 'A'.
- Note the #define BEAMCOUNT at the top of the main .ino file. This should be set to the number of Beams you're using. We recommend setting it to 1 and testing with a single Beam before trying the other examples.
- To daisy chain more beams: going from left to right, make sure the slider switch is set to 'A' for the first Beam, then 'B' for the second Beam, and so on. So of you're using a total of four Beams, then the switch setting should be A, B, C, D from left to right.
- Make sure the RSTPIN is set to the correct digital pin.
Now hit upload and you should see text and animations appear on Beam. Depending on the i2c speed supported by your microcontroller, it could take a few seconds to finish updating all the registers. Open the serial monitor and you should see a few debug messages being logged.


Comments