


Hardware components | ||||||
 |
| × | 1 | |||
 |
| × | 1 | |||
 |
| × | 1 | |||
 |
| × | 1 | |||
I just received two Next Thing C.H.I.Ps. The C.H.I.P is a single-board computer, similar to the BeagleBone Black and Raspberry Pi but has a starting price of only $9.00. If you would like to do robotics or other DIY projects and you are on a budget, the C.H.I.P may be the controller that you are looking for.
The C.H.I.P is loaded with features like built in WiFi B/G/N, Bluetooth 4.0, 1GHz processor and 4GB storage. The C.H.I.P is also an open hardware platform and you can get information about the hardware on the Next Thing Co hardware github page.
Obviously the first thing I wanted to do once I received the C.H.I.Ps was to get Swift installed on it. This post will walk you though how I setup the C.H.I.P and how I installed Swift. I will end this post by writing a Swift application that will turn an LED on and off.
Flashing the C.H.I.PThe first thing I needed to do upon received the C.H.I.Ps was to flash them. This is done by going to the C.H.I.P flasher page and following the instructions. One note: You will need to use the Chrome browser since the flasher is a chrome app. I put the 4.4 headless version on one of the C.H.I.Ps and the 4.4 GUI version on the other. Once flashing is complete I needed to configure the wireless network adapters on both of the C.H.I.Ps.
Configuring the NetworkThis is pretty easy to do with the C.H.I.P that has the HDMI adapter plugged into it (the one that I put the GUI version of the OS on) because I could simply plug in a USB keyboard/touchpad and connect it to a HDMI monitor. I use the Logitech K400 but the K400+ should also work but I have not tested it.
For the headless C.H.I.P, where I could not plug it into the HDMI monitor (only have one HDMI adapter) I ended up connecting though the USB port. To do this I connected the C.H.I.P to the USB port on my laptop and gave it a minute or so to boot up. I then connected to the C.H.I.P using the “sudo cu -l /dev/tty.usbmodem1423 -s 115200 “ command from a terminal prompt on my Mac. For Linux machines you can use “sudo screen /dev/ttyACM0” command to log into the C.H.I.P. To log onto the C.H.I.P I used the default root/chip username/password.
Once I logged into the C.H.I.P, I used the nmtui utility to set the wireless network. This is a very easy to use command line utility that will run in a terminal window.
Installing SwiftNow that I had the C.H.I.P setup and on my wireless network Icould begin installing Swift. I startedoff by updating any software that was installed on my C.H.I.P. To do this I used the following two commands:
apt-get update
apt-get upgrade
Next I needed to setup a couple different repositories to pull packages from. I did this with the following commands:
echo "deb [arch=armhf] http://repos.rcn-ee.com/debian/ jessiemain" |
sudo tee –append /etc/apt/sources.list
apt-get update
apt-get install rcn-ee-archive-keyring
wget -qO- http://dev.iachieved.it/iachievedit.gpg.key | sudoapt-key add –
echo "deb [arch=armhf]http://iachievedit-repos.s3.amazonaws.com/ trusty main" | sudo tee--append /etc/apt/sources.list
Now I am able to install the dependencies for Swift. This is done with the following commands:
apt-getupdate
apt-getinstall libicu-dev
apt-getinstall clang-3.6
apt-getinstall libpython2.7
update-alternatives--install /usr/bin/clang clang /usr/bin/clang-3.6 100
update-alternatives --install /usr/bin/clang++clang++ /usr/bin/clang++-3.6 100
Finally, I am able to install Swift with this command:
apt-get install swift-2.2
At this point we should have a working copy of Swift installed on our system. This is the 2.2 version of Swift. I put instructions on how to get Swift 3 at the bottom of this post.
Testing the Swift installationTo test that Swift is installed correct, you can issue the following command:
Swift --version
It should return something like this:
Swift version 2.2-dev (LLVM 3ebdbb2c7e,Clang f66c5bb67b, Swift 1bf4643998)
Target: armv7-unknown-linux-gnueabihf
For an additional test we can try compiling a file. Create a file named “main.swift” and put thefollowing line of code in it:
print(“Hello World”)
Save this file and then run the following command to compile it.
swiftc main.swift
This should produce an executable file named main. We can run it with the following command:
./main
If all is well you should see the message “Hello World”printed to the console.
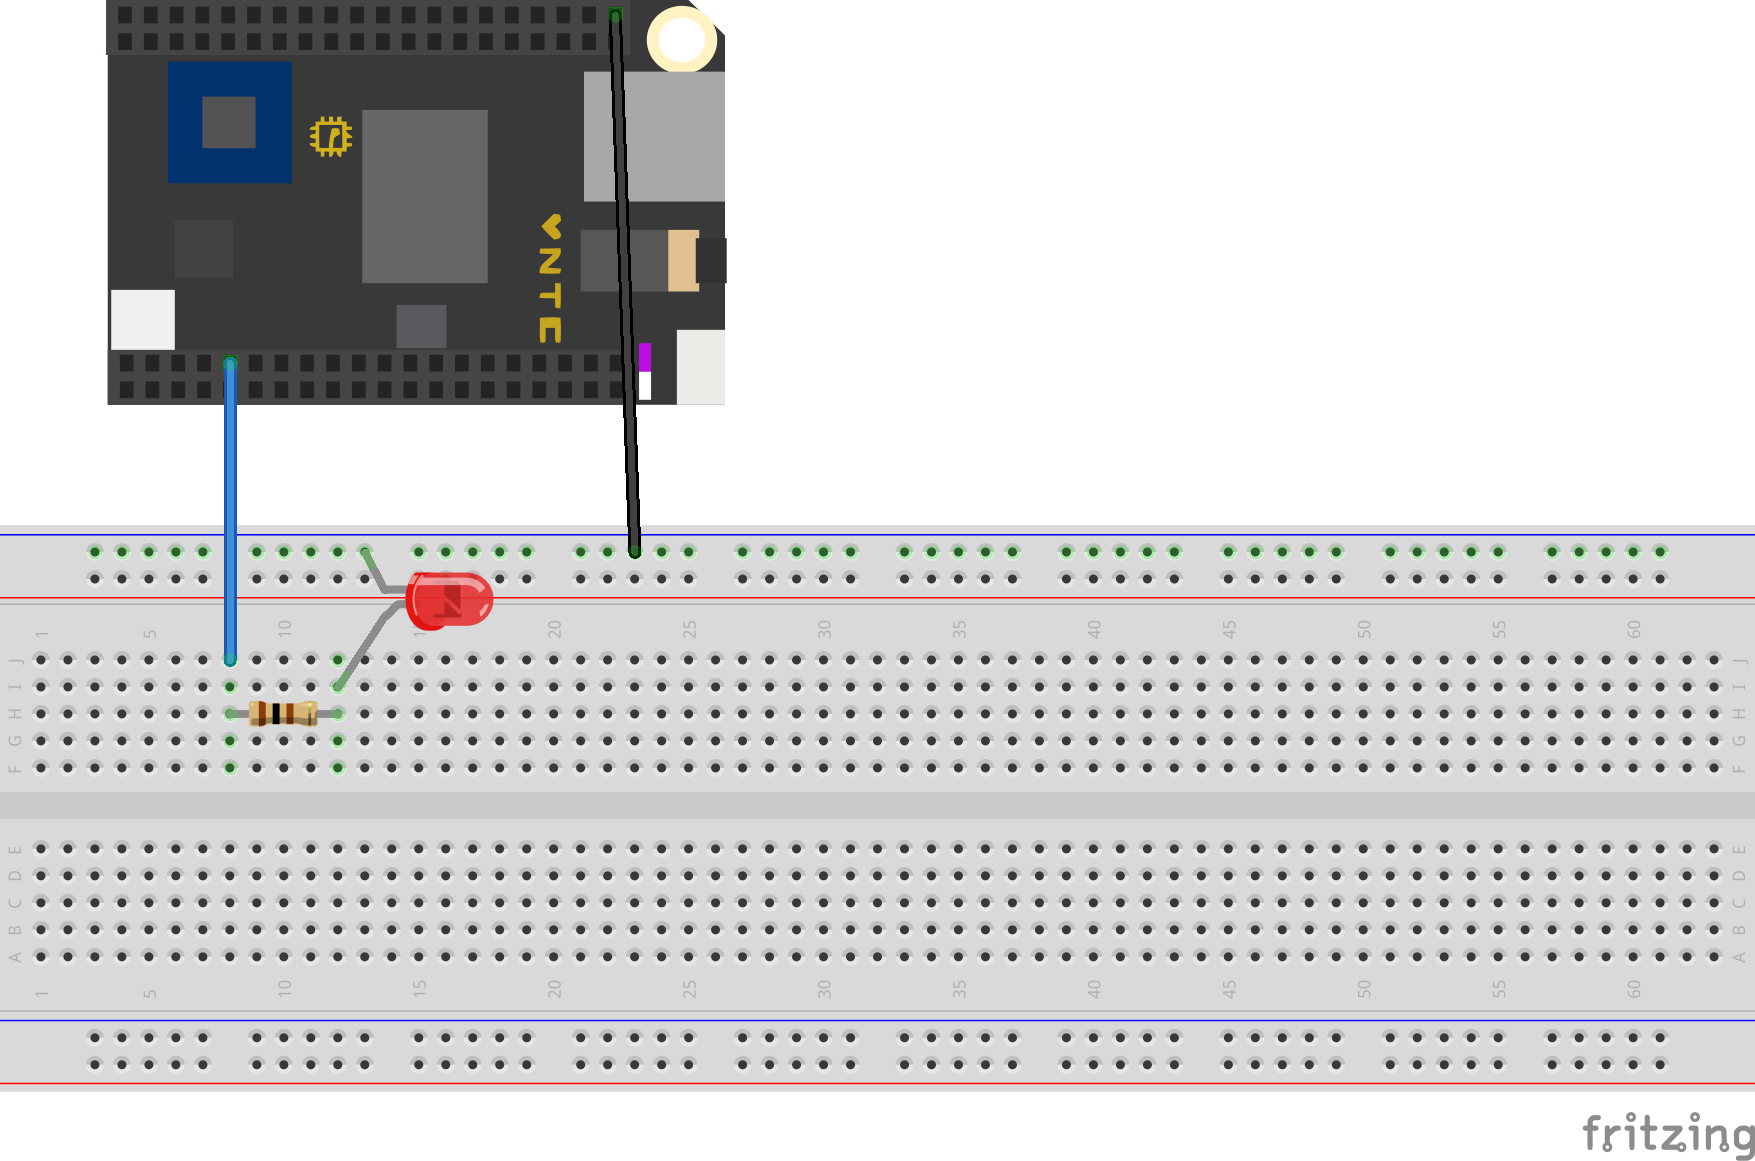
Blinking an LED – Hardware setupNow that we have out C.H.I.P configured and Swift installed it is time to see what we can do with Swift and the C.H.I.P. For this initial project I will simply make a LED blink on and off. Our circuit diagram looks like this:
We have a single LED connected to the CSID0 pin on the C.H.I.P via a 100 ohm resistor.
Blinking an LED – Swift SBDigitalGPIOTo access the GPIO pins on the C.H.I.P I modified a couple files from my SwiftyBones framework. You can find the files for the C.H.I.P on the SwiftyBones_CHIPrepository including a main.swift file that contains code from this post.
Lets see how we will use the SwiftyBones_CHIP library by creating an application that will blink the LED that is connected to the CSID0 pin. The first thing we need to do is to include the SBCommon_CHIP.swift and SBDigitalGPIO_CHIP.swift files in our project. Now lets create the main.swift file and include the following code in it:
import Glibc
if let led = SBDigitalGPIO(name:"CSID0", direction: .OUT) {
      while(true){
           iflet oldValue = led.getValue() {
                 letnewValue = (oldValue == DigitalGPIOValue.HIGH) ? DigitalGPIOValue.LOW:DigitalGPIOValue.HIGH
                 led.setValue(newValue)
                 usleep(150000)
           }
      }
} else {
      print("errorinit pin")
}
This code starts off by creating an instance of the SBDigitalGPIO type (this is a value type) that is bound to the CSID0 pin on the C.H.I.P. The next line creates an endless loop so the led will continue to blink.
We use the getValue() method from the SBDigitalGPIO type to retrieve the current value of the CSID0 pin. We then use the ternary operator set the newValue constant to the opposite of what the current value of the CSID0 pin is and then write that new value to the CSID0 pin using the setValue() method of the SBDigitalGPIO type. Therefore when the current value is high we set the new value to low and when the current value is low we set the new value to high causing the LED to blink on and off.
We use the usleep() function to sleep for a short period of time before looping back. That is all there is to it.
Swift on the C.H.I.PHopefully in the coming weeks I can do more with Swift on the C.H.I.P. I would like to create a framework for the C.H.I.P similar to SwiftyBones if time allows. I would also like to use the C.H.I.P with some of my robotics projects like the BuddyBot because it is much cheaper than the BeagleBone Black (when you are funding the projects yourself every penny counts J) and has a lot of nice features like the built in WiFi and Bluetooth 4. The BeagleBone Black does have a lot to offer that the C.H.I.P does not have like the Analog In pins and 8 PWM pins (it does appear that the C.H.I.P has one PWM port but I have not tried to use it yet) however it does appear that the C.H.I.P is a much cheaper alternative to the BeagleBone Black if you do not need the Analog In or more that one PWM port.
Swift 3If you would like to try out Swift 3, you can download itlike this:
wget http://swift-arm.ddns.net/job/Swift-3.0-ARM-Incremental/lastSuccessfulBuild/artifact/swift-3.0.tgz
Once Swift 3 is downloaded you would need to unzip and untar it. WARNING: do not untar this from the root directory, it will overwrite your /usr directory. The Swift executables like swiftc are located in the /usr/bin/ directory of the file structure that was just untared.


Comments