


Hardware components | ||||||
 |
| × | 1 | |||
 |
| × | 1 | |||
 |
| × | 1 | |||
Software apps and online services | ||||||
 |
| |||||
 |
| |||||
In this project, I connected a water level sensor to a NodeMCU ESP8266 and used KiwisIoT to monitor the water level sensor reading online.
The ESP8266 reads the sensor output and sends the value through Wi-Fi to the KiwisIoT dashboard. This helps me observe changes in the water level remotely.
Basic flow:
Water Level Sensor → ESP8266 → Wi-Fi → KiwisIoT → Dashboard
Step 1: Project IdeaThe main idea is to monitor changes in the water level using a water level sensor.
When the water level changes, the sensor output also changes. The ESP8266 reads this value and sends it to KiwisIoT.
I can then view the sensor data on the dashboard without continuously checking the water container manually.
Step 2: Components RequiredHardware
- NodeMCU ESP8266
- Analog Water Level Sensor Module
- Jumper Wires
- USB Cable
Software
- Arduino IDE
- KiwisIoT
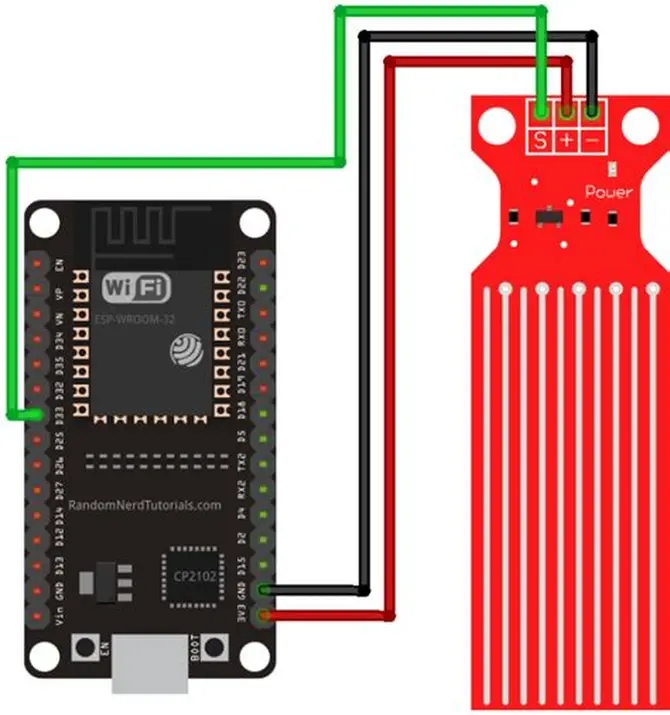
For a typical analog water level sensor with VCC, GND and AO pins, I connected it like this:
Water Level Sensor → NodeMCU ESP8266
- VCC → 3.3V
- GND → GND
- AO → A0
The AO (Analog Output) is connected to A0 because I want to read the changing sensor value.
Note: Check the pin labels on your particular sensor. Keep the ESP8266 and its connections protected from water. The sensor output must remain within the safe A0 input-voltage range of your particular NodeMCU board.
Step 4: Arduino ProgramI used the KiwisIoT library to read the water level sensor and send the value to the dashboard.
#include <KiwisIoT.h>

const char* ssid  = "YOUR_WIFI_NAME";
const char* pass  = "YOUR_WIFI_PASSWORD";
const char* topic = "YOUR_TOPIC_ID";

KiwisIoT kiwisiot(ssid, pass, topic);

#define WATER_LEVEL_PIN A0

void setup() {
  Serial.begin(9600);
  kiwisiot.begin();
}

void loop() {
  kiwisiot.run();

  int waterValue = analogRead(WATER_LEVEL_PIN);

  kiwisiot.send("1", waterValue);

  Serial.print("Water Level Value = ");
  Serial.println(waterValue);

  delay(1000);
}
Replace the Wi-Fi details and Topic ID with your own values before uploading the code.
The ESP8266 continuously reads the analog sensor value and sends it to KiwisIoT Channel 1.
Step 5: KiwisIoT DashboardAfter connecting the ESP8266 to Wi-Fi, I created a dashboard in KiwisIoT.
For this project:
Channel 1 → Water Level Sensor
I used a widget to display the incoming water level sensor reading.
The basic dashboard flow is:
Water Level Sensor → A0 → ESP8266 → Wi-Fi → KiwisIoT Channel 1 → Widget
The dashboard allows me to monitor changes in the water level remotely.
Step 6: How It WorksThe water level sensor produces an analog signal that changes according to the amount of water contacting its sensing area.
The ESP8266 reads this output using:
analogRead(WATER_LEVEL_PIN);The reading is stored in:
int waterValue = analogRead(WATER_LEVEL_PIN);The value is then sent to KiwisIoT using:
kiwisiot.send("1", waterValue);When the water level changes, the sensor reading may also change. The ESP8266 sends the new reading to KiwisIoT, where I can view it on the dashboard.
Important: The raw analog reading is not automatically a water level percentage. The sensor must be tested and calibrated for the particular container and sensor placement before converting readings into a percentage.
Step 7: Working FlowWater Container
↓
Water Level Sensor
↓
Analog Signal
↓
ESP8266 A0
↓
Wi-Fi
↓
KiwisIoT Channel 1
↓
Dashboard
The ESP8266 acts as the bridge between the physical water level sensor and the online IoT dashboard.
Step 8: ApplicationsThis project can be used for basic IoT experiments such as:
- Water container level monitoring
- Water storage tank monitoring prototype and Water management demonstrations
- Remote sensor monitoring
The sensor can help monitor water level changes, but the readings should be calibrated before using them to make decisions about tank capacity or overflow prevention.
Step 9: TroubleshootingSensor value is not changing
- Check VCC → 3.3V.
- Check GND → GND
- Check AO → A0.
- Make sure the sensing area is positioned correctly.
- Test the sensor at different water levels.
- Keep the electronics and exposed connections protected from water.
Dashboard is not receiving data
- Check the Wi-Fi connection.
- Check the KiwisIoT Topic ID.
- Check Channel 1.
- Check that the KiwisIoT library is installed correctly.
- Check the ESP8266 connection.
- Make sure
kiwisiot.run();is insideloop()
Water level values are too high or too low
The readings depend on the sensor module, water contact, sensor placement, supply voltage and NodeMCU board.
Test the sensor at several known water levels and record the readings. Use those readings to calibrate your setup.
The readings do not correspond to the water level
Make sure the sensor is mounted consistently and that the water contacts the intended sensing area. Do not assume that the same raw reading will represent the same water level in every container.
Step 10: Final ResultAfter uploading the code, I opened the Serial Monitor at 9600 baud.
Example readings might look like:
Water Level Value = 912
Water Level Value = 845
Water Level Value = 630
Water Level Value = 480
These values are illustrative only. Actual readings depend on the sensor and the testing conditions.
The same reading is sent to:
ESP8266
↓
Water Level Value
↓
KiwisIoT Channel 1
↓
Dashboard
This allows me to monitor the water level sensor remotely through the KiwisIoT dashboard.
Step 11: Questions & Answers1. What does the water level sensor detect?
It produces an electrical reading related to the water contacting its sensing area.
2. Why did I use A0?
I used A0 because the sensor module provides an analog output.
3. What does Channel 1 represent?
Channel 1 = Water Level Sensor Reading.
4. Does the value represent a water level percentage?
No. The value returned by analogRead() is a raw analog reading. Calibration is needed before converting it into an estimated percentage.
5. Can I use this project to monitor a water tank?
Yes, as a prototype. The sensor must be installed appropriately for the tank, and its readings must be calibrated for the tank's shape and water-level range.
6. Can I use it for overflow alerts?
Yes, with additional threshold logic and a suitable notification or alarm mechanism. For critical overflow protection, use a reliable independent safety mechanism as well.
7. Can I add another sensor?
Yes. Additional sensors can be connected to suitable available pins and assigned to other KiwisIoT channels, taking the board's input limits into account.
8. Can I monitor the water level remotely?
Yes. Once the ESP8266 connects to Wi-Fi and successfully sends readings to KiwisIoT, I can view the data on the dashboard.


Comments