Lisa kester
Published © GPL3+

Fido's Automated Laser Pointer

Want your dog to play while you're gone? Is he getting enough exercise while you're away? Or do you just want your pooch to have more fun?

AdvancedFull instructions provided10 hours8,431
Fido's Automated Laser Pointer

Things used in this project

Hardware components

Arduino UNO
Arduino UNO
×1
Raspberry Pi 2 Model B
×1
Jumper wires (generic)
×8
Screws
×4
Breadboard (generic)
×1
Wi Fi Adaptor Raspberry Pi
Ours plugs into the USB port. It's just used to give the Pi Wi-Fi access.
×1

Hand tools and fabrication machines
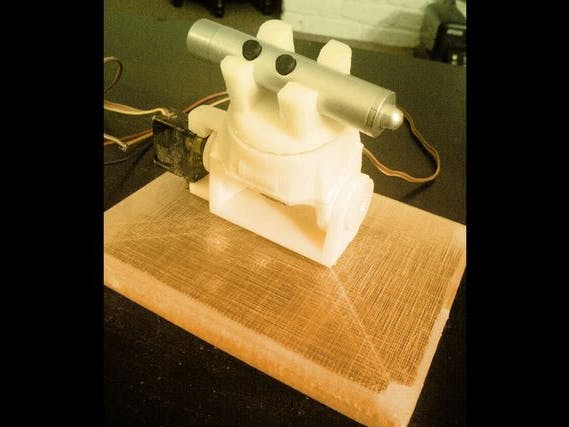
3D Printer (generic)
Used custom 3D printer designed and built by Eric Sarellana. Most 3D printers should work.
Screw Driver

Story

Read more

Custom parts and enclosures

Lazer Pointer Casing

These are the 3D modeled files that are assembled to create the lazer pointer housing. They come in multiple formats to make it easier to print.

Code

Raspberry Pi Script (runLazer.py)

Python
This script is used to tell the Arduino to start the layer program. It activates pin 11 by setting it to HIGH. If you want to test the functionality, you can run this on the command line by typing "sudo python runLazer.py". Normally, this script is run automatically via the node JavaScript program I've included.
# Author: Lisa Kester
# Twitter: @injectgeek

# IMPORTANT: This file MUST be named runLazer.py because the other program calls it.

# This python script is used to send a signal to 
# the aduino uno to start running the lazer pointer device.

# Import raspberry pi library so we can access the general purpose IO pins.
import RPi.GPIO as gpio

# Import time so we can delay an action
import time

# This is the pin that the Raspberry Pi uses to tell the Arduino to start moving the lazer.
pin = 11;

# Ignore warnings (optional)
gpio.setwarnings(False);

# Cleanup previous gpio library usage 
gpio.cleanup();

# This specifies the naming convention we're using for the  pins on the raspberry pie.  I'm using plain old numbers.
gpio.setmode(gpio.BOARD);

# Setting up pin 11 to use as an output.  Replace this number if you want to use a different pin.
gpio.setup(pin,gpio.OUT);

# This sends power to pin 11.  It's considered to be in a HIGH state.
gpio.output(pin,True);  

# Wait 5 seconds
time.sleep(5);

# Turn the power back off on pin 11.  That was enough time for the arduino to get a turn on signal from the PI.
gpio.output(pin,False); 

Arduino Servo Program

Arduino
This program moves the two servos in the Arduino. To use it, you need to install it onto your Arduino. You also need to hook your servos up to pins 9 and 10 to use the program as is. It also connects to the Raspberry PI via a jumper wire. The PI uses pin 11 and the Arduino uses pin 2 for this connection. If you need to use different pins, just change the pin variables defined in the code. There is one for each servo.
/*
Author: Lisa Kester
Twitter: @injectgeek

This program controls the servos for a lazer pointer IOT device.
Now your dog can chase the lazer pointer without you!

How it works:
This program waits to recieve a HIGH signal from a pin.
When it recieves a the signal change, it triggers 
the servo movement.  It basically moves back and forth
in a loop.

 */

#include <Servo.h> 

// This will control the upper servo for the lazer pointer casing
Servo myservo;

// This will control the lower servo for the lazer pointer casing
Servo myservobase;

// This is the pin I'll be using like an on/off switch.  
// When the PI gives it power, then I want the arduino to move the servo.
const int  buttonPin = 2;    
const int  servoPin = 9;
const int  servoBasePin = 10;

// Variables will change:
int buttonState = 0;         // current state of the button
int lastButtonState = 0;     // previous state of the button

// The position of the servo
int pos = 0;      

void setup() {
  // initialize the button pin as an input:
  pinMode(buttonPin, INPUT);
  
  // Tell the upper servo object to use the specified pin (servoPin)
  myservo.attach(servoPin); 
  
  // Tell the lower servo object to use the specified pin (servoPin)
  myservobase.attach(servoBasePin); 

  // initialize serial communication:
  Serial.begin(9600);
}

// This function adds variation to the lazer pointer path by adding pauses in different places.  
// My pooch likes the lazer pointer to pause here and there so she can try to catch it.
void AddPauses(){
      if(pos > 150 && pos < 160 ||  pos > 0 && pos < 10){
        delay(15); 
      }
      if(pos == 180 || pos == 0){
        delay(75);
      }
}

// This returns a position for the lower servo based 
// on the value passed in for the upper servo.  You might need to add
// tape on the bottom of your device so it won't fall over.
int getBasePos(int upperpos){
   if(upperpos > 10 && upperpos < 30){
     return 90;     
   }
   else if(upperpos >= 30 && upperpos < 40){
     return 80;     
   }
   else if(upperpos >= 40 && upperpos < 80){
     return 90;     
   }
   else if(upperpos >= 80 && upperpos < 90){
     return 65;     
   }
   else if(upperpos >= 90 && upperpos < 100){
     return 80;     
   }

  return 90;     
}

// This contains the algorithm to move the lazer pointer.
void runServo(){
  
  // Repeat the lazer pointer path 15 times.
  for (int i = 0; i < 15; i++){  
   
   // Move the lazer pointer from 0 to 180 degrees
   for(pos = 0; pos <= 180; pos += 1)  
    {        
    
      // Add pauses for puppy interest
      AddPauses();
      
      // Move the base
      myservobase.write(getBasePos(pos));
      
      // Move the upper servo
      myservo.write(pos);   
      
      // Make sure the lazer isn't moving too fast for the puppy      
      delay(20);                       
    } 
    // This is the return arc.  The lazer moves from 180 degrees to 0.
    for(pos = 180; pos>=0; pos-=1)     
    {
      myservobase.write(getBasePos(pos));
      AddPauses();      
      myservo.write(pos);              
      delay(15);                       
    } 
  }
}

// The main loop for the arduino.  This is like a main() function.  
// The program starts here and continues forever.
void loop() {
  // read the pushbutton input pin:
  buttonState = digitalRead(buttonPin);

  // compare the buttonState to its previous state
  if (buttonState != lastButtonState) {
    // if the state has changed to HIGH, then start moving the servo
    if (buttonState == HIGH) {
      // if the current state is HIGH then the button
      // wend from off to on:
    runServo();
    
    // Switch the button to low
    digitalWrite(buttonPin, LOW);
    }    
    // Delay a little bit to avoid bouncing
    delay(50);
  }
  // save the current state as the last state,
  //for next time through the loop
  lastButtonState = buttonState;

}

Raspberry Pi Lazer Main Program

JavaScript
This is the main program you need to run for the lazer pointer to work with the cloud. The easiest way to run it, is to install the JavaScript AWS SDK and navigate to the examples. Put this script and the python script in the same folder. You'll also need to setup a configuration.json file with the parameters given to you when you create the device. Additionally, you'll need the three certificates specified in the configuration.json file. I'll include an example configuration.json file so you'll know what those are. Example command to run the program from the command line: sudo node lazerListener.js -F ./lib/keys/configuration.json --thing-name Lazer
/*
* Author: Lisa Kester
* Twitter: @injectgeek

* This file is part of the Lazer Pointer IoT device.  
* It moves a lazer pointer for your dog whenever
* you activate it from the AWS console.

  This file is a modification of the echo-example.js file 
  that comes with the JavaScriptSDK.
*/

/*
 * Copyright 2010-2015 Amazon.com, Inc. or its affiliates. All Rights Reserved.
 *
 * Licensed under the Apache License, Version 2.0 (the "License").
 * You may not use this file except in compliance with the License.
 * A copy of the License is located at
 *
 *  http://aws.amazon.com/apache2.0
 *
 * or in the "license" file accompanying this file. This file is distributed
 * on an "AS IS" BASIS, WITHOUT WARRANTIES OR CONDITIONS OF ANY KIND, either
 * express or implied. See the License for the specific language governing
 * permissions and limitations under the License.
 */

//app deps
const thingShadow = require('..').thingShadow;
const isUndefined = require('../common/lib/is-undefined');
const cmdLineProcess   = require('./lib/cmdline');
const execFile = require('child_process').execFile;

function processTest( args ) {

if (isUndefined( args.thingName ))
{
   console.log( 'thing name must be specified with --thing-name' );
   process.exit(1);
}
//
// The thing module exports the thing class through which we
// can register and unregister interest in thing shadows, perform
// update/get/delete operations on them, and receive delta updates
// when the cloud state differs from the device state.
//
const thingShadows = thingShadow({
  keyPath: args.privateKey,
  certPath: args.clientCert,
  caPath: args.caCert,
  clientId: args.clientId,
  region: args.region,
  reconnectPeriod: args.reconnectPeriod
});

//
// Register a thing name and listen for deltas.  Whatever we receive on delta
// is echoed via thing shadow updates.
//
thingShadows
  .on('connect', function() {
    console.log('connected to things instance, registering thing name');

    thingShadows.register( args.thingName, { persistentSubscribe: true } );
    });

thingShadows 
  .on('close', function() {
    thingShadows.unregister( args.thingName );
    console.log('close');
  });

thingShadows 
  .on('reconnect', function() {
    thingShadows.register( args.thingName, { persistentSubscribe: true } );
    console.log('reconnect');
  });

thingShadows 
  .on('offline', function() {
    console.log('offline');
  });

thingShadows
  .on('error', function(error) {
    console.log('error', error);
  });

thingShadows
  .on('delta', function(thingName, stateObject) {
      console.log('received delta on '+thingName+': '+
                  JSON.stringify(stateObject));
	  thingShadows.update( thingName, { state: { reported: stateObject.state } } );		  
	  
	  // Check to see if the lazer pointer state is on.  It's expecting an object like: { state: 'on'}
	  // NOTE: You'll have to manually switch it to off, then on again.
	  if(stateObject.state.state === 'on'){
		  console.log('Lazer pointer state changed to :' + stateObject.state.state);
		  // Run the lazer pointer program when a delta is recieved		  	  
		  const child = execFile('python', ['runLazer.py'], (error, stdout, stderr) => {
			if (error) {
			  console.log(error);
			}
			console.log(stdout);
		  });
	  }      
  });

thingShadows
  .on('timeout', function(thingName, clientToken) {
      console.warn( 'timeout: '+thingName+', clientToken='+clientToken);
  });
}

module.exports = cmdLineProcess;

if (require.main === module) {
  cmdLineProcess('connect to the AWS IoT service and perform thing shadow echo',
                 process.argv.slice(2), processTest, ' ', true );
}

Configuration.json file

JSON
This is the information passed to the main program. It's the same format as what you'd send to the echo-example.js file. You'll need to replace all the parameters with information from your AWS IoT "Thing." The caCert is something I downloaded externally; I found a download on the Javascript AWS IoT SDK documentation for it. The other certs are given to you when you create the "Thing" in the console.
{
	"host": "A3RFJD6U2VK2IZ.iot.us-east-1.amazonaws.com",
	"port": 8883,
	"clientId": "Lazer",
	"thingName": "Lazer",
	"caCert": "./lib/keys/rootCA.pem",
	"clientCert": "./lib/keys/a09a5452f3-certificate.pem.crt",
	"privateKey": "./lib/keys/a09a5452f3-private.pem.key"
}

Credits

Lisa kester

Lisa kester

1 project • 2 followers
Software Engineer
Thanks to Eric Sarellana.

Comments