


A Raspberry Pi kiosk that records short demo videos, sends them through an AI video translation workflow, and plays back translated subtitles or dubbed output.
Why I built itSmall demos often happen in noisy, multilingual spaces: maker fairs, school labs, museum counters, trade-show booths, and community workshops. A presenter may record a short explanation in one language, but the next visitor may need subtitles or audio in another language. I wanted a small physical kiosk that could record a short source clip, send that clip into an AI video translation workflow, and play the translated result back on the same local screen.
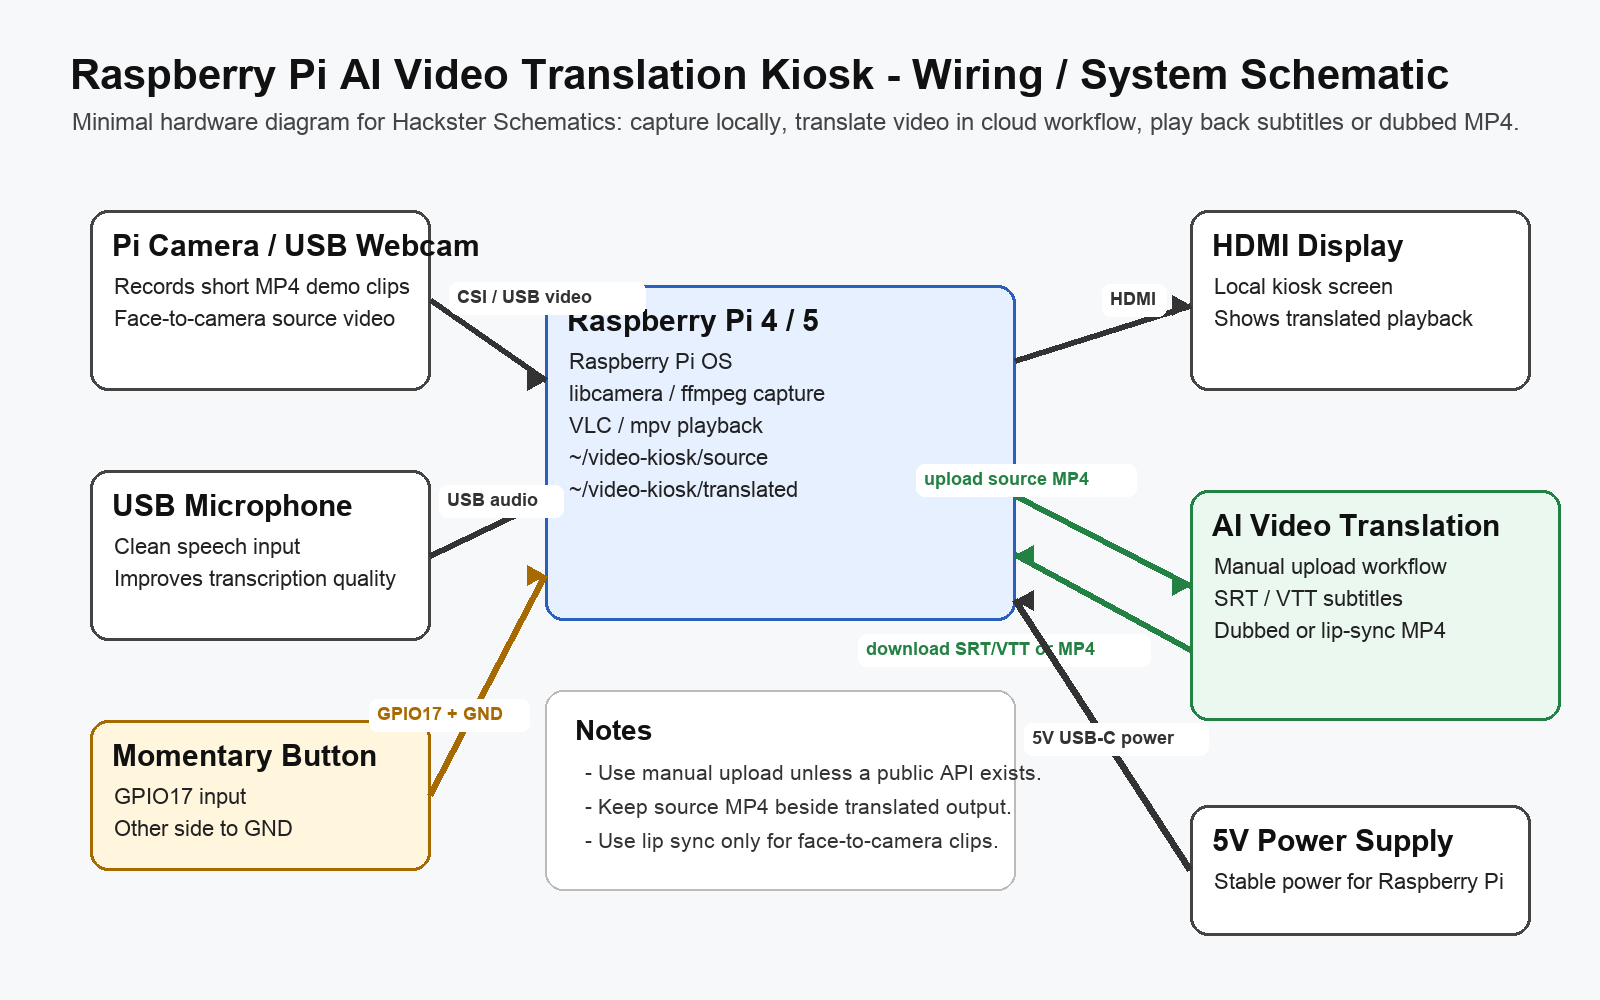
This project is not trying to run full video localization on the Raspberry Pi. The Pi is responsible for the physical interaction: camera capture, microphone input, local file storage, button control, and playback. The AI video translation stage is handled by an online workflow so the kiosk can generate translated subtitles, AI-dubbed video, or a lip-sync output without requiring a GPU on the edge device.
What it does- Records a 20- to 60-second MP4 from a Raspberry Pi camera or USB webcam.
- Stores source clips in a local folder for review.
- Uses a manual upload workflow for AI video translation.
- Supports translated subtitle output such as SRT or VTT.
- Supports AI video dubbing output when the demo needs target-language audio.
- Supports optional lip-sync review for face-to-camera clips.
- Plays the translated subtitle or dubbed video output on the local kiosk display.
- Raspberry Pi 4 Model B or Raspberry Pi 5
- Raspberry Pi Camera Module 3 or a USB webcam
- USB microphone or a camera with usable audio capture
- HDMI display or small touchscreen
- Momentary push button
- 10k resistor for the button circuit
- 5V Raspberry Pi power supply
- microSD card with Raspberry Pi OS
- Optional case, stand, tripod, or kiosk enclosure
- Raspberry Pi OS
- libcamera or ffmpeg for recording
- VLC or mpv for local playback
- Python or a small shell script for the button handler
- An online AI video translation workspace for subtitles, AI dubbing, voice cloning review, and lip-sync output
The flow is deliberately simple:
- A visitor presses the kiosk button.
- The Raspberry Pi records a short MP4.
- The operator checks the source recording.
- The source clip is uploaded to the AI video translation workflow.
- The translated subtitle file or dubbed MP4 is downloaded.
- The Raspberry Pi plays the translated output locally.
The cloud step uses AI Translate Video as a reference workspace for AI video translator tasks, subtitle translator output, SRT/VTT export, AI video dubbing, translated MP4 generation, voice cloning review, multi-speaker handling, and optional lip sync video translation:
WiringThe button wiring is minimal. Connect one side of the momentary button to GPIO17 and the other side to ground. Use the internal pull-up resistor in software, or add a 10k resistor depending on your preferred wiring style. The camera connects through the Raspberry Pi camera connector or USB. The display connects over HDMI.
If you use a USB microphone, test the audio device name before writing the final recording command. Audio is the most important input for video translation, so a cheap external USB microphone usually performs better than relying on a distant camera microphone.
Recording testFor a Pi Camera Module, start with a short video test:
mkdir -p ~/video-kiosk/source ~/video-kiosk/translated libcamera-vid -t 30000 --codec h264 -o ~/video-kiosk/source/test.h264
Convert to MP4 if needed:
ffmpeg -i ~/video-kiosk/source/test.h264 -c copy ~/video-kiosk/source/test.mp4
For a USB webcam, the exact device path varies. A typical ffmpeg command may look like this after checking your video and audio devices:
ffmpeg -f v4l2 -i /dev/video0 -f alsa -i default -t 30 ~/video-kiosk/source/test.mp4
After recording, open the translation workspace and upload the source MP4. Select the target language and choose the output type:
- Use translated subtitles when the goal is readable captions and easy correction.
- Use AI video dubbing when the viewer should hear the video in the target language.
- Use lip sync only for face-to-camera demos where mouth movement affects trust.
- Export SRT or VTT files if the translated captions need to be reused on a website, YouTube video, LMS, or archive page.
This project uses manual upload and download. It does not claim a private API integration. That makes the build easier to reproduce and keeps the Hackster project focused on the physical kiosk.
PlaybackCopy the translated output into the playback folder:
cp ~/Downloads/translated-demo.mp4 ~/video-kiosk/translated/
Play it locally:
vlc --fullscreen ~/video-kiosk/translated/translated-demo.mp4
If the output is a subtitle file rather than a dubbed MP4, keep the original video and subtitle file together:
vlc ~/video-kiosk/source/test.mp4 --sub-file ~/video-kiosk/translated/test.en.srt
The best results came from short clips with clean speech, close microphone placement, and one speaker facing the camera. Subtitle translation was the easiest output to review because the SRT or VTT file could be opened and corrected. AI dubbing worked best for simple product explanations, classroom demos, and short visitor instructions. Lip sync was useful only when the speaker's face was central to the demo.
Practical limitations- Noisy rooms reduce transcription quality.
- Long videos slow down upload, review, and playback.
- Multi-speaker videos require extra review.
- Lip sync should not be used for every clip.
- Manual upload is slower than an API, but it is reliable for a reproducible kiosk project.
I included a PDF setup guide with the hardware scope, workflow map, testing checklist, and failure cases. It is meant to help reproduce the kiosk build and explain where the AI video translation stage fits into the physical project.


Comments