


Hardware components | ||||||
 |
| × | 1 | |||
| × | 1 | ||||
| × | 1 | ||||
 |
| × | 1 | |||
 |
| × | 1 | |||
Wi-Recon Pro: Scan nearby WiFi networks effortlessly. Get signal strength, encryption & GPS location in real-time. Sleek design, OLED screen. Optimize WiFi or explore outdoors. Ultimate in 1 device!
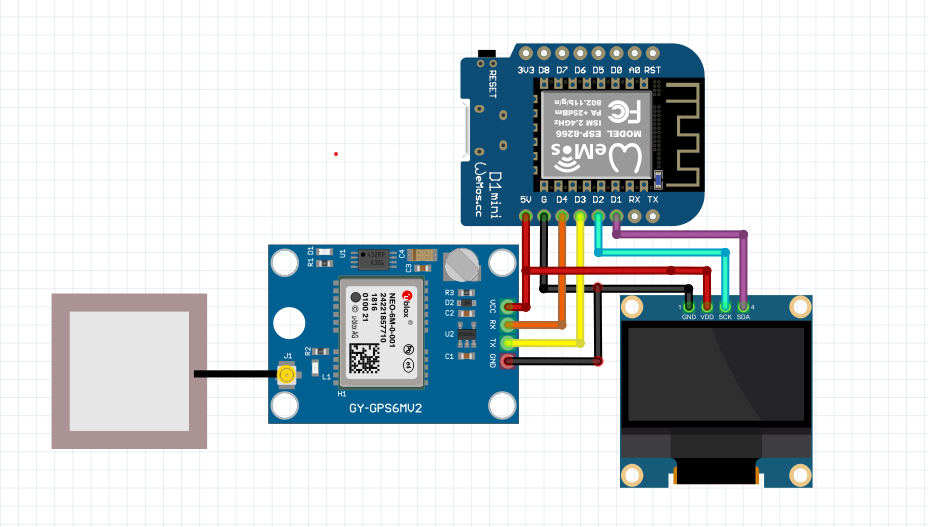
Installation & SetupWiFi Scan and OLED Display OLED SDA -> ESP8266 D1
OLED SCL -> ESP8266 D2
OLED GND -> ESP8266 GND
OLED VCC -> ESP8266 VCCGPS TX (D3) -> ESP8266 D3
GPS RX (D4) -> ESP8266 D4
GPS GND -> ESP8266 GND
GPS VCC -> ESP8266 VCCFlashing the Firmware
#Download the compiled binary (.bin) file for the WiFi Recon project.
#Connect the ESP8266 flasher to your computer.
#Open the ESP8266 flasher software (e.g., esptool, NodeMCU Flasher).
#Select the appropriate serial port for the flasher.
#Choose the downloaded.bin file as the firmware to be flashed.
#Configure any necessary flash settings (e.g., baud rate, flash size).
#Initiate the flashing process and wait for it to complete.
#Uploading Code to ESP8266
#To upload a Code to ESP8266/d1 mini use a esp8266 flasher
#The Flasher and Program files are in our GitHub to Download file
#Just press that green button and download as zip then extract it
#In this thing there is a 2 files here. just install it depend on your configuration
#Then open that esp8266 flasher it looks like this
#Go to the config option then press that first setting icon and choose our downloaded bin file (packet_monitor.bin) from our GitHub
#Then go back to that operation section. Now connect your d1 mini or any other esp8266 module after you plug in that your device you can see that Com port option appear choose your port and click flash button that is it!
#IF nothing is shown on that display just press that reset button on your d1 mini board
#Power on the circuit after flashing the firmware.
#The WiFi Recon will automatically start running and displaying information on the OLED screen.
#hackernowful
#hypesecinfotech


Comments