


Hardware components | ||||||
 |
| × | 1 | |||
 |
| × | 1 | |||
 |
| × | 1 | |||
 |
| × | 1 | |||
| × | 2 | ||||
Software apps and online services | ||||||
 |
| |||||
Hand tools and fabrication machines | ||||||
 |
| |||||
I was inspired by the idea of helping people with disabilities in their tasks with the PC. The hand is one of the most used parts of the body other than the feet. It undergoes maximum physical use at any time and is hence subject to trauma more than any other part of the body. It is endowed with special properties of the skin which grant added protection from physical, chemical and environmental agents. A mutilating injury to the hand occurs as a result of transmission of high-energy forces to the hand which are often seen in industrial accidents, agricultural injuries commonly by thresher machine, household injuries often by kitchen equipment like entrapment in mixer grinder, gunshot accidents, explosives or road traffic accidents in which the hand may be run over by an automobile. This article highlights a solution to take control of a PC mouse for a mutilated hand.
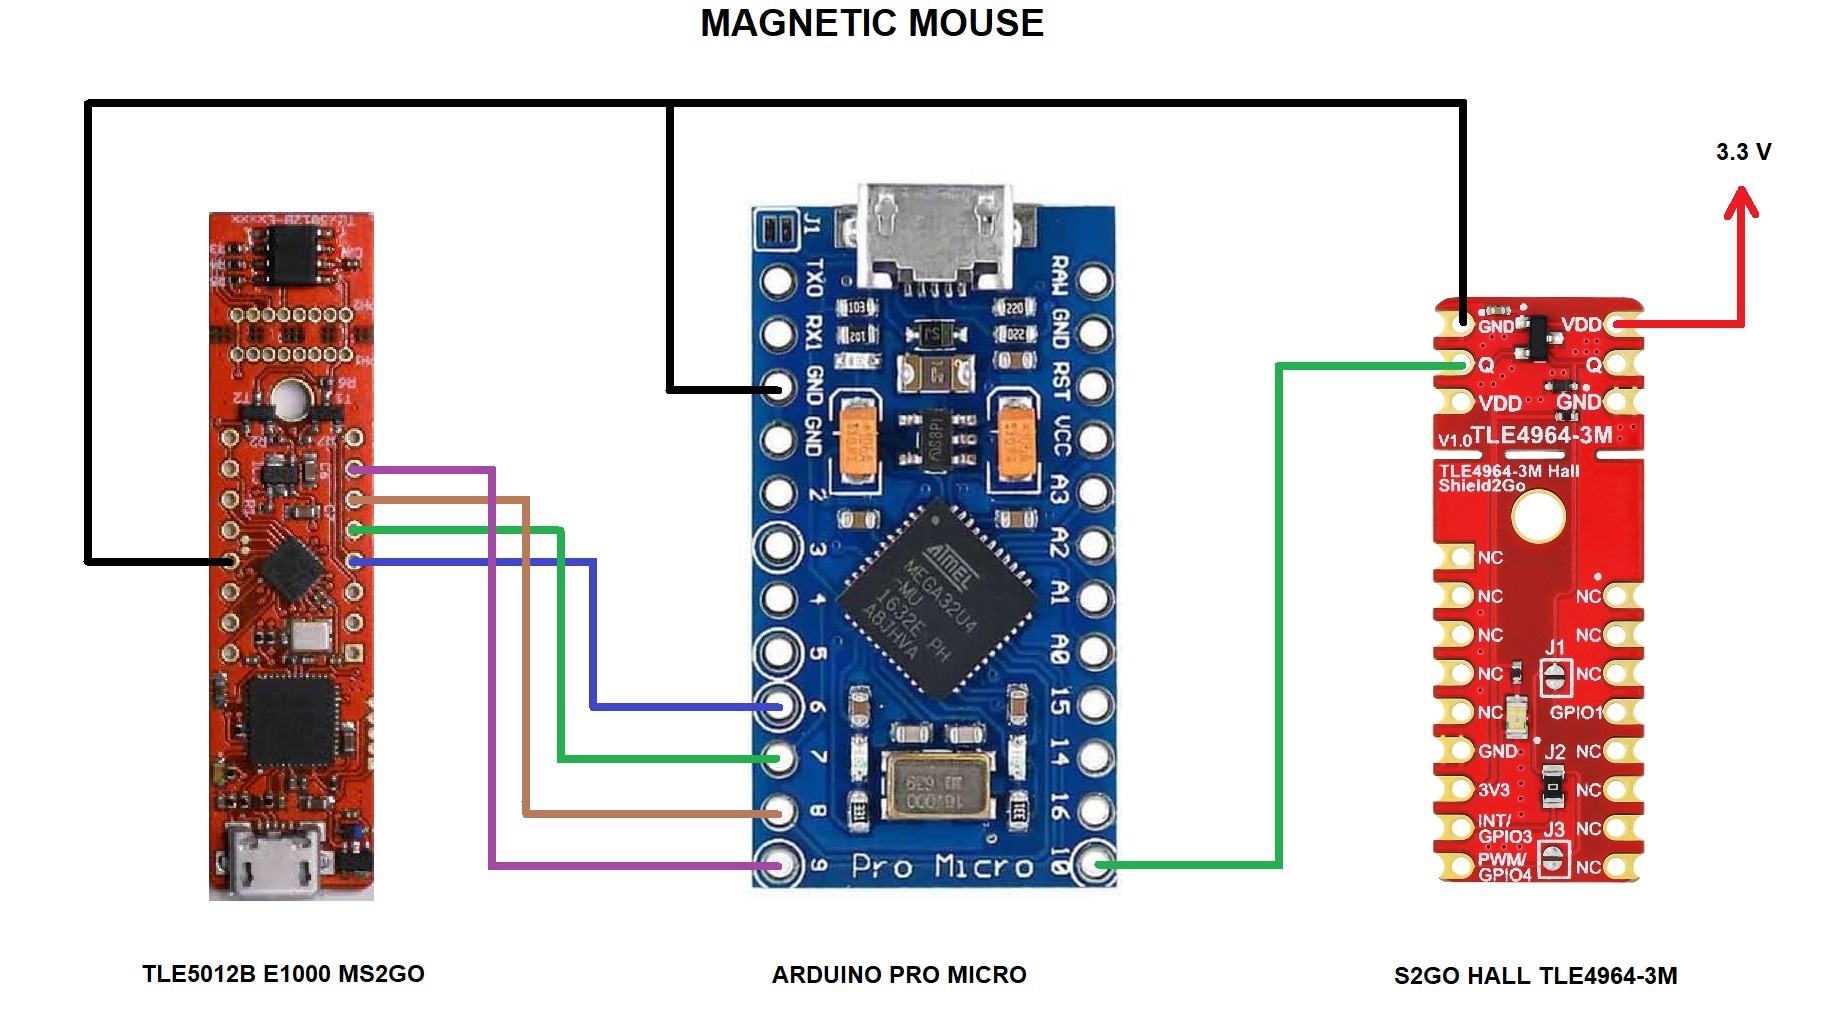
Below I show you the schematic diagram of this project. In the Things used in this project section, you can get more information about the hardware.
Schematic
How does it works?
- The TLE5012B E1000 MS2GO Magnetic angle sensor is used to navigate the PC or Laptop as a simple mouse.
- The S2GO HALL TLE4964-3M Hall effect switch shield is used as a button to click in applications where the mouse pointer is located.
- The Arduino Pro Micro board is used as an interface between the magnetic mouse and the PC, since it has the advantage of being able to interface with the PC via USB.
- Direction detection: In this project the microcontroller of the magnetic angle sensor prints the direction registered by the sensor, when using the joystick attachment accessory. So I have divided the 360 degrees into the following sections to indicate the mouse pointer where to move: UP, DOWN, LEFT, RIGHT AND STOP.
Software
In this project I have used Arduino IDE, the latest version can be downloaded from the next link: https://www.arduino.cc/en/software
To learn the basic concepts of the TLE5012B E1000 MS2GO magnetic sensor, I have used as a reference the next project published by Infineon Team: https://www.hackster.io/Infineon_Team/angle-measurement-kit2go-f7c3ec#things
The TLI5012B E1000 is a 360° angle sensor that detects the orientation of a magnetic field. This is achieved by measuring sine and cosine angle components with monolithic integrated Giant Magneto Resistance (iGMR) elements. These raw signals (sine and cosine) are digitally processed internally to calculate the angle orientation of the magnetic field (magnet).
The TLI5012B E1000 is a pre-calibrated sensor. The calibration parameters are stored in laser fuses. At start-up the values of the fuses are written into flip-flops, where these values can be changed by the application-specific parameters. Further precision of the angle measurement over a wide temperature range and a long lifetime are improved with the internal autocalibration algorithm.
Data communications are accomplished with a bi-directional Synchronous Serial Communication (SSC) that is SPI-compatible. The sensor configuration is stored in registers, which are accessible by the SSC interface. Additionally the TLI5012B E1000 has Incremental Interface (IIF),
Main features:
- Giant Magneto Resistance (GMR)-based principle.
- Integrated magnetic field sensing for angle measurement.
- 360° angle measurement with revolution counter and angle speed measurement.
- Max. 1.9° angle error over lifetime and temperature-range with activated auto-calibration.
- Synchronous Serial Communication (SSC) with 15 bit representation of absolute angle value (0.01° resolution)
- Incremental Interface (IIF) with 12 bit resolution of angle value on the output (one count per 0.088° angle step).
- Incremental Interface (IIF) in A/B mode with absolut count enabled (provides absolute value at output)
- Fast angle update period (42.7μs).
- Autocalibration mode 1 enabled.
- Bi-directional SSC interface. DATA pin set to push-pull output with 8Mbit/s baud rate (2Mbit/s in open-drain).
Library installation
To install the library. In the Arduino IDE, go to the menu Sketch > Include library > Library Manager. Type TLE5012 and install the library.
Code
magnetic_mouse.ino
// AUTHOR: GUILLERMO PEREZ GUILLEN

#include <TLE5012-ino.hpp>

Tle5012Ino Tle5012Sensor = Tle5012Ino();
errorTypes checkError = NO_ERROR;
double positionReading = 0.0;
int input=0;

void setup() {
  // put your setup code here, to run once:
  delay(2000);
  Serial.begin(9600);
  pinMode (3,OUTPUT);
  pinMode (4,OUTPUT);
  pinMode (5,OUTPUT);
  pinMode (6,OUTPUT);
  while (!Serial) {};
  checkError = Tle5012Sensor.begin();
  Serial.print("checkError: ");
  Serial.println(checkError,HEX);
  delay(1000);
  Serial.println("Init done");
}

void loop() {
  // put your main code here, to run repeatedly:

Tle5012Sensor.getAngleValue(positionReading);

if (positionReading >= -25 && positionReading <= 25) {
  Serial.println("Up");
  digitalWrite (3,LOW);
  digitalWrite (4,HIGH);
  digitalWrite (5,HIGH);
  digitalWrite (6,HIGH);
   input=1;
}

else if (positionReading < -65 && positionReading >= -100) {
  Serial.println("Right");
  digitalWrite (3,HIGH);
  digitalWrite (4,LOW);
  digitalWrite (5,HIGH);
  digitalWrite (6,HIGH);
  input=2;
}

else if (positionReading < -140 || positionReading > 140) {
  Serial.println("Down");
  digitalWrite (3,HIGH);
  digitalWrite (4,HIGH);
  digitalWrite (5,LOW);
  digitalWrite (6,HIGH);
  input=3;
}

else if (positionReading > 65 && positionReading <= 100) {
  Serial.println("Left");
  digitalWrite (3,HIGH);
  digitalWrite (4,HIGH);
  digitalWrite (5,HIGH);
  digitalWrite (6,LOW);
  input=4;
}

else {
  Serial.println("Stop");
  digitalWrite (3,HIGH);
  digitalWrite (4,HIGH);
  digitalWrite (5,HIGH);
  digitalWrite (6,HIGH);
  input=5;
}

  delay(100);
}
How does it works?
- I have modified this code from the one published by the Infineon Team here (Direction Detection): https://www.hackster.io/Infineon_Team/angle-measurement-kit2go-f7c3ec
- The directions detection of my project is displayed in the graph shown in the Hardware section of this tutorial.
- Pin 3 is configured to indicate upward movement of the mouse pointer. Direction indicated by the magnetic sensor with values between -25 and 25.
- Pin 4 is configured to indicate movement of the mouse pointer to the right. Direction indicated by the magnetic sensor with values between -65 and -100.
- Pin 5 is configured to indicate downward movement of the mouse pointer. Direction indicated by the magnetic sensor with values less than -140 or greater than 140.
- Pin 6 is configured to indicate movement of the mouse pointer to the left. Direction indicated by the magnetic sensor with values between 65 and 100.
- Any other direction indicated by the magnetic sensor the mouse pointer is stopped. For example values between -25 and -65.
The TLE4964 3M is an integrated Hall effect switch designed specifically for highly accurate applications with superior supply voltage capability, operating temperature range and temperature stability of the magnetic thresholds. Here I attach a tutorial to learn the basics of this sensor: https://www.hackster.io/Infineon_Team/tle4964-3m-hall-shield2go-e9c28e
Key features are a operating supply voltage from 3.0V to 32V, reverse polarity protection until 18V, overvoltage capability up to 42V without external resistor, output overcurrent and overtemperature protection and active error compensation. In addition the sensor has a high stability of magnetic thresholds, and high ESD performance in a small SMD package PG SOT23 3 15.
How to use this sensor in the magnetic mouse?
- We will use this sensor as a switch to sends a momentary click to the computer at the location of the cursor. This sensor is normally at logic 1, and in the presence of the neodymium magnet it will be set to logic 0.
- It's not necessary to touch the magnet with the sensor, so it's recommended to experiment to get the appropriate distance to activate the switch.
I used two magnets in the test since they are more effective when I click the magnet over the TLE4964 3M sensor.
Since the Arduino Pro Micro board is powered by ATmega32u4 chip, which makes it one of a few Arduino boards with inbuilt USB communication capabilities, the schematic diagram shown in the hardware section makes the Arduino Pro Micro behave like a USB mouse executing controlled movements.
As we saw, this HID (Human Interface Device) emulation functionality is available natively on boards that incorporate ATMEGA 32u4 processors (Micro, Leonardo). Below you can get the code:
pro_micro_interface.ino
// AUTHOR: GUILLERMO PEREZ GUILLEN

#include <Mouse.h> // Special Library

void setup()
{
    Serial.begin(9600);
    pinMode (6,INPUT_PULLUP);
    pinMode (7,INPUT_PULLUP);
    pinMode (8,INPUT_PULLUP);
    pinMode (9,INPUT_PULLUP);
    pinMode (10, INPUT_PULLUP);
}

void loop()
{
//char dato[1];
int SWITCH1 = digitalRead(6);
int SWITCH2 = digitalRead(7);
int SWITCH3 = digitalRead(8);
int SWITCH4 = digitalRead(9);
int SWITCH5 = digitalRead(10); // CLICK

     if (SWITCH5 == LOW) {   // CLICK
      Serial.println("CLICK");
      Mouse.click();
     }

     if (SWITCH1 == HIGH) {   // UP
      Serial.println("UP");
      Mouse.move(0, 5, 0);
     }

     if (SWITCH2 == HIGH) {   // RIGHT
      Serial.println("RIGHT");
      Mouse.move(-5, 0, 0);
     }

     if (SWITCH3 == HIGH) {   // RIGHT
      Serial.println("DOWN");
      Mouse.move(0, -5, 0);
     }

     if (SWITCH4 == HIGH) {   // RIGHT
      Serial.println("LEFT");
      Mouse.move(5, 0, 0);
     }

     else {
      Serial.println("STOP");
      Mouse.move(0, 0, 0);
     }
    delay(100);
}
How does it works?
- If SWITCH 1 is activated, then the mouse moves UP.
- If SWITCH 2 is activated, then the mouse moves to the RIGHT.
- If SWITCH 3 is activated, then the mouse moves DOWN.
- If SWITCH 4 is activated, then the mouse moves to the LEFT.
- If SWITCH 5 is activated, it then sends a momentary click to the computer at the location of the cursor.
- The mouse pointer makes indicated movements with jumps of 5 pixels every 100ms.
In the image below I show you the assembled magnetic mouse. I have fixed the pieces with silicone to avoid unwanted movements.
Below is the test video. In the first part I show you how to navigate with the magnetic mouse. In the second part I have used the calculator application to demonstrate its functionality.
Conclusion- This prototype has demonstrated its functionality for people with hand disabilities, whether due to mutilation or deformation of the hands. Perhaps with practice the user can acquire more skill.
- Improvements can also be made. For example, you can configure the speed of the mouse pointer by changing the jumps and sampling speed of the data as I mentioned in the explanation of the codes.
- The direction detection was the result of looking for an idea where all mouse movements would be controlled with the joystick attachment accessory.


_3u05Tpwasz.png?auto=compress%2Cformat&w=40&h=40&fit=fillmax&bg=fff&dpr=2)
Comments