

Hardware components | ||||||
 |
| × | 2 | |||
| × | 1 | ||||
_ztBMuBhMHo.jpg?auto=compress%2Cformat&w=48&h=48&fit=fill&bg=ffffff) |
| × | 1 | |||
 |
| × | 1 | |||
 |
| × | 1 | |||
 |
| × | 3 | |||
 |
| × | 1 | |||
 |
| × | 1 | |||
| × | 2 | ||||
| × | 2 | ||||
| × | 1 | ||||
Software apps and online services | ||||||
 |
| |||||
Hand tools and fabrication machines | ||||||
 |
| |||||
A self-driving car, also known as an autonomous vehicle, connected and autonomous vehicle, driverless car, robo-car, or robotic car, is a vehicle that is capable of sensing its environment and moving safely with little or no human input. Self-driving cars combine a variety of sensors to perceive their surroundings, such as radar, lidar, sonar, GPS, odometry and inertial measurement units. Advanced control systems interpret sensory information to identify appropriate navigation paths, as well as obstacles and relevant signage.
Self-driving cars are already exploring the difficulties of determining the intentions of pedestrians, bicyclists, and animals, and models of behavior must be programmed into driving algorithms. Human road users also have the challenge of determining the intentions of autonomous vehicles, where there is no driver with which to make eye contact or exchange hand signals. https://en.wikipedia.org/wiki/Self-driving_car
In the near future, pedestrians and bicyclists may travel in the street in a riskier fashion if they believe self-driving cars are capable of avoiding them. Driving safety experts predict that once driverless technology has been fully developed, traffic collisions and resulting deaths and injuries and costs, caused by human error, such as delayed reaction time, tailgating, rubbernecking, and other forms of distracted or aggressive driving should be substantially reduced.
In order for people to buy self-driving cars and vote for the government to allow them on roads, the technology must be trusted as safe.
In this project we're going to do two tests with a small-scale autonomous robot. We will also make proposals for safety systems to protect pedestrians, cyclists and animals, and using proximity sensors SS-430 KEMET: So our main goals are:
- 1. Open and close the gate
- 2. Stop the Self-driving Car
To begin, we developed a prototype gate that opens and closes with the proximity sensor SS-430 KEMET. The system performs the following tasks:
- When you pass your hand through the sensor, an LED turns on and the gate closes.
- Again, when you pass your hand through the sensor, the LED turns off and the gate opens.
(Timing: 12 hrs.)
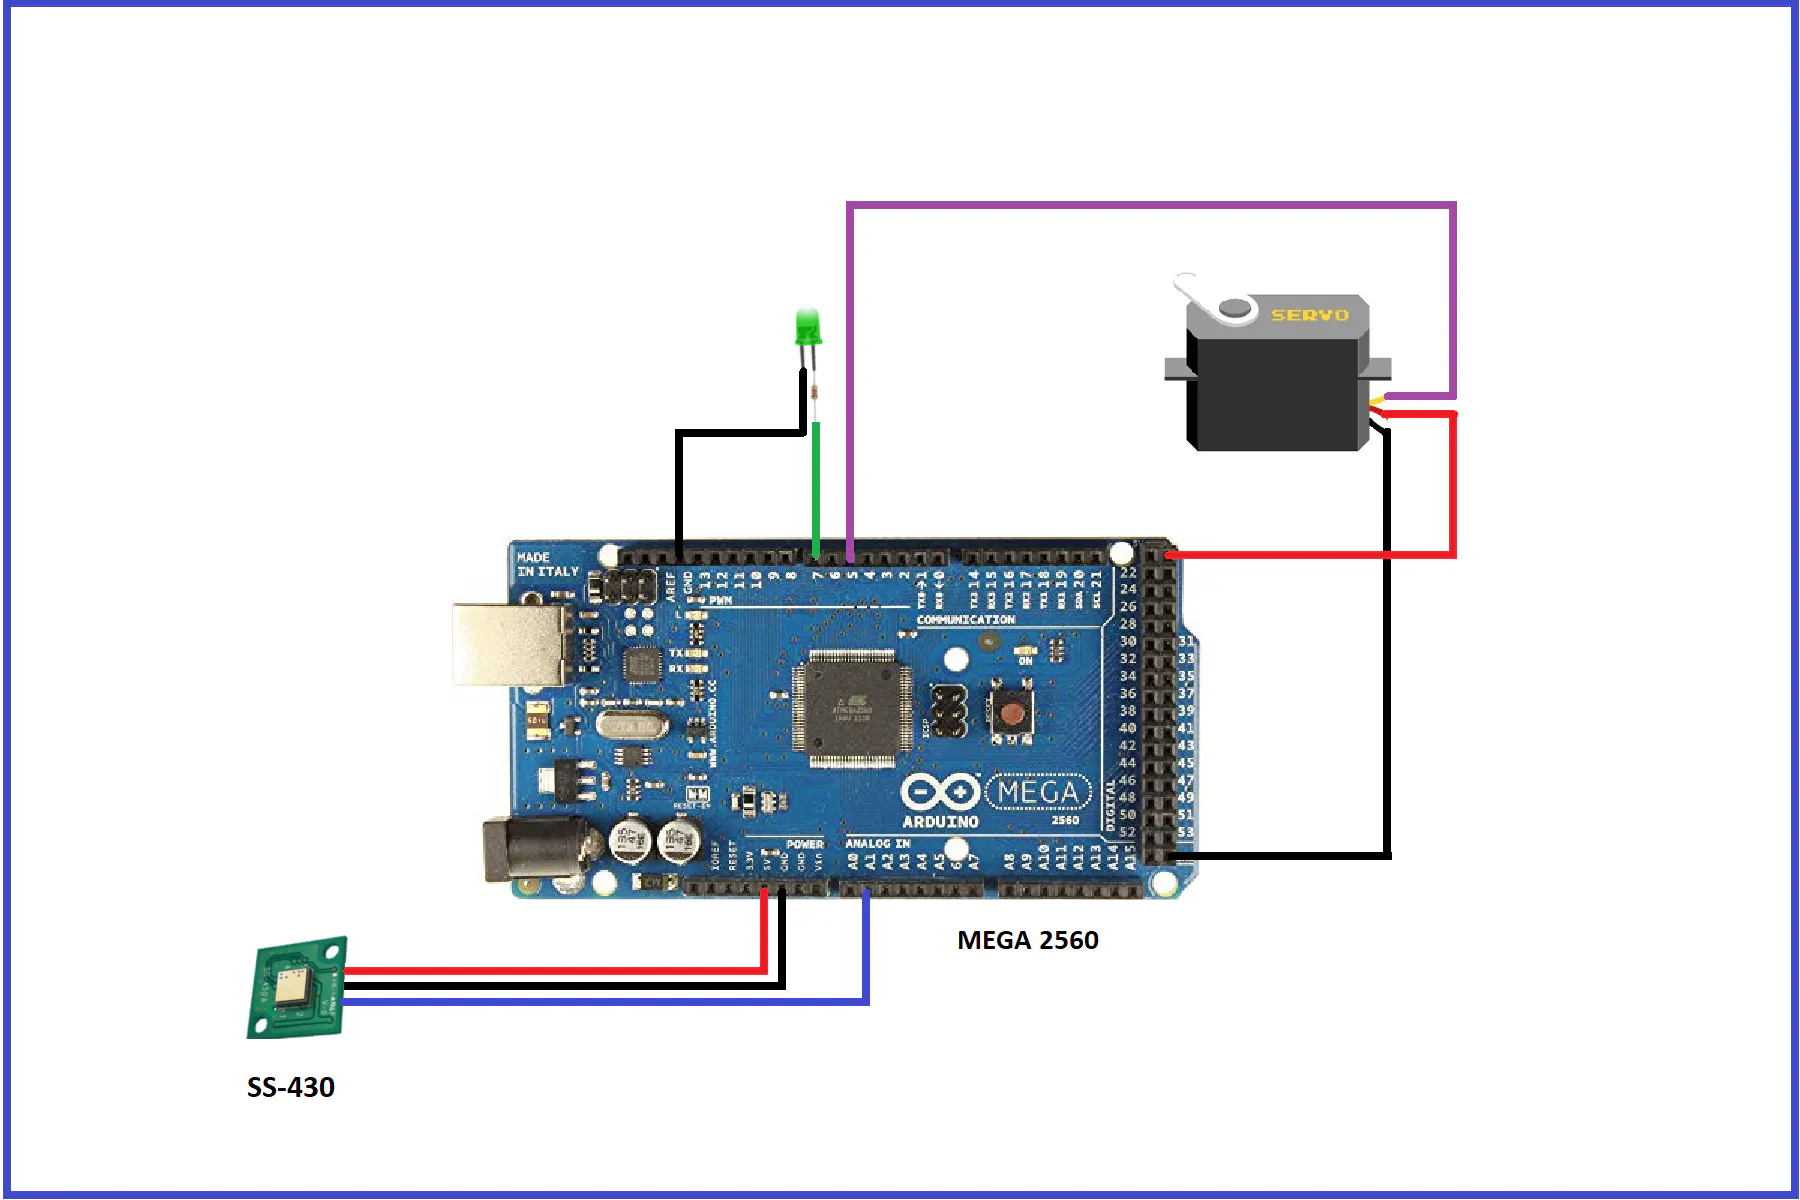
The electrical diagram of this safety system is shown below:
KEMET’s Pyroelectric Infrared Sensors use the pyroelectric effect of ceramic by absorbing infrared rays emitted from the human body. This detects the natural infrared signature produced by humans. Also, it can detect infrared rays without using lenses. https://content.kemet.com/datasheets/KEM_SE0208_SS.pdf
Due to the absence of a lens, KEMET’s Pyro Sensor is low profile, as it doesn't protrude, which makes it ideal for gathering visual requirements. With KEMET’s proprietary piezoelectric ceramic material and element structure of the Pyroelectric Infrared Sensor, humans can be detected through resin. This allows more freedom in the design of the outer appearance of the end product. By adding a KEMET proprietary lens the detection distance can be further improved.
SOFTWARE
In this chapter we explain how the code works, and you can download it at the download section: OpenAndCloseTheGate.ino
#include <Servo.h>
Servo myservo;  // create servo object to control a servo
int pos = 0;    // variable to store the servo position
// int Pyro = A1;
unsigned long PyroRead = 0;
unsigned long IR_threshold = 199900;
// Note: SS-430 has two pulses of 200msec per detection.
// IR_threshold is in microsec (usec), therefore 199.9 msec threshold
int LED = 7;
int Detected = LOW;
int IR_sensed = 0;

void setup() {
myservo.attach(5);  // attaches the servo on pin 9 to the servo object
pinMode (7, OUTPUT); //LED Connected to Pin 7
pinMode (A1,INPUT); // IR Sensor connected to A1
}
We use the servomotor library, and declare the variables. In Pin 5 we connect the servomotor, pin 7 the LED, and pin A1 the infrared sensor SS-430.
When we move our hand through the infrared sensor SS-430, it detects two pulses of 200 microseconds. The first pulse is detected when we put the hand over the sensor and the second pulse when we remove the hand. Reference: https://ec.kemet.com/blog/pyro-switch-hidden-ir-detection/
In my case, I did tests with the threshold and obtained better results with 199.9 microseconds. For some reason, the signal had a lot of noise and I controlled it with this threshold.
void loop() {
while ((IR_sensed < 2)){ //Break after 2 good triggers
PyroRead = pulseIn(A1, HIGH); //Measure trigger point
if(PyroRead > IR_threshold){ //Make sure trigger is over 198msec)
IR_sensed++; //Mark as a good trigger
}
}
if (Detected == HIGH){ // Turn LED OFF if it was previous ON
Detected = LOW;
digitalWrite(7, LOW);
for (pos = 180; pos >= 0; pos -= 1) { // goes from 180 degrees to 0 degrees
myservo.write(pos);              // tell servo to go to position in variable 'pos'
delay(10);                       // waits 10ms for the servo to reach the position
}
}
else {
Detected = HIGH; // Turn LED ON if it was previous OFF
digitalWrite(7, HIGH);
for (pos = 0; pos <= 180; pos += 1) { // goes from 0 degrees to 180 degrees
// in steps of 1 degree
myservo.write(pos);              // tell servo to go to position in variable 'pos'
delay(10);                       // waits 10ms for the servo to reach the position
}
}
PyroRead = 0; // Reset readings
IR_sensed = 0;
delay(750); // Accept triggers after 750 msec
}
After detecting the two pulses of 200 microseconds, we have two situations:
- If the LED was ON, now we turn it OFF and open the gate with the servomotor.
- If the LED was OFF, now we turn it ON and close the gate with the servomotor.
PRINTING AND ASSEMBLING THE CONTROL PANEL
We have developed the parts of this security system with the 3D printer, and which we show in the figures below. You can download the STL files at the end of this tutorial.
This is a 10x10 cm panel, where we will place all the parts of our security system: SS-430 proximity sensor, Arduino MEGA 2560 board, LED, servomotor and gate.
This is the piece in which we assemble the servomotor, which will support the gate that opens and closes. Now, our project would be assembled as follows:
TEST
This system provides security for pedestrians, cyclists and animals in areas where autonomous robots are operating. Every time we need to occupy an area we will only have to activate the gate with our hand to close it. Once we finished our tasks, we will open the gate with our hand.
CONCLUSION
This experience was interesting because we obtained satisfactory results, for example:
- Although the recommended threshold is 198 microseconds, I did tests and obtained better results with a threshold of 199.9 microseconds.
- The electromagnetic noise, light and slight movements to the SS-430 sensor produces incorrect readings, so we solved it by placing the device in a fixed place and free of interference.
- I used the Without lens module, since my tests were carried out in a small and closed place.
What we are going to do in this project is that when we pass our hand over the SS-430 sensor, then the Autonomous Robot will stop for five seconds. Then the vehicle will continue with the march. The communication is achieved through HC-05 Bluetooth devices, the panel is configured as a master and the autonomous robot as a slave. Here we find two applications:
- The autonomous robot can be stopped at our will when we see an accident risk.
- We can stop the autonomous robot at our will, so that a passenger gets on or off the vehicle. This would have a use in public transport for example.
(Timing: 12 hrs.)
TRANSMITTER
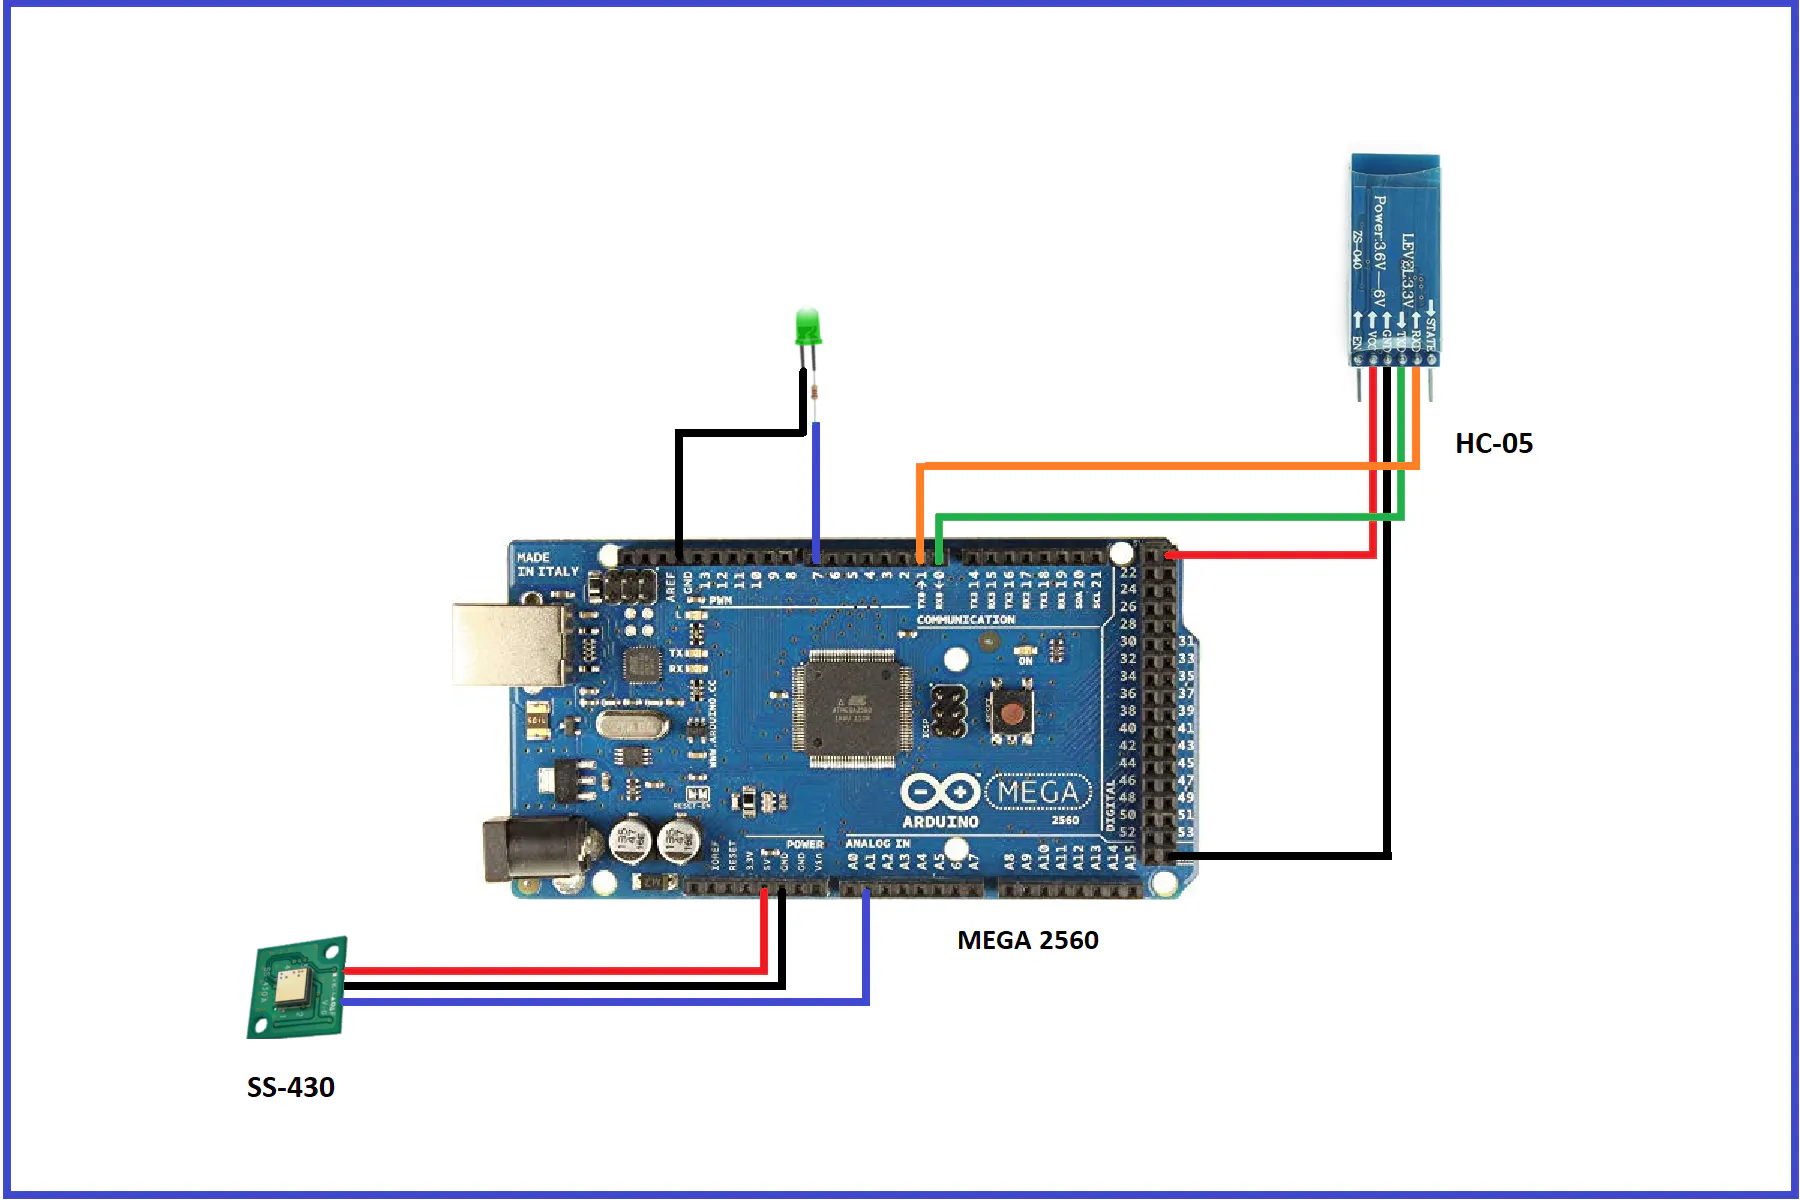
The electrical diagram of the transmitter system is shown below:
Every time we move our hand over the SS-430 sensor, this device sends the acknowledgment signal to the Mega 2560 board. Then, the "a" character is sent through the serial port and the HC-05 Bluetooth board. LED turns on 5 seconds and then automatically turns off. This process is repeated every time we approach our hand to the sensor..
In my case, the AT commands to configure this Bluetooth HC-05 as a master are the following:
AT
AT+ROLE=1
AT+CMODE=0
AT+BIND=21,13,5df34
AT+RESET
Transmitter code: StopMotion.ino
unsigned long PyroRead = 0;
unsigned long IR_threshold = 199900;
// Note: SS-430 has two pulses of 200msec per detection.
// IR_threshold is in microsec (usec), therefore 198msec threshold
int LED = 7;
int Detected = LOW;
int IR_sensed = 0;
void setup() {
Serial.begin(9600);
pinMode (7, OUTPUT); //LED Connected to Pin 7
pinMode (A1,INPUT); // IR Sensor connected to A1
}
void loop() {
while ((IR_sensed < 2)){ //Break after 2 good triggers
PyroRead = pulseIn(A1, HIGH); //Measure trigger point
if(PyroRead > IR_threshold){ //Make sure trigger is over 198msec)
IR_sensed++; //Mark as a good trigger
}
}
digitalWrite(7, HIGH);
Serial.println("a");  // stop the autonomous robot
delay(5000);
digitalWrite(7, LOW);
Serial.println(" ");  // stop the autonomous robot
PyroRead = 0; // Reset readings
IR_sensed = 0;
}
RECEIVER
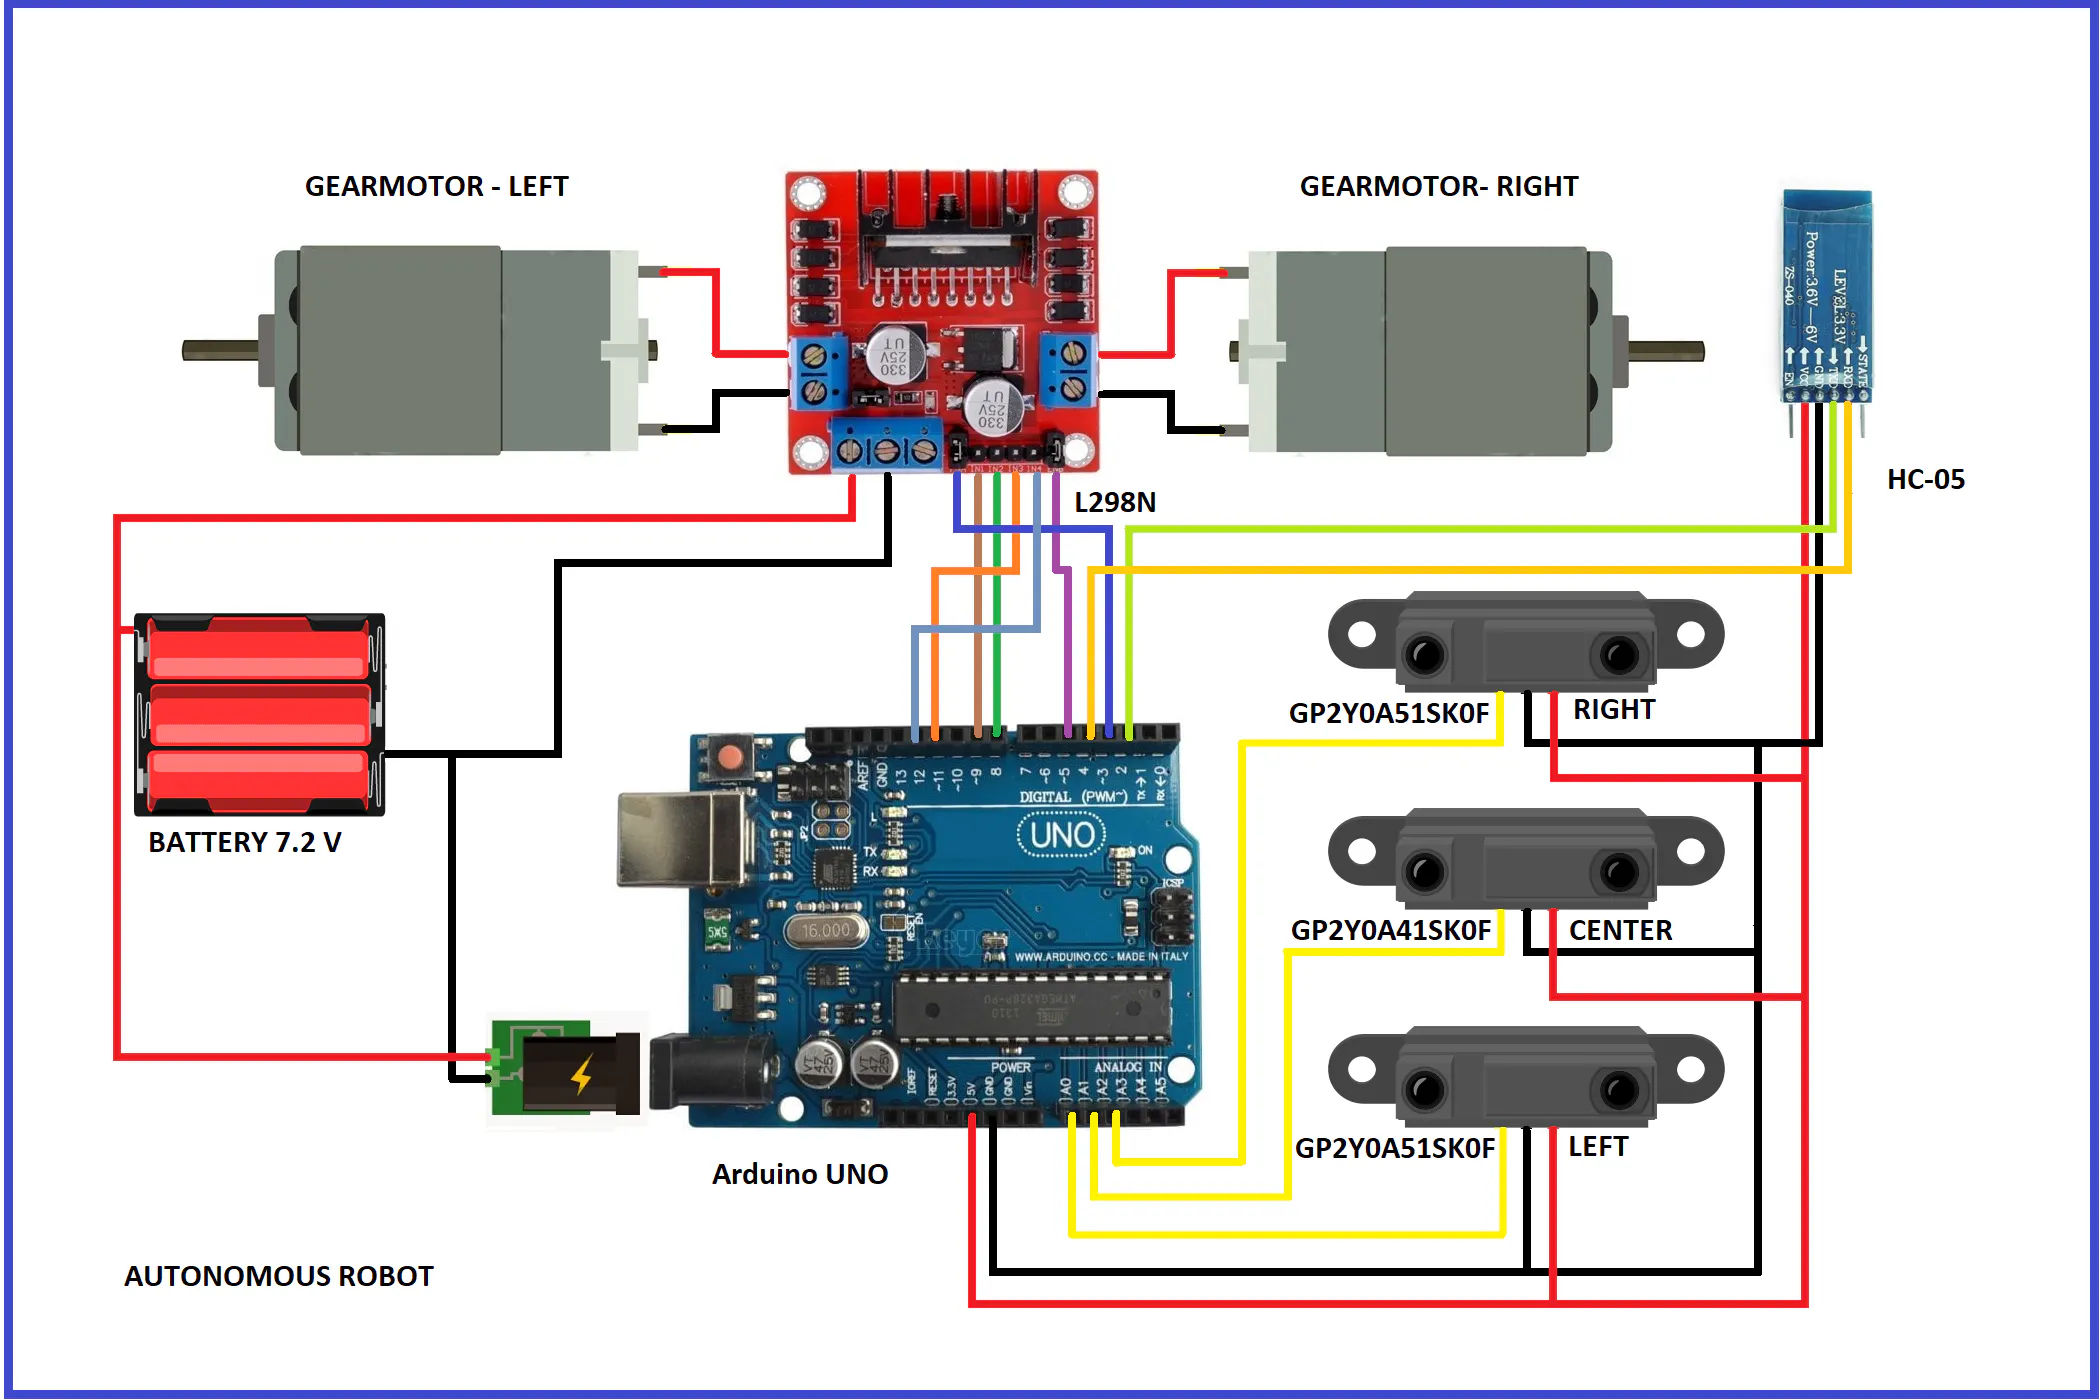
The electrical diagram of the receiver system (Autonomous robot) is shown below:
How does it works?
- The robot is equipped with 3 analog infrared sensors, which detect the distance at which the walls are, one in front and two on the left and right sides.
- When the robot is less than 10 cm from the wall in front of it, it stops automatically, rotates 180 degrees and starts the motion.
- The robot uses PID controller to maintain a central distance between the left and right walls. If the robot is near the left wall, then it can decrease the speed of the right motor to make the robot move to the right, moving away from the left wall, and vice versa.
- When the robot receives the "a" character by means of the HC-05 Bluetooth, the robot stops automatically 5 seconds, at the end of which it starts the motion.
In my case, the AT commands to configure this HC-05 Bluetooth as a slave are the following:
AT
AT+ROLE=0
AT+RESET
Receiver code: AutonomousRobot.ino
#include <SoftwareSerial.h>
SoftwareSerial ModuloHC05 (2, 4);  // 2 is the pin RX ARDUINO - TX BT
// 4 is the pin TX ARDUINO - RX BT
//Motor A
int EN1 = 3; //Speed control - EN1
int IN1 = 9; //Direction - IN1
int IN2 = 8; //Direction - IN2
//Motor B
int EN2 = 5; //Speed control - EN2
int IN3 = 11; //Direction - IN3
int IN4 = 12; //Direction - IN4
int error=0;
int dif,difAnt=0;
const float Kp=0.1;
const float Kd=0.1;
int option;
int led = 13;
void setup() {
Serial.begin(9600);
ModuloHC05.begin(9600);
pinMode(led, OUTPUT);
pinMode(A0, INPUT); //left
pinMode(A1, INPUT); //forward
pinMode(A2, INPUT); //right
pinMode(EN1, OUTPUT);
pinMode(IN1, OUTPUT);
pinMode(IN2, OUTPUT);
pinMode(EN2, OUTPUT);
pinMode(IN3, OUTPUT);
pinMode(IN4, OUTPUT);
// Set initial rotation direction
digitalWrite(IN1, LOW);
digitalWrite(IN2, LOW);
digitalWrite(IN3, LOW);
digitalWrite(IN4, LOW);
digitalWrite(led, LOW);
}
void loop() {
char option;
float volts1 =  analogRead(A1)*0.0048828125;  // value from sensor * (5/1024)
float distance1 = 9*pow(volts1, -1); // worked out from datasheet graph //GP2Y0A41SK0F - 4 a 30 cm
dif = analogRead(A2) - analogRead(A0);
error = floor(Kp*(dif)+Kd*(difAnt-dif));
difAnt=dif;
int d0 = constrain(255 - error, 0, 255);//left speed
int d1 = constrain(255 + error, 0, 255);//right speed
if (distance1 <= 10){
stop();
delay(100);
//backward 275 ms
{
digitalWrite(IN1, LOW);
digitalWrite(IN2, HIGH);
analogWrite(EN1, 128);  // average speed
digitalWrite(IN3, LOW);
digitalWrite(IN4, HIGH);
analogWrite(EN2, 128);  // average speed
}
delay(275);
stop();
delay(100);
//turn to the left 90 degrees
digitalWrite(IN1, HIGH);
digitalWrite(IN2, LOW);
analogWrite(EN1, 128);
digitalWrite(IN3, LOW);
digitalWrite(IN4, HIGH);
analogWrite(EN2, 128);
delay(480);
stop();
delay(100);
}
//move forward with calculated speeds
digitalWrite(IN1, HIGH);
digitalWrite(IN2, LOW);
analogWrite(EN1, d0);
digitalWrite(IN3, HIGH);
digitalWrite(IN4, LOW);
analogWrite(EN2, d1);
delay(50);
if (ModuloHC05.available()){
//we read the option sent
option=ModuloHC05.read();
Serial.write(option);
if(option=='a') {
digitalWrite(led, HIGH);
stop();
delay(5000);
digitalWrite(led, LOW);
}
}
}
void stop(){
digitalWrite(IN1, LOW);
digitalWrite(IN2, LOW);
digitalWrite(IN3, LOW);
digitalWrite(IN4, LOW);
delay(10);
}
PRINTING AND ASSEMBLING THE CHASSIS
We have developed the parts of this autonomous robot with the 3D printer, and which we show in the figures below. You can download the STL files at the end of this tutorial.
This chassis is very important, since we are going to place the Arduino UNO board, the three infrared distance sensors, the L298N driver, the battery and the HC-05 Bluetooth.
This cylinder-shaped support will help us to connect the chassis with the ball caster.
TEST
This system provides security to stop the autonomous robot with a simple movement of our hand as shown in the video below.
CONCLUSION:
We have achieved our goal of stopping the autonomous robot with a simple movement of our hand. In this way, we can prevent an accident. In the same way we can use this application in public transport with autonomous robots, either to get on or off a passenger.
Comments