


Hardware components | ||||||
_ztBMuBhMHo.jpg?auto=compress%2Cformat&w=48&h=48&fit=fill&bg=ffffff) |
| × | 1 | |||
 |
| × | 1 | |||
| × | 1 | ||||
Software apps and online services | ||||||
 |
| |||||
Hand tools and fabrication machines | ||||||
 |
| |||||
Intro: So this project goes over how to use your Alexa to send commands and control your TV by talking to it. Anything your TV Remote can do, your Alexa can do. What we are going to do is record the remote IR Signals and use Alexa to resend those same signals when voice commanded. Here are the steps you need to make this happen or watch this YouTube video:
Step 1: Download Prerequisite LibrariesDownload the following libraries and put them into your Arduino IDE libraries:
- ESPAsyncTCP - https://github.com/me-no-dev/ESPAsyncTCP
- ESPAsyncUDP - https://github.com/me-no-dev/ESPAsyncUDP
- FauxMoESP - https://bitbucket.org/xoseperez/fauxmoesp > Downloads > Download Repository
Open up the ESP8266-Alexa.ino sketch and upload it to your NodeMCU (download the board info from Board Manager in Arduino IDE). All you should need to change is the Wi-Fi Credentials and the Device Names.
You can customize the Device Names in the ESP8266-Alexa.ino sketch and the Signals that go out in the IR-Alexa-Send.ino sketch:
Upload the IR_REMOTE_read.ino sketch to your Arduino to read the remote signal hits and record your IR signals received for reference later on as seen in this tutorial:
Step 4: Programming Arduino to Send TV IR Signals via AlexaNext, open up IR-Alexa-Send.ino in the Arduino IDE and upload it to your Arduino Uno (make sure you change the uploading board info to UNO).
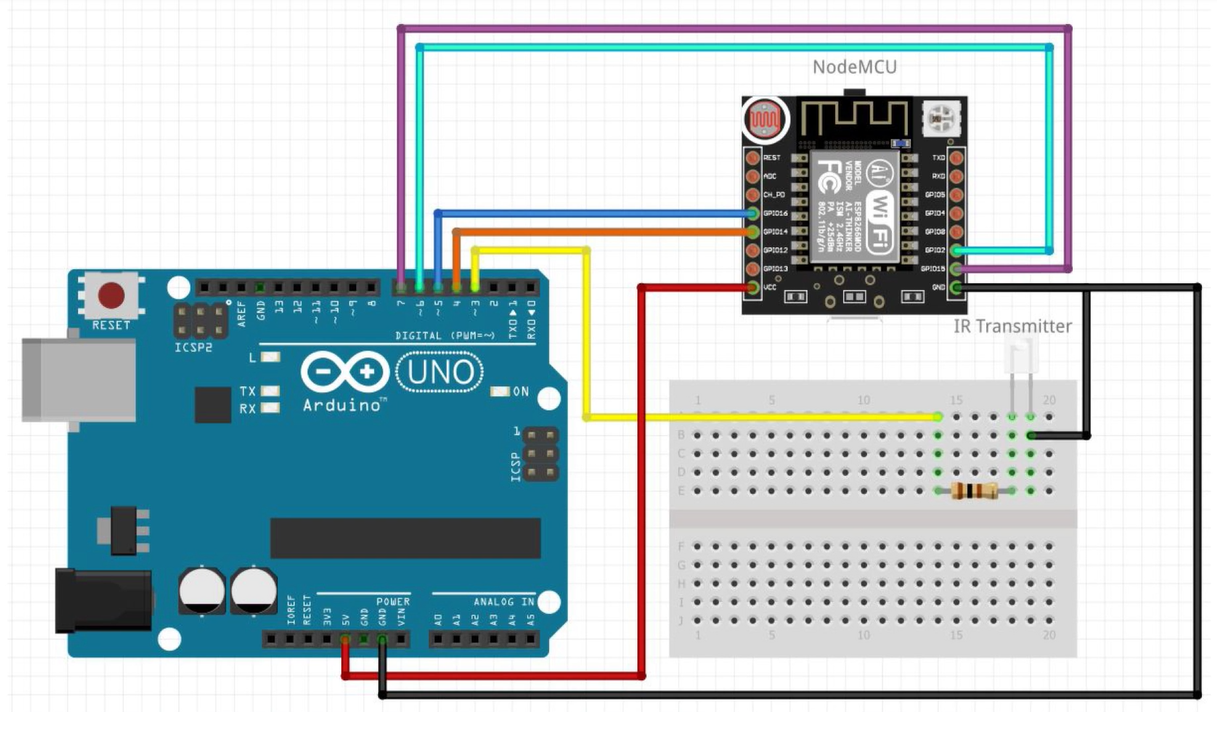
Wire up power to both modules and connecting wires between. Make sure IR transmitter is wired up to Terminal 3 of UNO. See attached schematic for more information:
Now go into your Amazon Alexa app on your mobile device or PC, go to your Smart Home and press "Add Devices" to find each of the commands you set in the ESP8266-Alexa.ino sketch.
Once they are found you can test it using one of the following command structure:
- "Alexa, turn on DEVICE NAME"
- "Alexa, turn DEVICE NAME on"
- "Alexa, turn the DEVICE NAME on"
- "Alexa, turn on the DEVICE NAME"


Comments