

Hardware components | ||||||
 |
| × | 1 | |||
 |
| × | 1 | |||
 |
| × | 1 | |||
 |
| × | 1 | |||
 |
| × | 1 | |||
Software apps and online services | ||||||
| ||||||
In our reception our staff needed to be buzzed in, so we decided to take our own medicine and create a virtual button.
This code allows you to send a RPC (Remote Procedure Call), which looks like a normal HTTP call from any browser. We used Mongoose, since it is really easy and fast to work with and it's built-in OTA (Over The Air) update of code, means we could install our tech and still over time upgrade the firmware, without dissembling it for reprogramming.Step 1: Preparation
- Install Mongoose-OS: Straight forward, just follow these very easy steps for your OS here:
https://mongoose-os.com/software.html
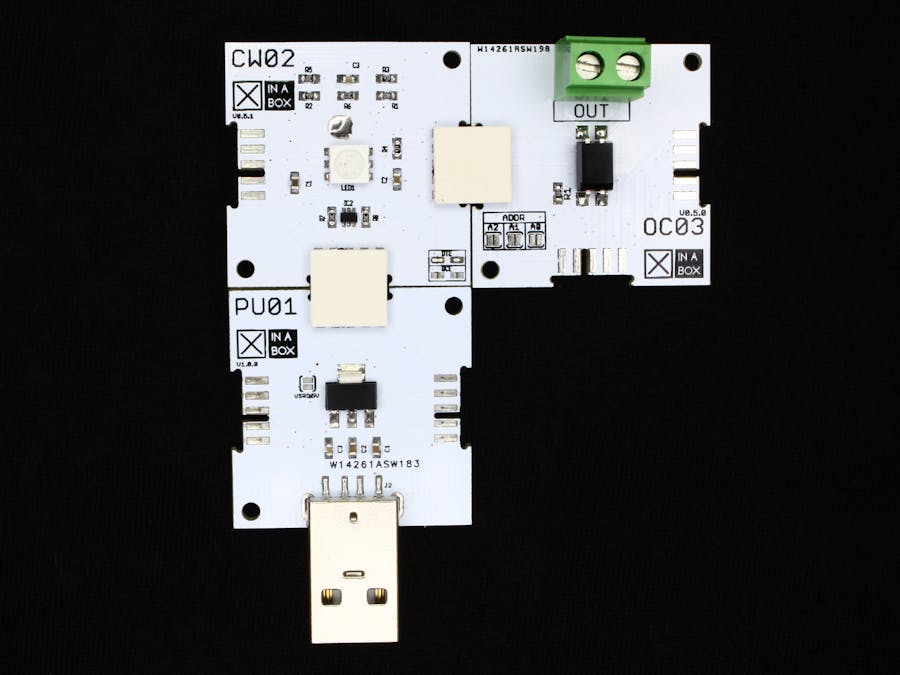
- Click the IP01 and the CW02 together using a XC10 connector. See image below:
- Insert the IP01 into your USB port
- Make sure the IP01 switches is in position B and DCE.
- Flash the Mongoose-OS to CW02 from your command line. Like this:
cd <to your Mongoose installation>
export MOS_PORT=<your comport, such as /dev/cu.usbserial-xyz>
bin/mos flash esp32
- You could also just enter the console and do most from there, but here we do it from the command line, so the work is quickly done. To enter the console:
cd <to your Mongoose installation>
bin/mos
While these steps could be done in one long statement, we decided to split them up, and since you would copy and paste them anyhow, lets make it easy:
Set the I2C pins to the CHIPs standard:
bin/mos config-set i2c.scl_gpio=14 i2c.sda_gpio=2
Connect your CW02 to your WiFi:
bin/mos wifi <Your SSID> <Your password>
Disconnect WiFi in AP mode and setup a domain name, so you can connect to the CW01 by hostname instead of finding the correct IP address. This will only work if:
- You disconnect WiFi in AP mode as we do below.
- Either use a Mac or install Bonjour on you Windows machine.
bin/mos call Config.Set '{"config": {"wifi": {"ap": {"enable": false}}}}'
bin/mos call Config.Set '{"config": {"dns_sd": {"enable": true}}}'
bin/mos call Config.Set '{"config": {"dns_sd": {"host_name": "xinabox_switch"}}}'
And finally you have to reboot the CW02 in order for the config to work
bin/mos call Config.Save '{"reboot": true}'
Very quickly after this you should be able to ping xinabox_switch.local
Unplug the IP01 from your computer and assemble a circuit as per top image.
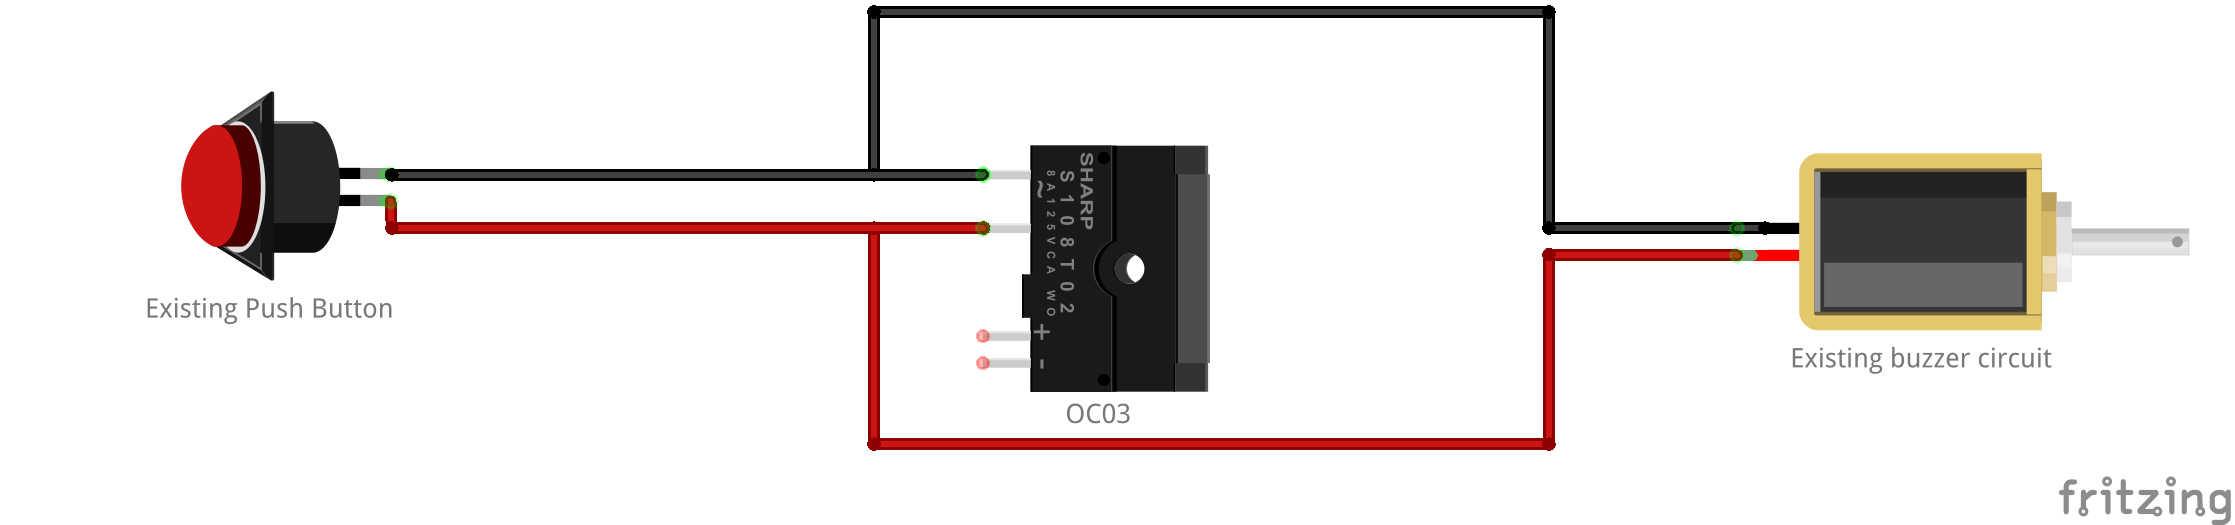
Plug the PU01 (or if you decided to stick with the IP01) into a USB power source. Connect wires parallel from your existing switch (leave that, just in case) to the OC03 (polarity doesn't matter). See Fritzing drawing.
Once powered up and to see that you are actually talking to your ☒CW02, what about scanning the BUS, aka the I2C bus:
bin/mos --port ws://xinabox_switch.local/rpc call I2C.Scan
If it all works and your ☒OC03 is installed correctly, you should see a number '56' be returned. That is the I2C address of the OC03 in decimal (in hex it is 0x38).
Step 4: Programming- Now open the Mongoose in console mode, see above. It should open with a Window where it ask for a port number, enter:
ws://xinabox_switch.local/rpc
- It will communicate with the CW02, and realise that the unit is already flashed and connected to WiFi, so it will just give 3 check marks. Close the window and
refresh file list
- Copy and paste the code below into init.js, and click on
save+reboot
- You circuit is now programmed.
You have now implemented another RPC call so from your terminal you can enter:
bin/mos --port ws://xinabox_switch.local/rpc call Switch
... and your buzzer should go for 2 sec. You could also just do it from - almost - any browser:
http://xinabox_switch.local/rpc/Switch
... with same effect.
Step 6: Next stepYou can use any tool that can fire off an URL. I do it from an Apple App called Workflow, that allows me to do it from my phone or as a complication from my Apple Watch, but there are many other options out there. Here is my Workflow script, but with hardcoded IP address: Enjoy!


Comments