

Hardware components | ||||||
 |
| × | 1 | |||
 |
| × | 1 | |||
Software apps and online services | ||||||
 |
| |||||
| ||||||
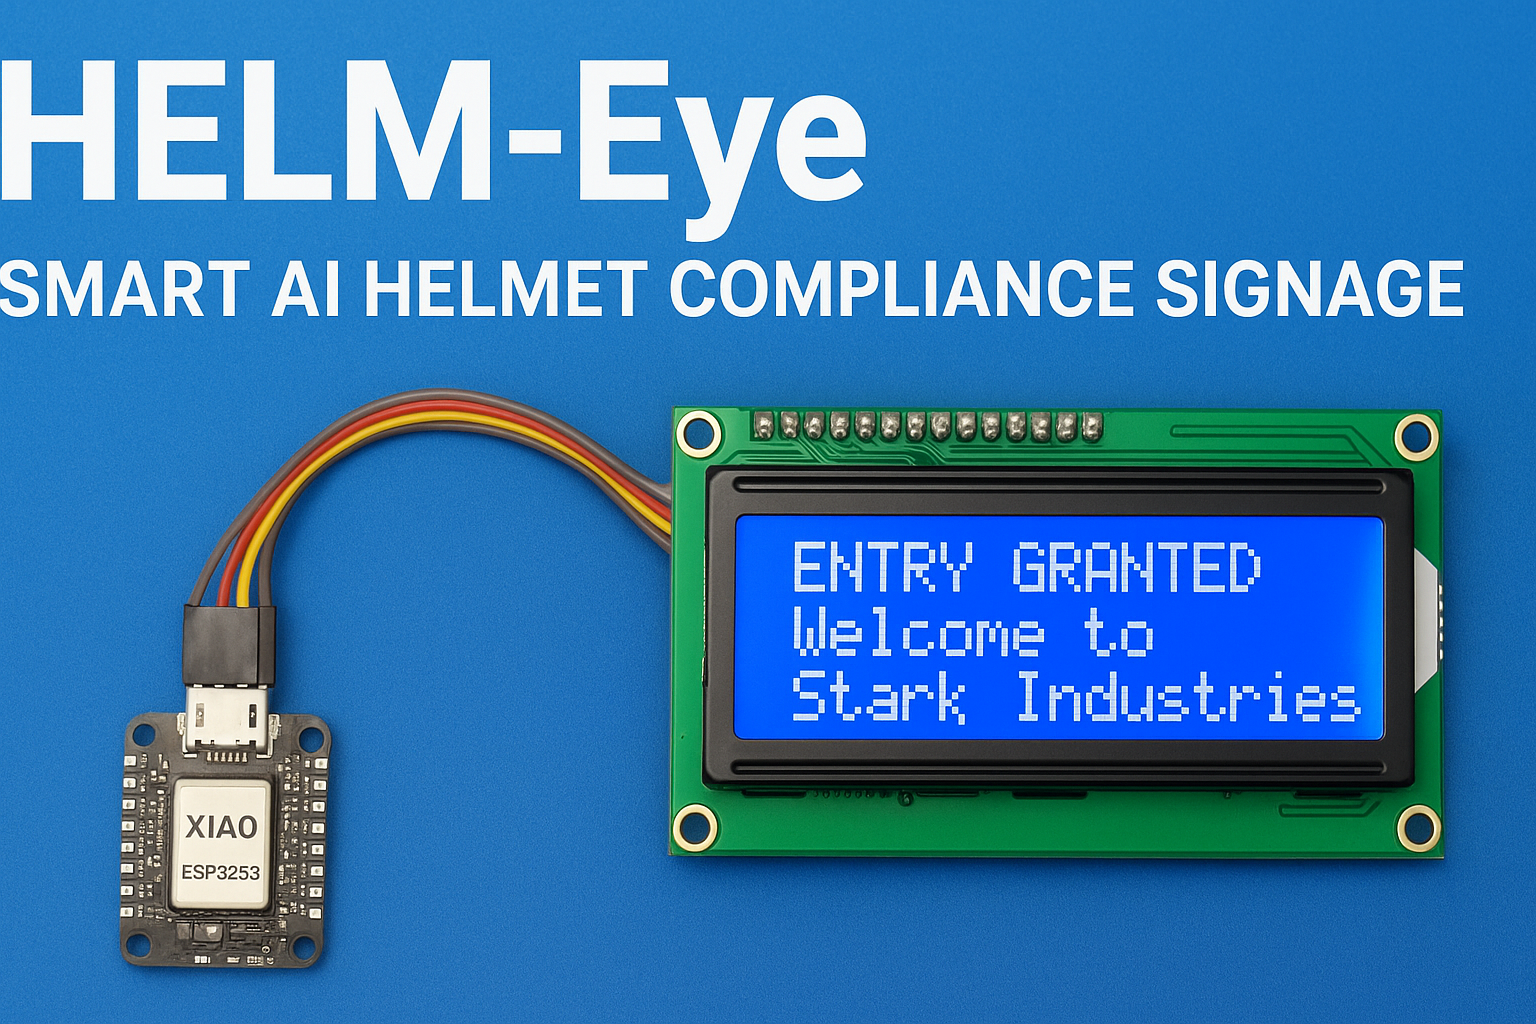
An AI-powered interactive safety signage system that detects if a worker is wearing a helmet and displays dynamic messages accordingly.
Elevator PitchSafety first!This project uses the Seeed Studio XIAO ESP32S3 Sense and SenseCraft AI to detect whether a person is wearing a safety helmet. The system then displays a clear safety message on a 16×2 I²C LCD display:
- Helmet detected → ENTRY GRANTED + Welcome message
- No helmet → ENTRY DENIED + Safety warning
- No person present → Displays company name
It’s compact, low-cost, beginner-friendly, and perfect for factory gates, construction sites, and restricted areas.
Bill of Materials (BOM)XIAO ESP32S3 Sense
16×2 I²C LCD Display (0x27 addr)
USB-C Cable
Breadboard (optional)
Features- Runs real-time helmet detection using onboard camera.
- Displays dynamic messages depending on detection result.
- Fully works offline — no internet needed after setup.
- Easy to build with minimal wiring.
Install Arduino IDE from arduino.cc.
- Install Arduino IDE from arduino.cc.
In Arduino IDE:
- Go to File → Preferences → Add Board Manager URL:
https://files.seeedstudio.com/arduino/package_seeeduino_boards_index.json- Go to Tools → Board → Board Manager → Search for Seeed ESP32 and install.
Connect the XIAO ESP32S3 Sense via USB-C.
Select:
Board: XIAO ESP32S3 Sense
Port: Your device’s COM port.
Step 2 – Training the Helmet Detection Model in SenseCraft AIGo to SenseCraft AI.
Create a new project → Select Image Classification.
- Add two classes:
Helmet

No Helmet
Upload sample images (you can take them directly with your XIAO ESP32S3 Sense camera
Train the model using Swift YOLO or MobileNet (faster for real-time).
Once trained, click Deploy → Select Grove Vision AI / XIAO ESP32S3 Sense format.
Flash the model to the XIAO via the SenseCraft updater
Step 3 – Wiring the LCD DisplayWe’ll use an I²C LCD (SDA/SCL pins).
Diagram:
In Arduino IDE, go to Sketch → Include Library → Manage Libraries and install:
LiquidCrystal_I2C by Frank de Brabander
Seeed_Arduino_SSCMA (for SenseCraft AI model inference)
#include <Wire.h>
#include <LiquidCrystal_I2C.h>
#include "Seeed_Arduino_SSCMA.h"

// LCD settings
LiquidCrystal_I2C lcd(0x27, 16, 2);
SSCMA ai;

// Scroll variables
unsigned long lastScrollTime = 0;
int scrollPos = 0;
String scrollMsg = "";
#define SCROLL_INTERVAL 250

void setup() {
  Wire.begin();
  lcd.init();
  lcd.backlight();
  ai.begin();
  ai.setDefaultModel(); // Your SenseCraft model
}

void loop() {
  if (ai.invoke()) {
    int id = ai.getTopClass();
    String label = ai.getClassName(id);
    float conf = ai.getConfidence(id);

    if (conf < 0.6) {
      showStaticCentered("Stark Industries");
      lcd.setCursor(0, 1);
      lcd.print("                ");
    }
    else if (label == "Helmet") {
      showStaticTop("ENTRY GRANTED");
      scrollMsg = "Welcome to Stark Industries";
      scrollBottom();
    }
    else if (label == "No Helmet") {
      showStaticTop("ENTRY DENIED");
      scrollMsg = "Please wear a helmet";
      scrollBottom();
    }
  }
}

void showStaticTop(String msg) {
  lcd.setCursor(0, 0);
  lcd.print("                ");
  lcd.setCursor(0, 0);
  lcd.print(msg);
}

void showStaticCentered(String msg) {
  lcd.clear();
  int spaces = (16 - msg.length()) / 2;
  lcd.setCursor(spaces, 0);
  lcd.print(msg);
}

void scrollBottom() {
  if (millis() - lastScrollTime > SCROLL_INTERVAL) {
    String padded = scrollMsg + "   ";
    String displayPart = padded.substring(scrollPos, scrollPos + 16);
    lcd.setCursor(0, 1);
    lcd.print(displayPart);
    scrollPos++;
    if (scrollPos > padded.length()) scrollPos = 0;
    lastScrollTime = millis();
  }
}Power the XIAO ESP32S3 Sense.
- Stand in front of the camera wearing a helmet:Top:
ENTRY GRANTEDBottom: scrolling welcome text. - Remove helmet:Top:
ENTRY DENIEDBottom: scrolling warning text. - No person in view:Centered text:
Stark Industries
- Mount the XIAO ESP32S3 Sense and LCD in a weather-protected enclosure.
- Install at the entrance of a work site
- Optionally, add LED beacons or a buzzer for extra alerting


Comments