

Hardware components | ||||||
 |
| × | 1 | |||
| × | 1 | ||||
 |
| × | 1 | |||
For my next project, I'm building a machine to simply print a bunch of files by pressing different buttons.
We're basically going to mash together these two tutorials:
In the end, we'll write code to print arbitrary text, an image file, a saved text file, and a file retrieved from the Interplanetary File System – a new type of decentralized web!
I'm using the Mini Thermal Printer starter kit – follow the Adafruit tutorial to set up your printer with TTL, but you don't need the last networking part.
Ready? Let's go!
Step 1. Printing from a ButtonSee the attached printtest.py for this code.
Since the thermal printer is plugged into the Pi's RX and TX pins for TTL control, I don't have room to plug my test button into GPIO pin 18. So, I moved down and put it on pin GPIO23 + GND instead:
GPIO.setup(23, GPIO.IN, pull_up_down = GPIO.PUD_UP)
(It doesn't matter which button wire goes on which pin.)
Then, I initialized the printer (using the port and baud rate I found during the Adafruit tutorial – which doesn't change if you unplug the printer or Pi, unless you're plugging more stuff in):
os.system("stty -F /dev/serial0 19200")
I continued according to my "Shutdown/Restart Button" tutorial, using the os.system function to run the print commands from the Adafruit tutorial.
The first test worked! To use the script, run:
sudo python printtest.py
As with my previous tutorial, you need to run as the superuser (that is, with sudo) because it's required to use the GPIO pins.
Here's the feedback from that first test – I pushed the button a couple of times, and the end part (starting at ^C) is me killing the program with Ctrl+C:
Next, I wanted to send a text file to the thermal printer. I've saved some text into the file welcome.txt, in the same Scripts directory with printtest.py .
Since I was running with sudo (and therefore as root), I had to specify a longer path with the pi user's home directory in the command:
os.system("lp /home/pi/Scripts/welcome.txt")
Using the CUPS filter as described in Adafruit's tutorial, the printer automagically reformats text to fit the page. Good news: you can enter arbitrary text without it being cut off! Bad news: ASCII art gets reformatted :/
You can monkey around with scale to fix this; I wanted to print the welcome text for the Interplanetary File System, so I used "-o cpi=18" to set the characters per inch to 18, rather than the standard 12, since the ASCII art is about 50% longer than the default page width.
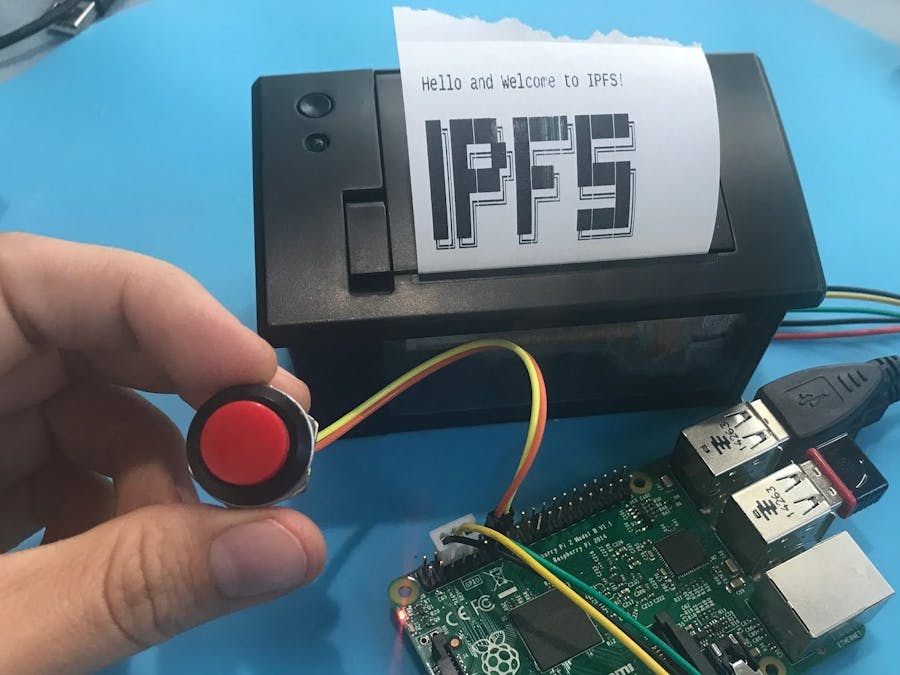
Step 3. Printing from the Interplanetary File System (IPFS)This depends upon you having set up IPFS on the Raspberry Pi. I used "ipfs-rpi" by Claudio Bizzotto (setup video coming soon!). Then, I updated the Python script to pull down the readme and print it out.
The print-ipfs.py file attached to this tutorial contains the code for this!
Canceling a PrintI needed to cancel lots of prints to save paper during testing! I haven't yet found a great way to do this with commands, but I did it by hitting Ctrl+C and yanking the printer power for at least 10 seconds ^_^
More soon... stay tuned!
VideoThis isn't edited down yet, but here's my first time setting up the thermal printer, with all its thrills and spills (and fire! see 13:00)...


_3u05Tpwasz.png?auto=compress%2Cformat&w=40&h=40&fit=fillmax&bg=fff&dpr=2)
Comments