/* For the Inkplate 6 e-paper display with ESP32: https://www.crowdsupply.com/e-radionica/inkplate-6
* Adapted from the Inkplate 6 Arduino example code: https://github.com/e-radionicacom/Inkplate-6-Arduino-library
*/
#include "Inkplate.h"
#include "driver/rtc_io.h"
#define uS_TO_S_FACTOR 1000000 //Conversion factor for micro seconds to seconds
#define TIME_TO_SLEEP 20 //Time ESP32 will go to sleep (in seconds) */
RTC_DATA_ATTR int slide = 0;
int ar = 0;
int dim = 0;
int ecks = 0;
int wye = 0;
int rekt = 0;
int prob = 0;
int offs = 0;
int smol = 0;
Inkplate display(INKPLATE_1BIT); //Set library to be in 1 Bit display mode by default
/*To convert image to bitmap (Array like this one) use LCD image converter program set to 4 bit grayscale. You can use 4 bit bitmap and display library will scale it to 3 bit bitmap and display it.
* Converting image to bitmap:
* Open lcd-image-converter.exe, when it opens click on New Image, than click OK. Go to Image -> Import... and browse image.
* Click on Options -> Conversion... than select next: Preset: Grayscale 4, on Prepare tab select Type: Grayscale, Main Scan Direction: Top to Bottom, Line Scan Direction: Forward
* On Image tab select Block Size: 8 Bits, Byte Order: Little-Endian
* At the end click on Show Preview and copy all HEX data.
* Paste it inside array (beetwen curly brackets) with type: static const uint8_t picture_name[] PROGMEM = {};, where "picture_name" is name of your array that represents picture.
*/
void setup() {
display.einkOn();
display.begin();
switch (slide) {
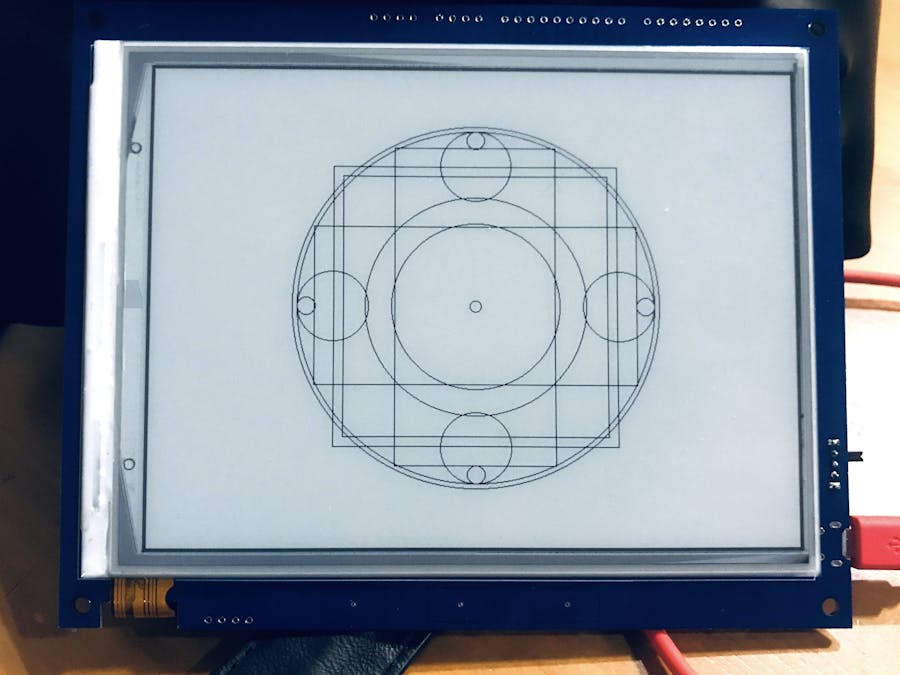
// Display 1 bit per pixel image using Adafruit GFX Library
// Origin is top-left; count locs from left-right and top-down
// Screen is 800px wide, 600px high
case 0:
//First we have to choose 1 Bit mode
display.selectDisplayMode(INKPLATE_1BIT);
//Now we write something to buffer
for (int i = 0; i < 1; i++) {
// circles from center to
esp_random();
display.drawCircle(400, 300, random(3,25), BLACK); // smol
display.drawCircle(400, 300, random(50,200), BLACK); // medium
display.drawCircle(400, 300, random(100,200), BLACK); // medium
ar = random(220,290);
display.drawCircle(400, 300, ar, BLACK); // lurge
display.drawCircle(400, 300, (ar + 6), BLACK); // double outline
}
for (int i = 0; i < 2; i++) {
// Maybe draw 4 or 8 circles, at the poles
esp_random();
prob = random(0,2); // values including 0,1
if (prob == 1) {
smol = random(10,60); // small circle radius
offs = ar - smol; // small circle center
display.drawCircle(400, (300 - offs), smol, BLACK);
display.drawCircle(400, (300 + offs), smol, BLACK);
display.drawCircle((400 - offs), 300, smol, BLACK);
display.drawCircle((400 + offs), 300, smol, BLACK);
}
}
for (int i = 0; i < 2; i++) {
// Draw 2 squares in the center of the screen
esp_random();
dim = random(25,75) * 6; // size of rect as pct of full screen (div/100 for pct, then x 600)
ecks = 400 - (dim * .5); // starting point: center minus half dimension
wye = 300 - (dim * .5); // starting point: center minus half dimension
display.drawRect(ecks, wye, dim, dim, BLACK); // xpos, ypos, width, height
}
for (int i = 0; i < 1; i++) {
// Draw 2 rectangles in the center of the screen, overlapping
esp_random();
// dim = 500;
// rekt = 300;
dim = random(10,85) * 6; // length of rect as pct of full screen (div/100 for pct, then x 600)
rekt = random(1,3) * dim; // breadth of rect as pct of length
rekt = rekt / 4;
ecks = 400 - (dim * .5); // starting point: center minus half dimension
wye = 300 - (rekt * .5); // starting point: center minus half dimension
display.drawRect(ecks, wye, dim, rekt, BLACK); // xpos, ypos, width, height
ecks = 400 - (rekt * .5); // starting point: center minus half dimension
wye = 300 - (dim * .5); // starting point: center minus half dimension
display.drawRect(ecks, wye, rekt, dim, BLACK);
}
break;
}
//IMPORTANT!!! Always clean screen before writing new picture to it!
//There is also similar function called clearDisplay() but this only clear buffer.
//Since we are using deep sleep of ESP32, ESP32 resets after every wake up, so buffer is clean and there is not any data to clean, so there is no reason to use clearDisplay().
display.clean();
display.display();
esp_sleep_enable_timer_wakeup(TIME_TO_SLEEP * uS_TO_S_FACTOR);
// slide++;
// if (slide > 4) slide = 0;
//This is to reduce current consumption of ESP32 in deep sleep mode. Otherwise, you don't need to use this.
rtc_gpio_isolate(GPIO_NUM_12);
esp_deep_sleep_start();
}
void loop() {
//Nothing
}


Comments