

For the "Hack to the Future" Hardware Weekend roadshow, we're borrowing an awesome little Bukito printer from Deezmaker. It's perfect because it's super-portable and very durable, reliably producing gorgeous prints at its fourth hackathon so far... having driven across the country, and halfway back, in our crazy van.
To demonstrate what we can do, in my downtime I print enclosures and multi-finger rings. I've started teaching beginners how to do it in Tinkercad.
Why Tinkercad? For one thing, it's absolutely the easiest application out there for beginners. It even has basic shapes like letters and numbers pre-built, which is perfect for this project.
Also, you don't have to download anything – it's all browser-based. This is perfect for hackathons, where the WiFi is a temperamental force.
1. Make an account
Self-explanatory. You can do the quick tutorial if you want.
2. Create the letters
Pick two four-letter words. Drag them onto the platform so that they are aligned at the bottom, and overlap a little on the sides. Don't worry if they don't line up perfectly.
Then, select them all and click Group. Notice that they all turn the same color, showing that it's a unit now.
Grab the little white square in the center of the top and bring it down to 2mm thick.
Next, measure your fist. Mine is about 80mm wide. Grab a corner square and resize the X/Y dimensions so that it looks good to you at that width. I like the elongated style, so I go for about 80mm x 14mm. But it doesn't have to be super-precise.
Then, flip it over 180º so that it faces downward.
3. Add the rings
Now, measure your two middle fingers! Mine are about 19mm across, with the middle finger a little wider than the ring finger.
Make a cylinder that's 5mm high and 3mm wider than your finger in the X and Y dimensions. Then, make another that's at least 5mm tall and the exact width of your finger. Turn it into a hole, and put it through the middle of the other cylinder... if it doesn't center perfectly, that's fine. Then, group the two so that it appears as a single ring with a hole in it.
Rotate the ring 90º so that it sticks up out of the platform, copy and paste it to make another, then smoosh them together and group them. Then, copy that unit to make another:
Now, center one set of rings in the middle of a text block:
Just make sure that the intersection doesn't reduce the amount of space inside the ring. And if you want to be super slick, put them a little bit off-center because your index finger is thicker than your pinky.
Group the unit, and you're ready to print! You can rotate the platform to look at the bottom and see how they'll turn out.
4. Finishing
Under the Design menu, click Download for 3D Printing. STL is a pretty useful file format, which many programs accept. From there on, the process depends on the type of printer you have. For the Bukito, we open it in Cura – a slicer, or program that turns the 3D model into a set of instructions for the printer. You can specify the resolution (I recommend 0.2mm), whether or not you want to include support material (you shouldn't need to), and temperature (about 220ºC for PLA filament), along with other settings.
Then, send it to the printer! The Deezmaker will take files saved to an SD card, but I prefer to leave my laptop hooked up to it and simply print over USB.
If you print at low resolution, it can get pretty gnarly and you'll have to do a lot of cleanup to get rid of sharp nubs that poke into the ring and into your fingers.
If it ends up being a little small, cut the ring on the inside-side to make it adjustable. :)
What's next? Once you've gotten hooked on Tinkercad, graduate to Autodesk's Fusion 360. It's a great intermediate step before you get into hotkey-heavy, powerful programs like Maya, Blender, Rhino, Inventor, SolidWorks, OpenSCAD, and so on.
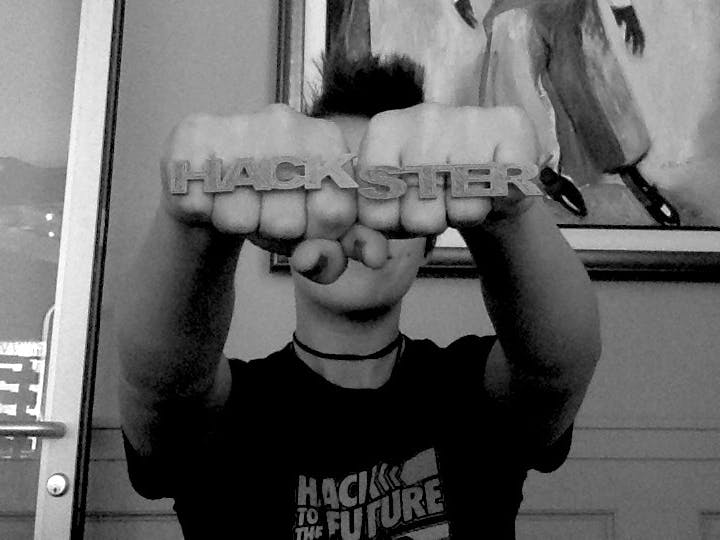
Example knucks: HACKSTER, ALEX GLOW, YEAH SURE


Comments