

Hardware components | ||||||
 |
| × | 1 | |||
| × | 1 | ||||
| × | 1 | ||||
| × | 1 | ||||
| × | 1 | ||||
| × | 1 | ||||
Hand tools and fabrication machines | ||||||
 |
| |||||
 |
| |||||
 |
| |||||
Here's the full video overview on this project. Skip to 1:00 for the hand-soldering demo! Extra-detailed, printable workshop instructions here!
Text instructions for hand-soldering (or see "Hot plate assembly" below):
- Dab flux onto each shiny metal pad of the circuit board. (This part isn't essential, but it will make things much easier because it helps the solder stick to the pads and not the rest of the PCB. Use only a tiny amount, because the excess may make a mess on the board surface – not harmful, but ugly.)
- Melt solder onto ONE pad for each component: resistor, switch, LED, and battery clip. (If you tin more than one pad, the component will be held up above the surface of the board and won't lay flat without a bunch of poking and re-heating. When you tin just one pad, that one will melt when you attach the component and the whole thing will lay flat.)
- Solder everything on, using tweezers to protect your fingies. Start with the switch (the most fiddly one – you'll probably need to clip off a couple of plastic nubbins on the bottom, using side cutters). Do the battery clip last; you may need to let the iron sit on the connections for a little while to heat it up all the way, because the clip is a heat-sink and will suck the heat away from the join until it's pretty hot.
- Let the whole thing sit for 5-10 minutes after you're done, because it will still be hot! Then, you can insert a CR1225 battery and turn the switch on (if it isn't already).
- If it doesn't light up, check each connection and make sure the solder blob is fully melted over both contacts. Also, check for bridged contacts – especially the three side legs on the switch! (The ones on the ends don't matter as much, because they are connected to each other anyway.)
- If you made a mess with the flux, you can try and clean it off with isopropyl alcohol. (I've had mixed results, and sometimes a few spots of rosin flux are better than a big smear!)
Here's where to order the pick. (The black "After Dark" colorway is going to be regular thickness, but you can get half-height PCBs done in purple if you actually want to use it as a pick, and they look pretty good too.)
Now, here's some more info about the design...
Avnet + Guild GuitarsIn the 1960s, Avnet made a series of acquisitions that broadened the company's reach – into perfume bottles, die casting machines, and yes, Guild Guitars. Here's a quick video about when Jimi Hendrix played one of their Starfire models: https://www.centennialcentral.com/avnet-and-the-greatest-guitar-player-ever
Many other headlining acts, such as the Beatles, became customers during this time – until Avnet resold Guild in 1989 while narrowing their focus onto electronics.
1.Board outline: I couldn't get the popular svg2shenzhen to work well for me, but this "svgconvert" Python script by brainsmoke was really easy to use.
After sizing my SVG properly in Inkscape, I just dropped it into the same directory as the script, and ran:
mkdir pick-edge.pretty
./svgtokicadmod.py < pick-edge.svg > pick-edge.pretty/pick-edge.kicad_mod
(Note that, unlike in their example, I had to add ".py" at the end of the script name.) Then, I put both my SVG and its new.pretty dir into a new subfolder, to keep everything tidy.
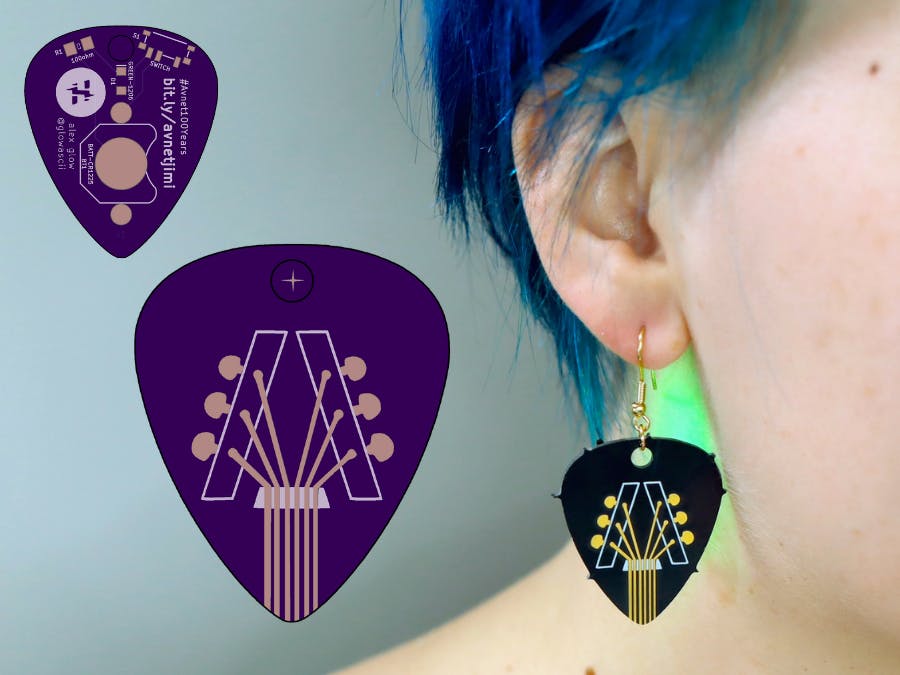
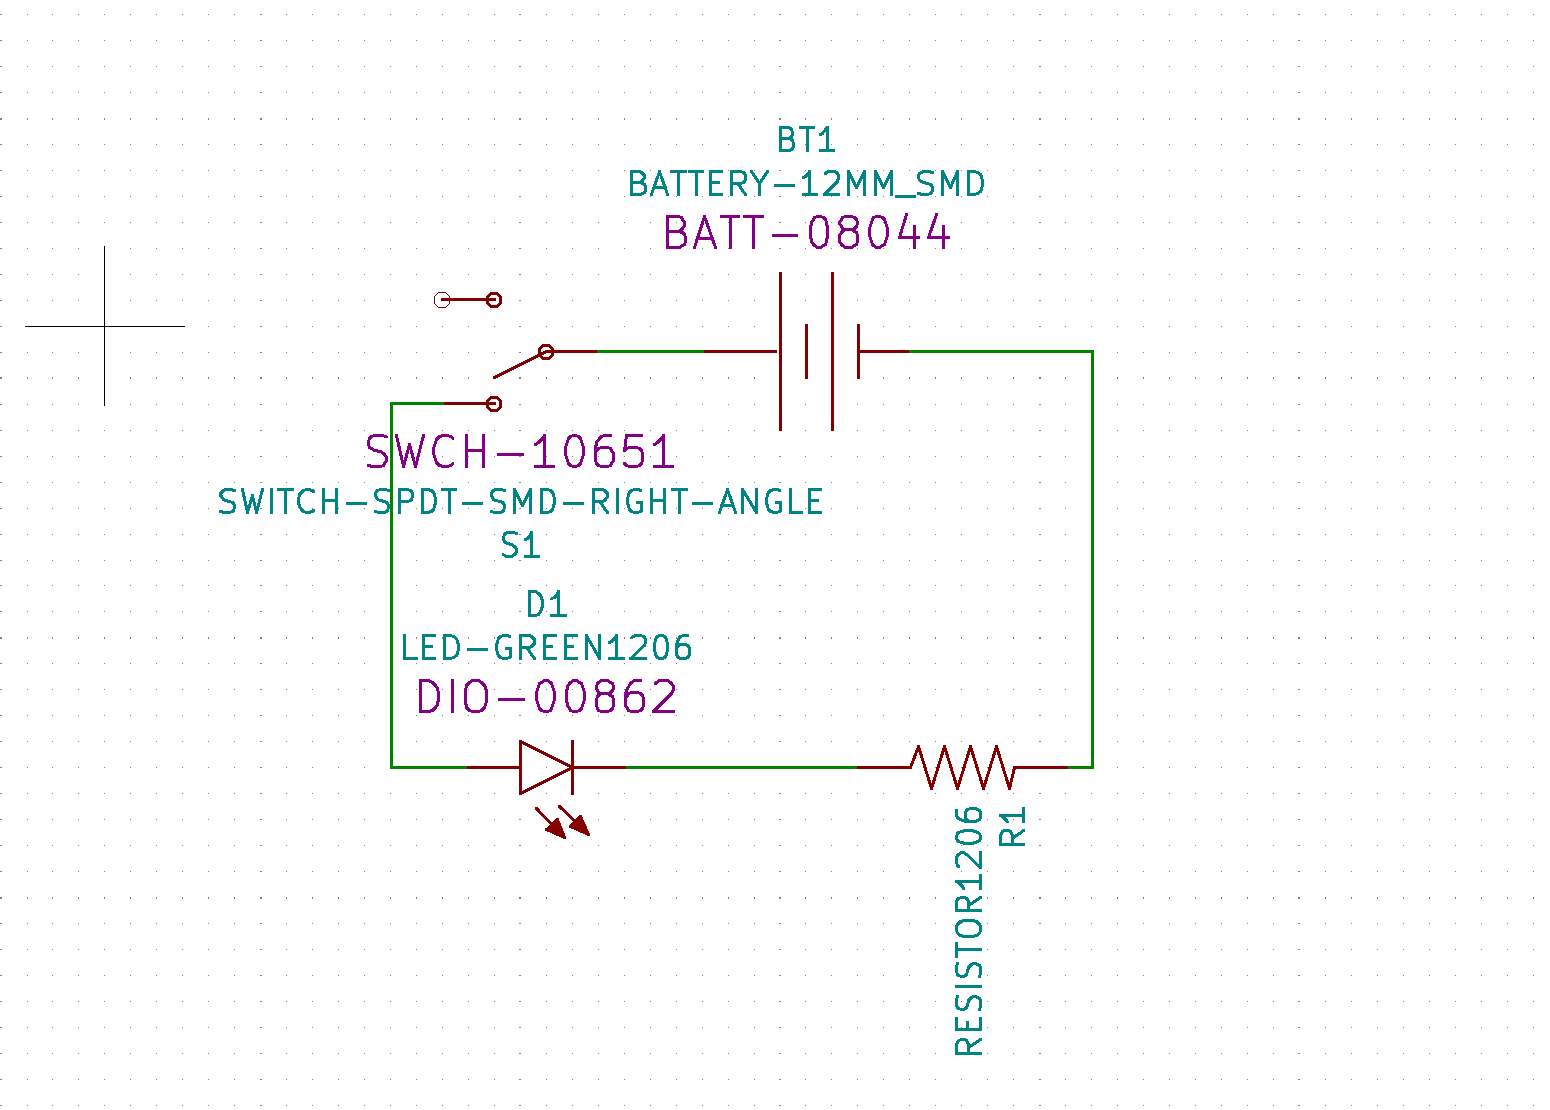
2. Circuit: This board is designed as a simple battery-powered, Avnet-green LED with a switch. The whole circuit is placed on the bottom side of the board, so that when it's worn as an earring, it'll be backlit by the green light.
The battery is a small CR1225 coin cell, and I found a matching surface-mount battery holder footprint in the SparkFun libraries I use for KiCad components, which works with the Newark part I'm using; likewise with the right-angle, surface-mount switch. The other two components (green LED and 100-ohm resistor) are in a standard 1206 SMT package, which I find easy to solder by hand – especially with a little flux.
On to the visuals!
3. Visual design: For the front of the pick, I decided to turn the Avnet logo into a guitar headstock, with tuning pegs traced from the Starfire guitar that Hendrix played. It's designed for OSH Park's After Dark colorway, with a black PCB substrate, clear solder mask, gold ENIG-coated copper traces, and white silkscreen. I used Procreate to trace the logo and add tuning pegs and strings, and I'll be publishing a full tutorial on that process soon!
The solder mask has to be the exact opposite of the copper/gold traces, because the gold plating happens only where the copper layer is exposed, while the silkscreen will only be applied on top of solder mask. Fortunately, I was able to use the exact same image for both the copper and solder mask layers. Here's that one, in KiCad's bitmap converter:
And here's the final file preview in Pcbnew (KiCad's board layout editor):
You can see where the plus-sign fiducial mark sits within the hole of the PCB, so I could use it to align the different layers of art, but it doesn't appear on the final product.
Once I got it together, here's the preview from OSH Park (which shows it as a standard purple PCB):
And here's the fully soldered board:
See the "Code" section below for the KiCad files.
Rest assured – I've since Dremeled the sharp little mouse-bites off most of the boards. :)
Hot plate assemblyHere's a demo of assembling the board with solder paste. (See the video at the top of the page for a soldering iron demo – though, it can help to use flux!)
Here's the process:
- Add a dab of solder paste to each contact.
- Place each component with tweezers. There may be a couple of small plastic nubbins on the bottom of the switch, which you'll need to clip off so that it will sit flat. (I recommend side cutters / flush cutters for this.) Place the LED with the two green dots toward GND.
- Heat up your hot plate, put down your board, and watch it magically melt together! (Everybody's favorite part!)
- Attach any mounting hardware, such as lapel pin backs or earring hooks. I usually solder the pin back to the battery holder (REMOVE the battery first!!).
...Voilà!
RevisionsIn v2, I've swapped around the battery and LED, so that it hangs better as a lapel pin (with the pin back soldered onto the battery holder).
Order your picks here. Here's to another 100 years! 🎉
Short link to this page: bit.ly/avnetpick


Comments