


Hardware components | ||||||
_baVEVgguW1.jpg?auto=compress%2Cformat&w=48&h=48&fit=fill&bg=ffffff) |
| × | 1 | |||
 |
| × | 1 | |||
 |
| × | 1 | |||
 |
| × | 1 | |||
 |
| × | 1 | |||
 |
| × | 1 | |||
 |
| × | 1 | |||
Software apps and online services | ||||||
 |
| |||||
 |
| |||||
Hand tools and fabrication machines | ||||||
 |
| |||||
Get up and running in under two hours! You'll need a computer, an Arduino with a compatible cable to connect it to your computer, and whatever it is that you'd like to control. Swap out the LEDs in this workshop for other components, plug in another Node module or two, and you'll be able to build a virtually infinite array of different projects – all from a few simple pieces.
SetupBust out your laptop and install the latest complete version of the Arduino IDE, from the top of this page: https://www.arduino.cc/en/Main/Software
Plug your Arduino board into a USB port on your computer.
Get out your components.
All set!
Project 1. BlinkFirst, let's configure an output! We'll communicate information from the Arduino to the user, via a flashing LED.
Load up Arduino's built-in example at File > Examples > Basics > Blink
Like most Arduino boards, the Uno comes with a built-in LED that's connected to digital pin 13. Upload the code and watch it flash on and off, changing once per second.
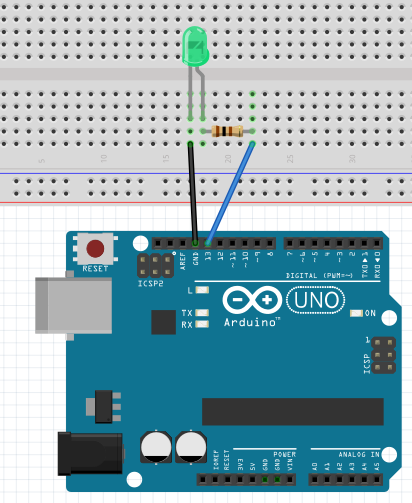
Now, do the same thing with an external LED! Grab yours and plug the long positive leg into the header at digital pin 13. Plug the short leg into the GND (ground) header. You can also move the positive leg to any of the other digital pins, and change the "13" in your code to match. (Most of the time, "pin 13" is going to mean digital pin 13. The analog pins will almost always be explicitly named.)
But running your Arduino this way lets too much power flow through the circuit, and can burn out the LED – and/or the microcontroller pin itself. Let's add a resistor before moving on: move the LED to a breadboard, with each leg in a different 5-hole row. Add a jumper wire connecting the negative leg to GND. Place another wire from digital pin 13 to an empty row, then connect that with the LED's positive leg using your resistor.
Here's some more info on why we really do need the resistor.
CODE
So! What are we actually doing here?
The code starts with some introductory notes, which are commented out with slashes and asterisks: one of two ways to tell the machine, "this piece is for humans – ignore." Well-commented code is a great way to make sure others can understand and modify it later.
/* Multi-line comments...
...use slashes and asterisks like this...
...and keep going until we "close" them. */
// A double forward-slash will comment out anything after it on the same line.
SO, THIS IS ACTIVE CODE // But this bit is commented out.
The Arduino-friendly part begins with a setup section, which runs first, each time you power on the board (or press reset). This is where you tell the Arduino what's connected to it: inputs such as sensors, outputs such as displays, and more. In our setup section, we're telling it that there is a controllable output on digital pin 13.
Once setup is done, the loop section takes over and (as the name implies) runs over and over again until the board is powered off. Our loop turns the LED on (HIGH) or off (LOW) every 1 second (1000 milliseconds).
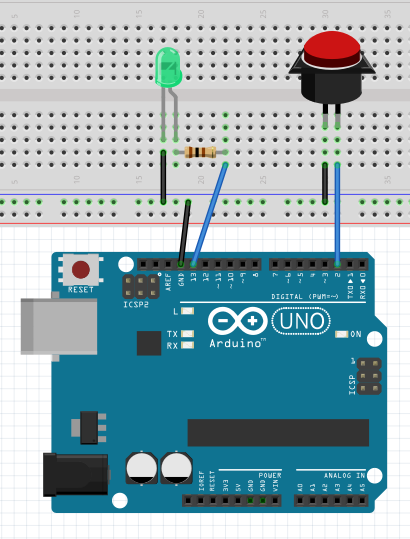
Project 2. ButtonOur second project adds user input: a way to send a message to the Arduino.
File > Examples > Digital > Button
This sketch includes a great description of the circuit right in the opening comments. Hook it up like so:
Notice how the LED's part of the circuit looks now. Most breadboards have power and ground rails running their entire length. That makes it easier to hook up circuits with just a single wire for each running back to your controller. So, both the resistor from the button and the LED are hooked back into this ground rail – instead of taking up both of the Arduino's GND pins.
The resistor we've just added is a pulldown resistor. Our code is going to check to see whether or not our digital pin 2 is connected to power, via the button-press. But while unconnected, the pin's value floats somewhere between HIGH (powered) and LOW (grounded). So, we let a bit of power flow to the ground pin all the time, through this 10 kΩ resistor, which "pulls it down" LOW. But when the button is pressed, power starts flowing between the 5V pin and pin 2, so it goes HIGH.
CODE
This time, we begin with some declarations of different variables that we'll be using. In the Blink sketch, if you wanted to change which pin the LED was on, you had to change pin 13 in three different places. This time, we tell the Arduino that we'll be using "buttonPin" to represent pin 2, and "ledPin" to represent pin 13. Now, anytime we swap things around physically, we just need to change that pin number in one place.
Those variables are going to stay the same the whole time the program is running, so we call them constants – hence the const int
. The other variable we have will change to reflect our button-pressing, so it's just a plain int
.
This time, we've got INPUTs (button) and OUTPUTs (LED) in the setup section.
In our loop, the first thing we do is check pin 2 to see whether it's HIGH or LOW, using digitalRead
. Then, depending on the result, we use an if/else statement to trigger the right action. If it's HIGH (button pressed), set the LED HIGH as well. Else (otherwise), set the LED LOW.
FYI, you can have more than two conditions – in which case, you tell it "if the button is on, then turn the LED on; else if the button is not pressed, then turn the LED off; else (say the button has ceased to exist or Schrödinger is visiting) run around and freak out."
Project 3. Serial feedbackNow, let's learn to read data directly from the Arduino as text – we'll see how it "talks".
Open up File > Examples > Basics > DigitalReadSerial and don't worry about changing your circuit. Upload it to your board.
CODE
Things should be looking pretty familiar by now. The new stuff has to do with the serial monitor:
In setup(), look for Serial.begin(9600);
which tells the Arduino to start communicating via text, at 9600 baud. The baud rate controls how much information is sent per second.
And in the loop(), you'll see the command Serial.println(buttonState);
– this tells the Arduino to take the current value of the button and print it to the monitor as a single line of text.
The monitor itself can be opened with the button at the top-right of the IDE:
Open it up, and you'll start to see a column of 0s. Push your button, and they will turn into 1s! Magic!
If you don't see the pretty 1s and 0s, check the settings at the bottom of the window:
- AUTOSCROLL should be selected
- NEWLINE should be selected
- 9600 BAUD should be selected
Here's where the Javascript comes in! We still have one more Arduino sketch to upload: File > Examples > Firmata > StandardFirmata
Hit the upload button and leave your board plugged in. This sketch teaches the Arduino to listen for commands over the serial connection – the same connection we were just using to talk to it via the serial monitor.
Now, there's a bit of setup to do on your computer itself.
Install Node.js and npm, using the instructions here: https://nodejs.org
These won't show up as regular applications – they live in your command line! To make sure it's done correctly, open up the Terminal application (often in Applications/Utilities) and type node -v
Hit enter, and this should return the version of Node.js that you're running.
Node Package Manager (npm) is the utility that installs modules: plugins for Node applications that give you powerful commands to work on things like robotics, websites, spreadsheets, and managing other applications. We're using it to install Johnny-Five (Hackster page), a robotics module.
To do that on a Mac/Linux system, fire up your terminal and enter:
mkdir arduino-nodebots && cd arduino-nodebots
npm install johnny-five
This means: "Create a directory (folder) called arduino-nodebots and go into it. There, install the Johnny-Five module so we can use it in applications that also live in this directory."
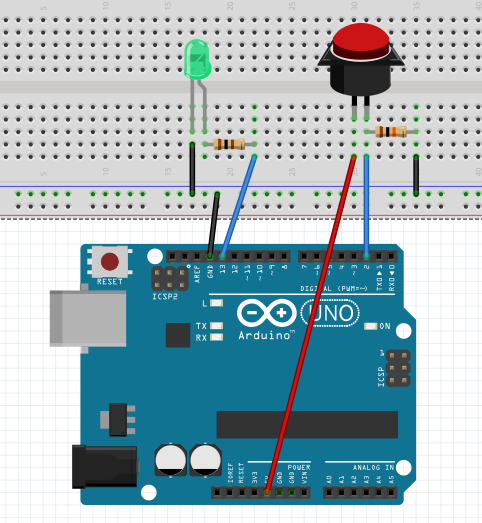
Your circuit is still gonna stay the same. Yay!
CODE
Let's see what we can do with Johnny-Five!
Head to the main site and grab this code: http://johnny-five.io/examples/led/
OK, so, use your favorite method to save that as a text file, "led.js", in your new arduino-nodebots directory. Careful: if you're using a normal-people text editor, it may try to stick a ".txt" or ".rtf" on the end there – erase it!
Now, in the terminal, you can run node led.js
and the application starts running!
Check out the commands listed on the Johnny-Five tutorial page: you can run led.stop()
and led.off()
and led.on()
and led.blink()
.
Explore the site to find more cool stuff you can do with this super-smart LED and other components. :)
Try more things!https://github.com/rwaldron/johnny-five/wiki/Getting-Started
http://johnny-five.io/examples/button/
http://johnny-five.io/examples/led-pulse/
http://johnny-five.io/examples/servo/
Next StepsWant to run this as a workshop? Use this handy-dandy slideshow!
nodebots.io/ – Join a local NodeBots group!
hackster.io/johnny-five/projects – See what others have built with NodeBots!
node-ardx.org/ – Another method for getting started, in case you get hung up on this one
See the whole series of Hackster 101 tutorials on Hackster and YouTube


_3u05Tpwasz.png?auto=compress%2Cformat&w=40&h=40&fit=fillmax&bg=fff&dpr=2)
Comments