

Hardware components | ||||||
 |
| × | 1 | |||
 |
| × | 1 | |||
 |
| × | 1 | |||
| × | 1 | ||||
| × | 1 | ||||
 |
| × | 1 | |||
Software apps and online services | ||||||
 |
| |||||
_4YUDWziWQ8.png?auto=compress%2Cformat&w=48&h=48&fit=fill&bg=ffffff) |
| |||||
Hackster's parent company, Avnet, is turning 100 this year! The company was founded in 1921 by Charles Avnet and has since grown into a Fortune200 global components distributor encompassing Hackster, element14, Newark, Farnell and . Charles Avnet started out selling radio parts on "Radio Row" in Manhattan, so I thought that for our centennial, I'd build a ham radio-themed project.
Despite building and fixing electronics for over 10 years now, I'm pretty new to designing my own circuits and PCBs, so I settled on a Morse code beeper, which uses only a few parts but can be reprogrammed to do lots of different things.
First, I designed and tested the circuit, and wrote the minimum-viable code, because I knew that getting the PCB fabricated would probably take the longest. Better to spend an extra day making sure my idea worked, rather than having to wait an extra week for a new PCB!
For the original through-hole version, I used some parts from SparkFun that I already know and love (from other PCB adventures), but the surface-mount upgrade uses only components sourced through Newark!
CircuitFor some reason I'd thought that ATtiny chips needed 5V, so I was very excited to discover that a standard ATtiny85 will run just fine on a 3-volt CR2032 coin cell battery, without any funky circuitry! It does look like there are even better options for low power, but this is a great advantage for prototyping. (See the Prototyping Notes at the bottom for more info on choosing a chip.)
Switch: Since this is designed as a lanyard tag, I'd have a hole at the top, and also an on/off switch. I hate it when badges can't switch off! I'd rather save that battery life and show it off whenever I want :) Plus, it's really annoying to dig a CR2032 out of pretty much any holder – and then you have to keep track of it... Anyway, I love on/off switches, and these right-angle SMD switches from SparkFun are wonderful!
Button: It turns out the ATtiny85 has internal pull-up resistors, but I didn't figure that out until later 😅 It's another of the chip's cool features that I'm gradually learning. So, I have a pull-up resistor connecting the button pin to VCC, and then the button will connect it to GND. There isn't any button functionality programmed in yet – it's hard not to mess with the speed of the loop – but I'm planning to use it to switch between pre-programmed Morse code messages, or even to produce beeps!
Buzzer: Some piezo buzzers have built-in connections that make a horrible, shrill alarm sound when you connect them to power and ground (without oscillating). They're good at that job, but I'm sourcing a little buzzer that uses the oscillations you send it to produce a tone. Much easier to make something that sounds pleasant!
LED: I thought about having it flash along with the beeps, but again, that messed with the loop timing... and I prefer it always-on, anyway.
Here are my prototypes! (I got a bit carried away playing with my new light source...) The beige one is prototype #1 – also designed to help test an ESP8266 – and the white one is #2. The Uno picture features my ATtiny85 programmer shield. ✨
Arduino's Library Manager provides 7+ options for Morse code libraries. After clicking the "More info" link under a few, I chose MorseCodeMachine, based on its excellent documentation and lightweight, readable structure. (Plus, judging by the example text, the creator seems to be a ham as well!)
I needed to replace the LED commands with beeps and boops, so I borrowed Jeremy S. Cook's code from this blog post. The code is very straightforward, and was really helpful because it turns out that the Arduino Tone library doesn't work on the ATtiny – PLUS, I'm programming the ATtiny chips with an Arduino Uno (following this tutorial by Arjun Ganesan), and that rules out the second option I found! So, when I was getting really disheartened, Jeremy's tutorial was a godsend.
See the "Code" section below for my current code, and this tutorial for how to program both through-hole and surface-mount chips for this badge!
Here's the original code test, on protoboard...
...And the final round of programming surface-mount versions (video)!
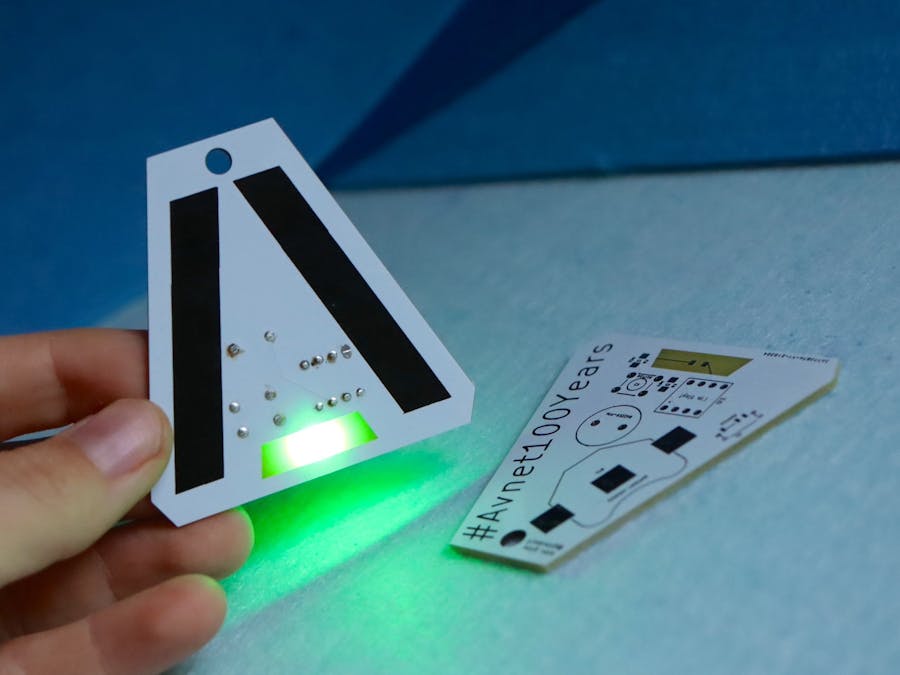
I used KiCad to design the PCB, tracing the Avnet logo into big polygons in Inkscape and importing them using KiCad's built-in Bitmap to Component Converter. But, how to show the black-and-green logo on a white background? That's too many colors for most PCB manufacturers. So, I settled on a green LED that would shine through the PCB substrate.
For this version, I haven't had a chance to try out all the surface-mount components that would eliminate through-holes from the design, so I tried to place them where they blended in with the white solder mask. The battery is inserted/removed from the edge, with one of the back holes clear to push it out, and the switch is also on an edge.
I've ordered the PCBs from JLCPCB, my first time buying from someone other than OSH Park! But I needed black silkscreen on white solder mask, as well as a clear PCB substrate so the LED will shine through from the back. (I may need to play around with PCB thicknesses, but fortunately, JLCPCB has lots of options.)
The ordering process was pretty easy. I exported Gerbers from KiCad using this tutorial from OSH Park (with a little bit of guilt for my disloyalty ;) ). The JLCPCB cart has a Gerber viewer built in, so I could make sure everything looked good. By selecting white solder mask, I automatically got black silkscreen, so the fact that silkscreen color isn't selectable wasn't a problem. Anything other than green does take an extra couple of days, though.
It's quite affordable, too!
The Newark site has a dizzying array of ATtiny variants! I downloaded the datasheet to see which I'd need. Here's the info I wanted, from page 206:
I've ordered four different types to test: -10PU and -20PU versions (10 and 20 Hz in an 8-pin DIP package) for this PCB, and gullwing SMD versions of each for potential future versions.
SMT versionI decided to do another version of this PCB, with surface mount technology, using solely components from Newark.
- Tactile switch
- Green LED: SMD 1206, QuasarBrite
- CR2032 Battery holder
- Piezo buzzer: Adafruit brand
- 330-ohm resistor: SMD 1206
- 10K-ohm resistor: SMD 1206
This version requires a special clip to program the surface-mount chip, but it looks much cleaner from the front side!
See below for the STL file to print a matching stand! I used black PLA.


_Ujn5WoVOOu.png?auto=compress%2Cformat&w=40&h=40&fit=fillmax&bg=fff&dpr=2)

_3u05Tpwasz.png?auto=compress%2Cformat&w=40&h=40&fit=fillmax&bg=fff&dpr=2)
Comments