


Hardware components | ||||||
 |
| × | 1 | |||
 |
| × | 1 | |||
| × | 1 | ||||
Software apps and online services | ||||||
 |
| |||||
 |
| |||||
| ||||||
Hand tools and fabrication machines | ||||||
 |
| |||||
With the release of Sparkfun's MicroMod ecosystem, assembling prototypes with swappable hardware has become easier than ever. To demonstrate the MicroMod Teensy Processor and Machine Learning Carrier boards, I wanted to use a microphone that can detect certain keywords and display them on a screen.
The hardware for this project consists of just three components. First is the MicroMod Machine Learning Carrier Board which contains a 3-axis accelerometer, MicroSD card slot, 24-pin CMOS camera connector, ample GPIO breakout pins, and two microphones (PDM and I2S), although only the I2S microphone and pin headers will be used. Next is a MicroMod Teensy Processor board that contains the same powerful NXP iMXRT1062 chip as the Teensy 4.x lineup of development kits. And finally, the last component is a generic 2.8" SPI LCD with a resolution of 320x240 pixels. I selected the ILI9341-driven TFT due to its strong support from the Teensyduino Arduino IDE add-on.
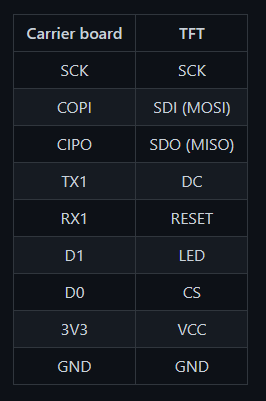
I connected the LCD to the Carrier Board with a series of jumper wires than ran between various SPI and GPIO pins. For more detailed information on wiring, you can view the associated schematic. The Teensy Processor module got slotted into the M.2 connector and evenly seated to ensure good connectivity. Because there is a lack of sleek ways to keep the components from simply tipping over, I designed a pair of custom brackets that hold the TFT and Carrier Board in place while also having the ability to become joined together as a singular unit.
By default, the pulse-density modulation (PDM) microphone is enabled on the Carrier Board, but because the Teensy audio library doesn't support the pin it's connected to, I was forced to cut the EN1 jumper and solder the EN2 jumper closed for the I2S microphone.
Before any machine learning models could be created, I first had to gather some audio samples. Keyword spotting generally works by taking an audio waveform, transforming it into a spectrogram or some other set of features, and then running the resulting data through an untrained model. Thankfully, both Microsoft and Google have some very thorough datasets that cover many of the most commonly-needed keywords such as "yes", "no", various numbers, simple directions, and background noise for when nothing is being said. I uploaded around 30 minutes each of 1-second clips for the following words:
- Yes
- No
- Up
- Down
- Left
- Right
with an additional 20 minutes of "noise" samples for a total of 3 hours, 25 minutes, and 33 seconds of audio data in Edge Impulse's Uploader tool.
My impulse for the Edge Impulse project had an initial time series data block that takes in a single audio axis and splits it into 1000ms windows.
This information is then fed into an Audio (Mel-filterbank energy or MFE) block which applies an FFT algorithm to each sample and creates a spectrogram from it.
Once the Keras neural network had been trained for 100 cycles at a learning rate of 0.005, I was able to further improve its accuracy using the EON Tuner utility that got its accuracy up to an impressive 92.3%.
You can view the public model and dataset here on Edge Impulse.
The microphoneNow that the model had been fully trained and downloaded as an Arduino library, it was time to figure out how to get the data from a person's voice into the model for inferencing. Thankfully, the Teensy Audio library is a extremely simple to integrate into a sketch, so I used it to take the audio from I2S microphone and send it to both the USB port and a Queue object for grabbing the incoming packets.
One problem is that the audio is sampled at a 44.1KHz rate from the microphone, whereas the dataset's samples are at 16KHz. This meant I had to create a simple downsampling algorithm that takes the nearest-neighbor from the raw audio for each of the 16, 000 points and averages the closest 3.
From here, the newly downsampled audio is passed every second to the Edge Impulse model via a signal object and results are received with an ei_impulse_result_t object.
With the model now giving a result every second, I wanted to create an interesting way to present what it inferred. Once the result is ready, a for-loop goes through each label and prints its name. Additionally, a rectangle is drawn underneath the text that corresponds to that label, and its size is determined by how confident the model is. For instance, a value of 0.9 equals 180 pixels in width, whereas a value of just 0.05 gives a rectangle that's 10 pixels wide. Finally, the actual value is printed in a column on the right for more detailed information.
This simple project is merely a launch-point for something greater. Feel free to grab your own MicroMod boards and start experimenting by creating other new and exciting projects that incorporate machine learning.


_3u05Tpwasz.png?auto=compress%2Cformat&w=40&h=40&fit=fillmax&bg=fff&dpr=2)
Comments