

Hardware components | ||||||
 |
| × | 1 | |||
| × | 1 | ||||
 |
| × | 1 | |||
Software apps and online services | ||||||
 |
| |||||
Before you can do any training, you must first get the Jetson Nano ready by setting the power supply input and ensuring it can be connected to with a terminal. If you haven’t already done this, read the guide for how to download the OS and boot for the first time here, then come back to proceed with the next steps.
Configuring a Camera and the Jupyter NotebookIt’s fairly difficult to train a computer vision-driven model and test it without being able to capture images and/or video, so some kind of camera is a necessity. Most generic USB webcams from either HP or Logitech should work well with the Nano. Additionally, the Jetson Nano also has two CSI camera connectors for use with Raspberry Pi-compatible modules. The flavor of camera, either USB or CSI, will determine what code you use, as the interfaces vary drastically.
Next, navigate to the Jupyter Notebook that is hosted on the Jetson, and go into the “nvdli-nano” folder. You should then see a folder named “hello_camera”, which you can then select. There are two notebooks: one for using a USB camera and one for using a CSI camera.
These two notebooks demonstrate how to interface a camera of your choice with Python code and view it. Then, you can simply copy it into a future project. After going through the respective guides and ensuring you can view a camera stream, it’s time to train a model.
Machine learning involves feeding a network of “neurons” labelled data and then correcting the output of the neurons by adjusting their weights. After enough data has been entered and the network has been trained, it should be able to label an image fed to it and assign it a probability. After testing it and finding the results to be tolerable, you can then apply that model to label images in real-time, such as from a camera feed.
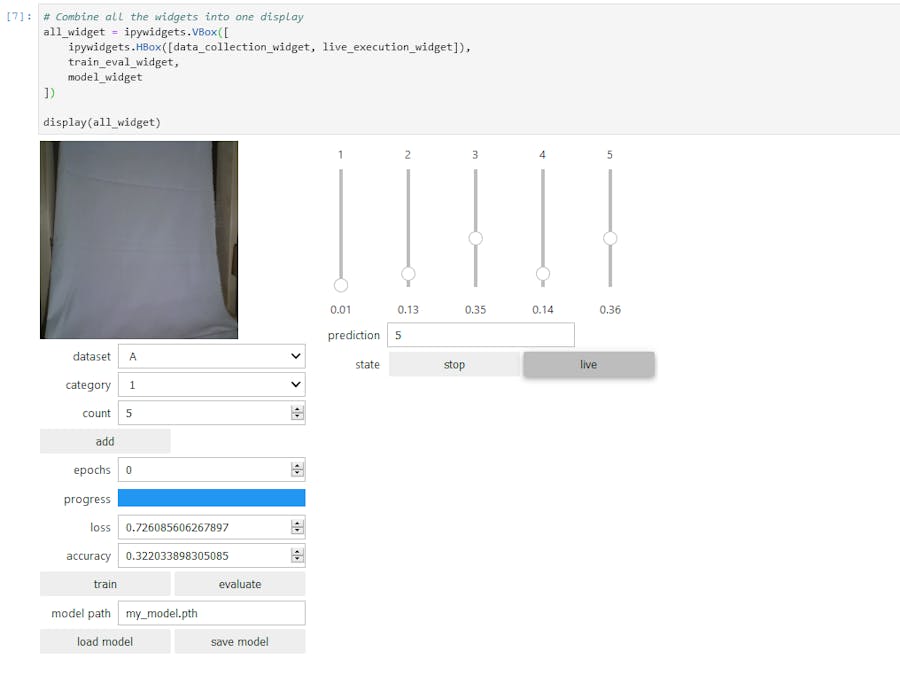
The Jupyter Notebook allows you to get the data, train the model, and test it all from a single webpage. The notebook is in the “nvdli-nano/classification” folder. After opening up the “classification_interactive.ipynb” file, run through each cell of code. They include getting the camera set up, defining the categories and task you want to use, setting up the image preview and collection area, creating a model, creating a live execution unit, and finally the model training function. Make sure to comment/uncomment lines according to which objects you want to detect. For this example, I chose to use the ‘fingers’ task, which has five corresponding categories of ‘1’, ‘2’, ‘3’, ‘4’, and ‘5’.
Now that the page has the interactive GUI, it’s time to take some pictures. Hold up your hand in front of the webcam and extend one to four fingers/thumb. There is a dropdown box where you can select the label to give your image.
If you’re holding up 3 fingers, make this number 3 before you click ‘Add’. Once you have at least 20 or so images for each category, go ahead and train the model. More epochs correlates to a higher accuracy, so I tend to set mine to at least 6. The Nano will get fairly warm, as it’s having to do many operations, so it’s a good idea to set up a small fan while the Jetson Nano is running.
Running the Model and TestingThe model is now trained, so you can save it and use it elsewhere. After loading it, you can set the mode to ‘Live’, and by holding up fingers in front of the camera, you can see how the sliders change accordingly. The number in the box called ‘Prediction’ is how many fingers the model has determined you are holding up, and the number below each slider is the probability that you are holding up that many. If you find that it isn’t giving the correct number, try adding more data and training it for more epochs to increase the accuracy. Keep in mind that switching the background or changing your hand’s orientation without having any training data that reflects it can lead to incorrect results.
While determining the number of fingers you’re holding up is fine, it isn’t that useful in most of the projects you will create. Thankfully, it’s quite easy to simply change the labels you plan on using and then capturing more images and labelling them. So, imagine recognizing if you’re doing a certain gesture, or detecting a certain bird in your backyard.
Future PlansNow that you are able to train a neural network to classify streams of data, the possibilities are nearly limitless. I plan on creating a system that can detect various signs and then control where a robot car moves accordingly.


Comments