

Hardware components | ||||||
 |
| × | 1 | |||
Software apps and online services | ||||||
| ||||||
In the age of internet-connected devices, data coming from sensors can be overwhelming, and therefore difficult to process and analyze. That's why using a cloud service can be useful for gathering large amounts of data for storage, management, and evaluation. Many services also have builtin security, such as key generation, and tie-ins with other platforms by using webhooks.
ElephantEdge and IoTConnectAs part of the ElephantEdge contest, contestants are challenged with the task of using AI and big-data principles to monitor elephant behavior to assist park rangers in keeping them safe from poachers and other hazards. To view this data in an elegant manner, users are implored to create a dashboard using Avnet's IoTConnect platform. It can be used to view and infer movement habits, study environmental data and trends, and also send alerts when unusual activity is detected.
IoTConnect is a platform as a service (PaaS), which has utilities for device management, data collection and storage, app creation, and alerts. It's great for monitoring large systems with many sensors, as devices can be setup and flashed over the air (OTA) with new firmware, all while needing little to no coding. IoTConnect also lets users build dashboards to display nearly any kind of data, which makes visualization and trend spotting much easier.
Setting UpTo begin, you'll need to request access to use the dashboard for the ElephantEdge contest. Send an email to elephantedge@iotconnect.io and wait for up to 2 business days to receive a link. Login with your credential at http://avnet.iotconnect.io/ and then you should be redirected to the home page, which has the dashboard. There are some limitations to your license:
- Up to 50k messages total (~1500 per day)
- Expires after 3 monthly renewals
- Up to 3 devices
- Up to 2 users (1 extra)
With that in mind, it's time to connect a device and show some data.
Creating a TemplateTemplates define what a device is able to do, and it speeds up the process of adding multiple identical devices. Head over to the Templates tab and click Create Template. Next, set a unique code for the template, along with a name and description. The ESP32 will use a key, so leave that field as-is. Attributes are the data fields your device will send, so naming and types are important here. For now, add the following attributes:
- Name:
Humidity, Data type: NUMBER, Unit: % - Name:
Temperature, Data type: NUMBER, Unit: F - Name:
vibration, Data type: OBJECT,
For the nested objects under vibration: [{Name: x, Data type: NUMBER}, {Name: y, Data type: NUMBER}, {Name: z, Data type: NUMBER}]
Since data is sent and received to/from the cloud via MQTT, virtually any WiFi-enabled device will work. However, it is much easier to use a predefined SDK, and Avnet provides them for several languages, including Node.js, Java, Python, and C#.NET. There are also two C SDKs for the nRF9160 board or the ESP32/ESP8266. For this project, I will be using an ESP32 since it is widely available and plenty powerful.
You'll need to add the ESP32 as a device in the cloud portal, so go to the Devices tab and click the Create Device button. Enter a unique ID (I just called mine esp321) and then fill in the rest of the fields. Use the template that was created earlier for this device, and the ElephantEdge entity as the Entity.
To start using an ESP32, first ensure that the ESP32 device package is installed. If it's not, add https://dl.espressif.com/dl/package_esp32_index.json to the additional boards manager URLs field in the Arduino IDE and then install it through the Boards Manager. Next, go to the library manager and install the ArduinoJson library, which is essential when using the IoTConnect SDK.
For the IoTConnect SDK, go here and download the zip file and then extract it. You'll also need to download the sample code for the ESP32 here and then extract it. Next, copy all of the files (except for the.ino file!) from the iotconnect-C-sdk-ESP-2.2.0-1\ESP_SDK_&_DOC\ESP32SDK\ESP32 folder and paste them into the IoTConnect_ESP_SDK_2.2.0 folder (which should have the IoTConnect_ESP_SDK_2.2.0.ino file already in it). Go ahead and open IoTConnect_ESP_SDK_2.2.0.ino now.
Before editing anything, a couple of changes need to be made. First, change line 89 from client.getAllTwins(); to client.GetAllTwins(); and then modify line 123 from client.dispose(); to client.Dispose(); If you don't, you'll get compilation errors. Second, change line 553 in the IoTConnect.cpp file to void IOTConnectClient::SendAck(String Ack_Data, String timestamp, int messageType){ and add Ack_Json["t"] = timestamp; under line 556. You'll also need to change the forward declaration in the IoTConnect.h file on line 169 to void SendAck(String Ack_Data, String timestamp, int messageType);
After squashing all of those bugs, set your ENV, cpId, uniqueId, ssid, and pass at the top of the ino file. You can find the first two in the IoTConnect portal key vaults module (under Settings), and the uniqueId is what you entered on the Add Device page.
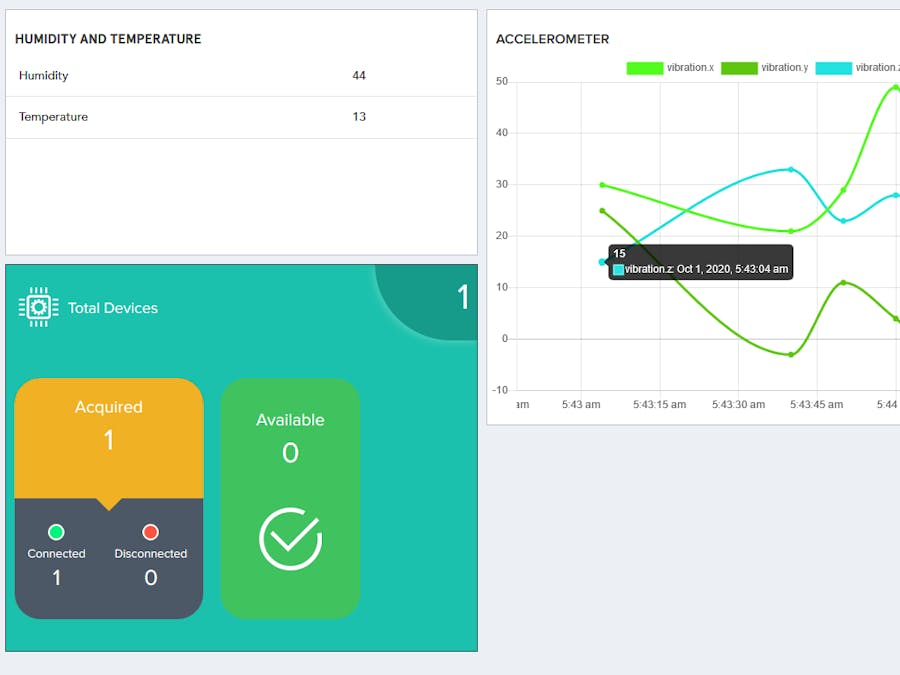
So now that you can send data using your ESP32, there needs to be a way to display it. Begin by creating a new dashboard and naming it something. Then, simple double-click the widgets you want and arrange them. I went with a live view of temperature and humidity, a time-series graph for accelerometer data, and a device widget.
My dashboard ended up looking like this:
After your ESP32 powers up, it should attempt to make a connection with your access point of choice and then connect to Avnet's IoTConnect cloud service. If it succeeds, the device will send a device to cloud (D2C) message once every second 10 times.
Since you now know how to add devices and configure them, try adding more sensors, such as GPS. Then experiment by modifying the dashboard with additional widgets. Also, make sure to participate in the ElephantEdge contest by creating a system to show elephant activity and even send alerts.


_3u05Tpwasz.png?auto=compress%2Cformat&w=40&h=40&fit=fillmax&bg=fff&dpr=2)

Comments