

Hardware components | ||||||
 |
| × | 1 | |||
| × | 1 | ||||
| × | 1 | ||||
| × | 1 | ||||
 |
| × | 1 | |||
 |
| × | 2 | |||
 |
| × | 1 | |||
Seeing my children mastering swiping, touching and tapping on the tablet, gave me the idea of making a gesture based TV remote control. Using the Raspberry Pi, the Skywriter HAT from Pimoroni and an IR LED, this was made possible rather easily. Here’s how I did it …
Raspberry PiPreparing the Raspberry Pi is the same as always. I flashed the latest Raspbian Jessie image onto a 8GB microSd card using “dd”.
For this project, I’m using the Raspberry Pi A+ as it has the exact same form factor as the Skywriter HAT.
Skywriter HATThe Skywriter HAT is an add-on board by Pimoroni, capable of detecting gestures. The HAT fits on top of the Raspberry Pi via the 40-pin GPIO header, and the software can be installed with a single command. The command takes care of installing the software dependencies, enabling I2C and providing some example applications. The documentation can be found on the Pimoroni GitHub page: https://github.com/pimoroni/skywriter-hat After connecting the HAT, I executed the oneliner to install the software:
pi@raspberrypi:~ $ curl -sSL get.pimoroni.com/skywriter | bash
And that’s all there is to it. Compliments to Pimoroni for making this install so easy!
After setting up the software, the Skywriter HAT can be tested. One of the example applications is called “test.py” and reports the detected gestures on screen. To run the example, execute following command:
pi@raspberrypi:~ $ sudo Pimoroni/skywriter/test.pyDepending on the movements made, the output will be different. Here's what mine looked like:('Airwheel:', 45.8375)('Airwheel:', 45.725)('Got a flick!', 'east', 'west')('Got a flick!', 'west', 'east')('Touch!', 'center')('Tap!', 'center')('Touch!', 'center')('Tap!', 'center')('Got a flick!', 'west', 'east')('Got a flick!', 'west', 'east')('Got a flick!', 'north', 'south')('Got a flick!', 'south', 'north')(0.1353759765625, 0.3520965576171875, 0.2229766845703125)(0.2788238525390625, 0.371307373046875, 0.2236480712890625)(0.455780029296875, 0.3703765869140625, 0.2238311767578125)(0.5930633544921875, 0.3404998779296875, 0.2238311767578125)(0.686553955078125, 0.2968902587890625, 0.224029541015625)(0.7591552734375, 0.252838134765625, 0.2248687744140625)(0.822540283203125, 0.222503662109375, 0.227203369140625)
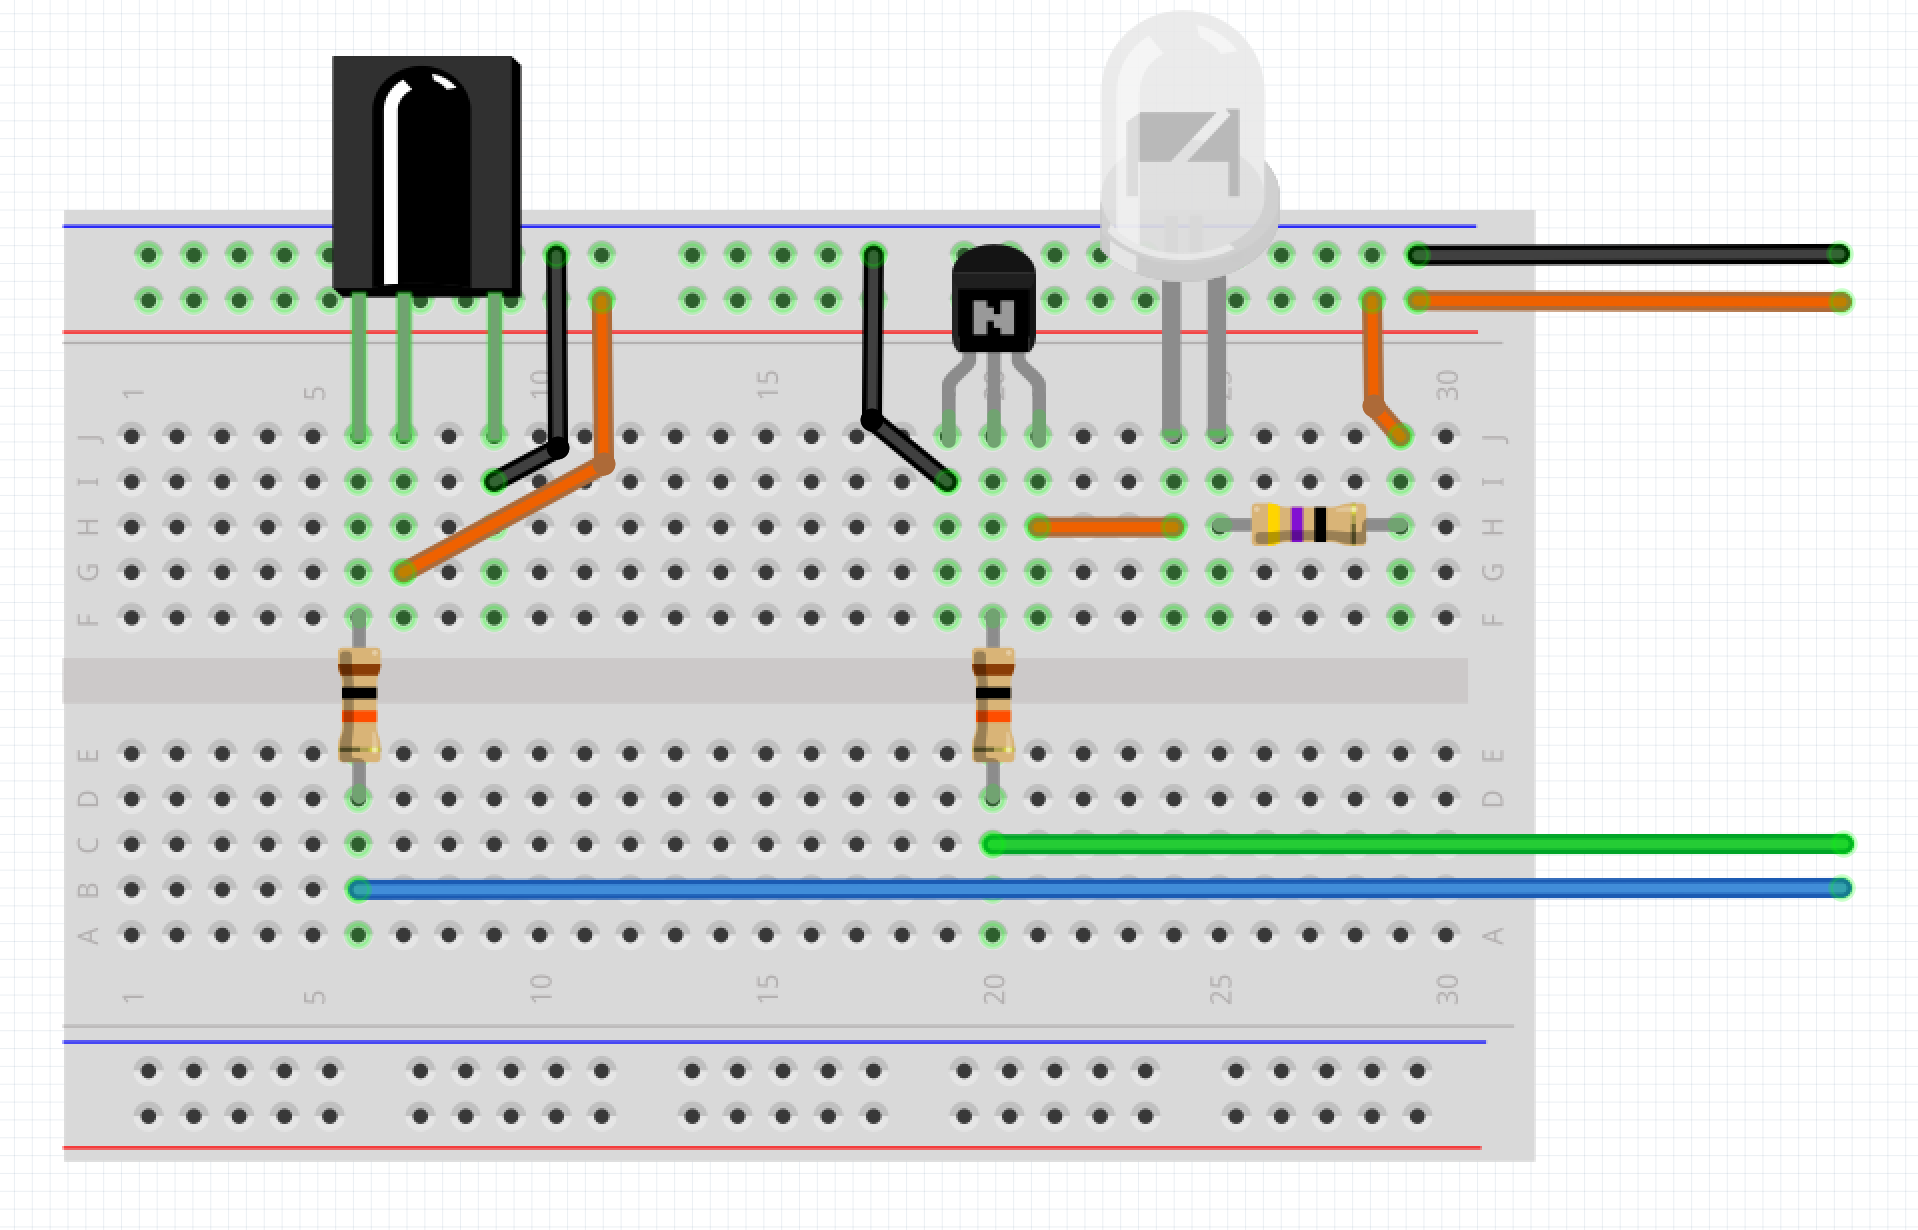
Lirc is the software in charge of the infrared (IR) signals. It is capable of recording signals from remote, as well as send them. This is why I have foreseen both an IR LED transmitter and and IR receiver.
CircuitThe circuit consists of two parts:
- transmitter
- receiver
For the transmitter part, an IR LED is controlled via a transistor and a GPIO pin. A resistor of about 50 ohms is put in series with the IR LED and the GPIO pin is connected to the base pin of the transistor using a 10k ohm resistor. The LED is powered using the Pi’s 3.3V GPIO pin.
For the receiver part, also powered at 3.3V, the data pin is connected to a GPIO pin via a 10k ohm resistor. Careful, depending on your type of IR receiver, the pinout could be different!
After prototyping the circuit and before soldering it onto a prototyping HAT, I verified basic functionality using an oscilloscope.
First step is of course to install the lirc application itself. This can be done using “apt-get”.
pi@raspberrypi:~ $ sudo apt-get install lirc
Edit the module files and append following lines:
pi@raspberrypi:~ $ sudo nano /etc/moduleslirc_devlirc_rpi gpio_in_pin=23 gpio_out_pin=22
The default hardware config file won’t work. Here’s an example of one that will. I commented out the default values so you can see which ones changed.
pi@raspberrypi:~ $ sudo nano /etc/lirc/hardware.conf# /etc/lirc/hardware.conf## Arguments which will be used when launching lircd#LIRCD_ARGS=""LIRCD_ARGS="--uinput"#Don't start lircmd even if there seems to be a good config file#START_LIRCMD=false#Don't start irexec, even if a good config file seems to exist.#START_IREXEC=false#Try to load appropriate kernel modulesLOAD_MODULES=true# Run "lircd --driver=help" for a list of supported drivers.#DRIVER="UNCONFIGURED"DRIVER="default"# usually /dev/lirc0 is the correct setting for systems using udev#DEVICE=""#MODULES=""DEVICE="/dev/lirc0"MODULES="lirc_rpi"# Default configuration files for your hardware if anyLIRCD_CONF=""LIRCMD_CONF=""
Finally, one last change is required in the boot config.
pi@raspberrypi:~ $ sudo nano /boot/config.txt# Lircdtoverlay=lirc-rpi,gpio_in_pin=23,gpio_out_pin=22
Don’t forget to reboot to apply all the changes. After that, you should have a “lirc0” device available.
pi@raspberrypi:~ $ ls -l /dev/lirc0crw-rw---- 1 root video 245, 0 Feb 6 15:51 /dev/lirc0
It is also possible to verify the correct modules (lirc_rpi & lirc_dev) have been loaded using the “lsmod” command.
pi@raspberrypi:~ $ lsmodModule Size Used bycfg80211 499834 0rfkill 22491 2 cfg802118192cu 569532 0snd_bcm2835 22317 0bcm2835_gpiomem 3703 0snd_pcm 92581 1 snd_bcm2835snd_timer 23454 1 snd_pcmsnd 68161 3 snd_bcm2835,snd_timer,snd_pcmlirc_rpi 8602 0uio_pdrv_genirq 3690 0uio 10002 1 uio_pdrv_genirqlirc_dev 11060 1 lirc_rpirc_core 23581 1 lirc_devi2c_bcm2708 6252 0i2c_dev 6730 0fuse 91981 1ipv6 360374 28
If that’s the case, everything should be ready to use.
RecordWhen recording keys, the correct names need to be assigned to identify them. The full list of possible values can be obtained using the following command:
pi@raspberrypi:~ $ irrecord --litst-namespaceKEY_0KEY_102NDKEY_1KEY_2KEY_3KEY_4KEY_5KEY_6KEY_7KEY_8...
In order to start recording IR signals from the remotes, the lirc process needs to be stopped.
pi@raspberrypi:~ $ sudo /etc/init.d/lirc stop[ ok ] Stopping lirc (via systemctl): lirc.service.
With lirc stopped, the recording process can start. Make sure you have the remote of the TV or decoder handy and follow the instructions.
pi@raspberrypi:~ $ irrecord -d /dev/lirc0 lirc-remote1.confirrecord - application for recording IR-codes for usage with lircCopyright (C) 1998,1999 Christoph Bartelmus(lirc@bartelmus.de)This program will record the signals from your remote controland create a config file for lircd.A proper config file for lircd is maybe the most vital part of thispackage, so you should invest some time to create a working configfile. Although I put a good deal of effort in this program it is oftennot possible to automatically recognize all features of a remotecontrol. Often short-comings of the receiver hardware make it nearlyimpossible. If you have problems to create a config file READ THEDOCUMENTATION of this package, especially section "Adding new remotecontrols" for how to get help.If there already is a remote control of the same brand available athttp://www.lirc.org/remotes/ you might also want to try using such aremote as a template. The config files already contain allparameters of the protocol used by remotes of a certain brand andknowing these parameters makes the job of this program mucheasier. There are also template files for the most common protocolsavailable in the remotes/generic/ directory of the sourcedistribution of this package. You can use a template files byproviding the path of the file as command line parameter.Please send the finished config files to <lirc@bartelmus.de> so that Ican make them available to others. Don't forget to put all informationthat you can get about the remote control in the header of the file.Press RETURN to continue.Now start pressing buttons on your remote control.It is very important that you press many different buttons and hold themdown for approximately one second. Each button should generate at least onedot but in no case more than ten dots of output.Don't stop pressing buttons until two lines of dots (2x80) have beengenerated.Press RETURN now to start recording.................................................................................Found const length: 108075Please keep on pressing buttons like described above.................................................................................Space/pulse encoded remote control found.Signal length is 67.Found possible header: 4540 4423Found trail pulse: 625No repeat code found.Signals are space encoded.Signal length is 32Now enter the names for the buttons.Please enter the name for the next button (press <ENTER> to finish recording)KEY_VOLUMEUPNow hold down button "KEY_VOLUMEUP".Please enter the name for the next button (press <ENTER> to finish recording)KEY_VOLUMEDOWNNow hold down button "KEY_VOLUMEDOWN".Please enter the name for the next button (press <ENTER> to finish recording)KEY_POWERNow hold down button "KEY_POWER".Please enter the name for the next button (press <ENTER> to finish recording)Checking for toggle bit mask.Please press an arbitrary button repeatedly as fast as possible.Make sure you keep pressing the SAME button and that you DON'T HOLDthe button down!.If you can't see any dots appear, then wait a bit between button presses.Press RETURN to continue...............................No toggle bit mask found.Successfully written config file.
The above was created using the remote control of the TV. But as we also have a decoder for digital TV, I repeated the process for the other remote. Except this time, I need the output file “lirc-remote2.conf”. Both config files were then combined (“lirc-remote1.conf” and “lirc-remote2.conf”) into a single file (“lirc-combined.conf”).
In the config file, it is also possible to give the remotes a proper name. I called mine “TV” and “Digibox”.
The finished file can then be copied to the proper location for the lirc application to use.
pi@raspberrypi:~ $ sudo cp lirc-combined.conf /etc/lirc/lircd.conf
When all recording is done, the lirc process can be restarted.
pi@raspberrypi:~ $ sudo /etc/init.d/lirc start[ ok ] Starting lirc (via systemctl): lirc.service.
Before sensing any commands, it’s good to check what is available matches what was recorded. This can be achieved using the “irsend LIST” command, followed by the remote name and empty quotes.
pi@raspberrypi:~ $ irsend LIST TV ""irsend: 000000000000e01f KEY_VOLUMEUPirsend: 000000000000d02f KEY_VOLUMEDOWNirsend: 00000000000040bf KEY_POWERpi@raspberrypi:~ $ irsend LIST Digibox ""irsend: 0000000000000001 KEY_POWERirsend: 0000000000000002 KEY_CHANNELUPirsend: 0000000000000003 KEY_CHANNELDOWN
Once the commands have been confirmed, it’s possible to test out the signals using the “irsend SEND_ONCE” command.
pi@raspberrypi:~ $ irsend SEND_ONCE Digibox KEY_POWERpi@raspberrypi:~ $ irsend SEND_ONCE TV KEY_POWER
In my case, the TV and Digibox turned ON. Repeating the same commands turned them OFF.
CombinedCombining the Skywriter HAT’s functionality with Lirc is simply a matter fo taking the skywriter example code and expanding/adapting the functions with the desired IR send commands.
View the code on Gist
The code above does the following:
- flick left and right to change the channel
- flick up and down to change the volume
- make a circular motion to turn TV and Digibox ON and OFF
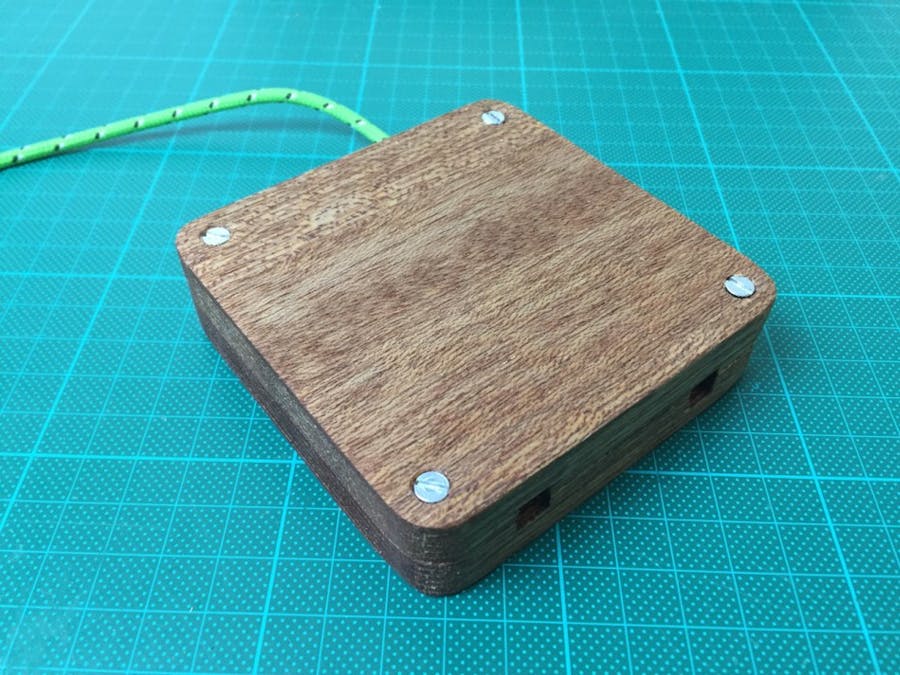
For the enclosure, I milled two parts with the necessary slots for power, USB and the IR LEDs using the CNC. The two pieces are joined using four screws.
The enclosure’s finish is simple: a bit of sanding and oiling.
Let me know what you think in the comments! And don’t forget I’m giving away one of my Pi Zero to celebrate my first 1000 subscribers on YouTube and the fact that I’m going to exhibit at Maker Faire Paris: http://frederickvandenbosch.be/?p=1563

Comments