


Hardware components | ||||||
 |
| × | 1 | |||
| × | 1 | ||||
| × | 1 | ||||
| × | 1 | ||||
 |
| × | 1 | |||
| × | 1 | ||||
| × | 1 | ||||
 |
| × | 1 | |||
| × | 1 | ||||
 |
| × | 1 | |||
 |
| × | 1 | |||
 |
| × | 1 | |||
| × | 1 | ||||
| × | 1 | ||||
| × | 1 | ||||
| × | 1 | ||||
Software apps and online services | ||||||
 |
| |||||
 |
| |||||
| ||||||
Hand tools and fabrication machines | ||||||
 |
| |||||
 |
| |||||
The Magnitude.io ExoLab is a STEM education program that connects students with experiments aboard the International Space Station (ISS) by providing a hands-on, project-based learning experience where students can conduct plant biology experiments in a specialized growth chamber, the ExoLab, and compare their results with a similar experiment happening on the ISS. This allows students to investigate how microgravity affects plant growth and other biological processes.
At the 2024 Space Exploration Educators Conference at Space Center Houston, Magnitude.io’s founder, Ted Tagami, challenged makers to create an open-source version of their ExoLab.
This project replicates the Magnitude.io ExoLab as closely as possible in size and functionality and seamlessly interfaces to their web-based application. It was successfully used on their 11th mission to the ISS in the Fall of 2024.
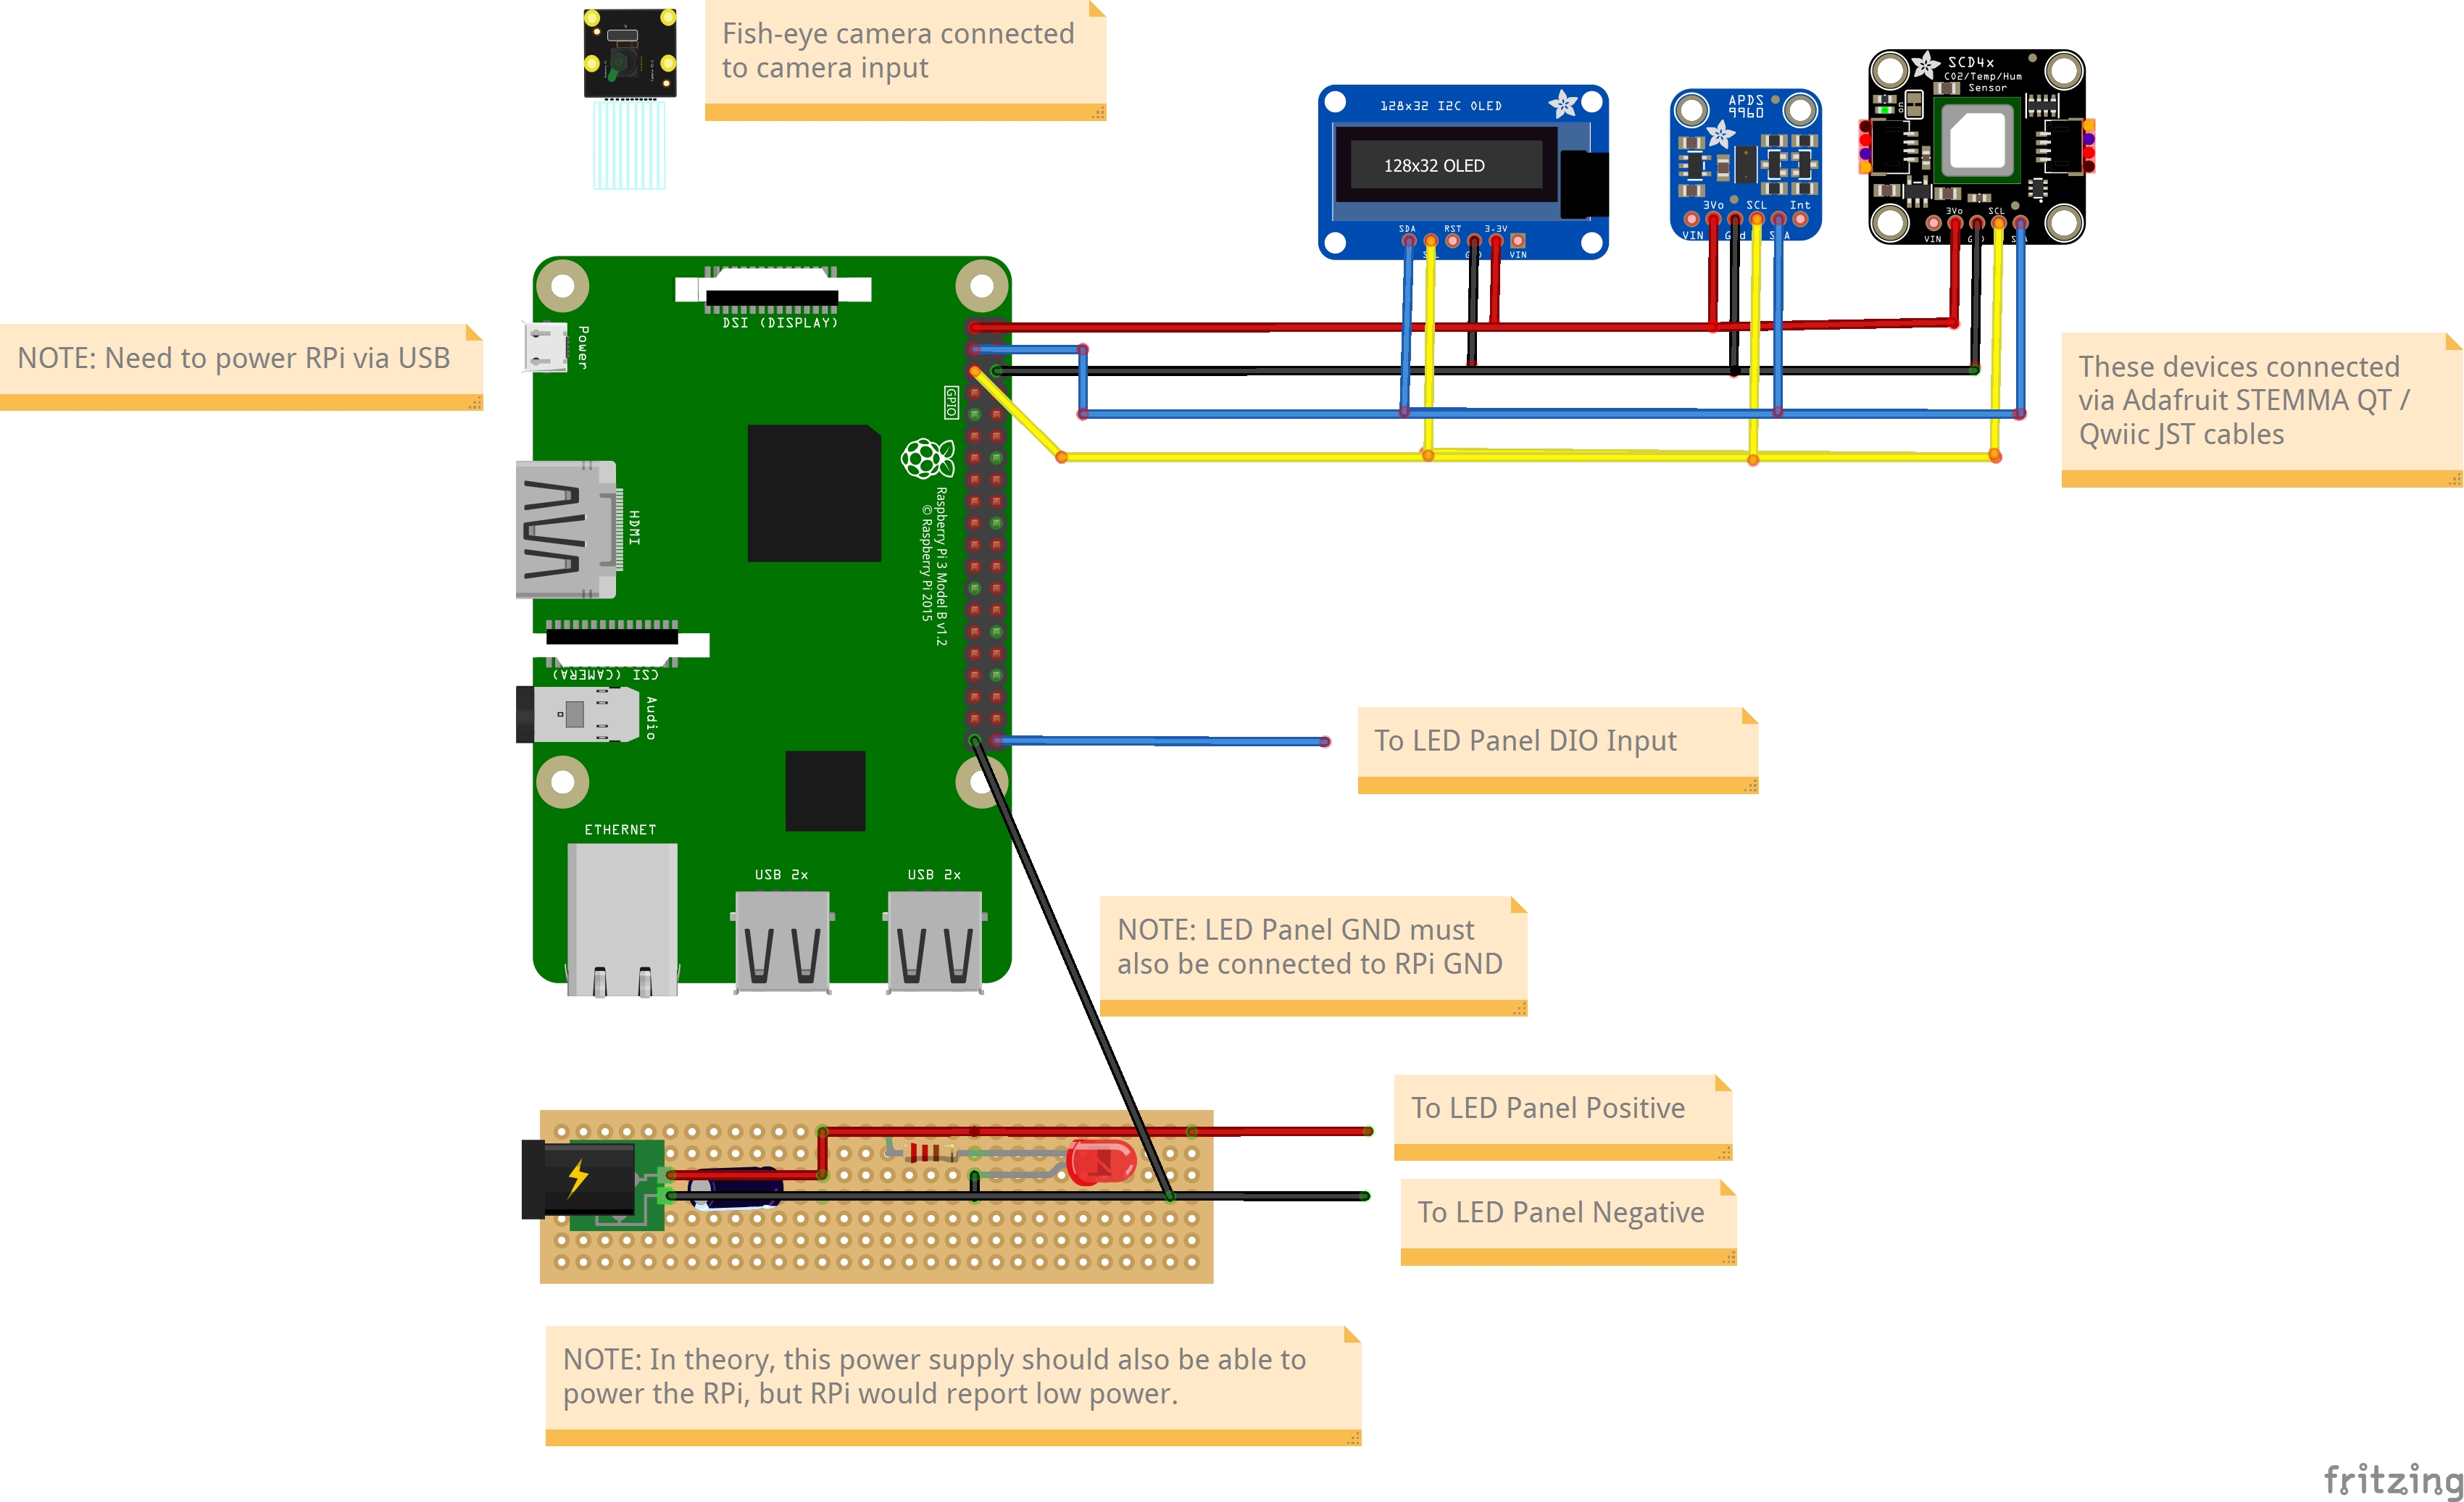
The ExoLab growth chamber contains a programmable 64 element LED array for lighting, sensors for measuring temperature, humidity, carbon dioxide, and light intensity, as well as a camera that periodically takes pictures of the seedling's growth over the course of the experiment. Using a Magnitude.io’s web-based application, images from this camera and the data from these measurements are then shown together. Students can compare the information from their lab to other labs all over the world, as well as the microgravity experiment that’s simultaneously happening on the ISS.
The original ExoLab enclosure is based on the standard CubeLab platform for experimentation on the ISS and measures 10cm x 10cm x20cm, also known as 2U. This implementation adds an additional 1U to the base of the enclosure for the Raspberry Pi 3B+. The enclosure has also been modified to make it easy to 3D print and assemble. The original Exolab’s difficult-to-fabricate U-shaped clear acrylic cover has been replaced by a single slide-in clear cover.
While the software implementation enables interfacing to the Magnitude.io network which requires a license, it can also be used standalone. Configuration parameters for lighting and timings are stored on the SD card in an editable JSON file, data measurements in a CSV file, and JPG images in a folder.
Additionally, this implementation enables use of Adafruit.io, a web-based platform for storing and visualizing data from Adafruit.com. The current implementation fits within the limits of the free version but could be extended to enable more command-and-control functions with the paid version (currently $99 per year).
Software is coded in Python with the appropriate Adafruit and Raspberry libraries. Magnitude.io’s servers do not store the JPG images, just the URL to this image. In this implementation, images are stored on Amazon Web Services (S3) using a free account.
How I Built This:I started with the original ExoLab design to source matching components and found everything on Adafruit and Amazon. Having built air quality monitors before, I decided to use a Raspberry Pi and Python. Use of components with the STEMMA QT (SparkFun Qwiic) connectors greatly simplifies the cabling and allows for the expansion of additional sensors.
From the ExoLab drawing, I recreated the enclosure in Tinkercad, exported the STL file and 3D printed it in PLA. The Raspberry Pi Zero W and power board was mounted on the rear of the enclosure. Several issues became apparent:
- The RPi Zero W was under-powered as a development / debugging platform.
- The PLA case melted and wrapped from the heat of the LED array
- The U-shaped clear polycarbonate cover was difficult to fabricate
- In general, the thing was ugly and lacked the elegance of the original ExoLab
Assuming someone who built the ExoLab would also want to modify the software, I upgraded the processor to a RPi 3B. It’s housed in a CubeSat frame attached to the underside of the ExoLab enclosure, thus keeping with the 3U CubeSat / CubeLab standard. I redesigned the enclosure as a box, with a slot of the slide-in clear cover, which can be cut with a laser cutter or a fine-blade hand saw.
It took several iterations and multiple 3D prints to get everything to line up and fit correctly.
The power board and RPi 3B are mounted to the frame via standoffs. The power board consists of barrel connector for the 5V 15A power supply, a 1000uf capacitor (to filter the power surge the turning the LED matrix on), a red indicator LED with resistor and connections to the LED matrix. Since the power board is so simple, I decide to use a small breadboard PCB instead of designing a custom PCB.
The enclosure consists of two parts: the “box” and the electronics enclosure. Both are printed using ABS to tolerate the heat. The LED array is mounted by standoffs to the top of the box. The 24-gauge hookup wires are routed through the enclosure to the power board. The LCD display, CO2 sensor and camera are press-fitted into the slightly undersized cutouts on the electronics enclosure. The lux light sensor is mounted to the underside of the enclosure with standoffs. The display, CO2 and lux sensors are interconnected using short QT cables. These cables, together with the camera ribbon cable and LED cables are routed through the bottom slots of the enclosure and “box”. The enclosure fits against the rear of the box and is held in place via a screw on each side.
Adafruit provides Python libraries, sample code and tutorials for the sensors, LCD display and LED array. I used these mostly as-is to test each component and the wiring.
The code is modularized into separate Python files:
Core Modules:MainV1.py - Main program that calls all other modulesStoreData.py - Stores sensor data in local text file (ExoLab_Data.csv) Settings.py - Attempts to read configuration from Magnitude.io server, if that fails reads the configuration from a locally stored file. Should that fail as well, it uses “hard-coded” parameters contained withinDevice Interfaces:Camera.py - Controls the fisheye cameraLCD.py - Controls the 16x2 LCD displayLightPanel.py - Controls the LED arraySensors.py - Reads the temperature, humidity, carbon dioxide and lux sensorNetwork Interfaces:MIOWS.py - Interfaces to Magnitude.io web serverAdafruitIO.py - Interfaces to Adafruit.IO serverAWS.py - Interfaces to Amazon Web Services for storage of JPG imagesData and Logfiles:ExoLab_Data.csv - ExoLab sensor data fileExoLab.log - Log file for debuggingDefaultSettingsV2.json - Default parameters in the same JSON format as received from the Magnitude.io server.
I first developed and tested the Core Modules and Device Interfaces. These provide a functional, standalone system with data and images stored locally. I then developed the Magnitude IO, Amazon, and AdafruitIO networking modules in that order.
For development and debugging, it’s easy to connect a monitor, mouse and keyboard to the Rpi 3B. For day-to-day operations, one can SSH into the ExoLab.
ExoLab in Use:A typical Magnitude.io mission to the International Space Station (ISS) lasts 6 weeks. Each mission studies how microgravity effects the sprouting and growth of plants. A different plant is chosen from each mission. At the end of the mission, the plant is frozen, returned to Earth and then sent to the mission's participating University for detailed analysis.
At the same time the plants are sprouting in the ISS growth chamber, schools around the world are sprouting the same seeds in their ExoLab chambers. These chambers are functional identical to the one on the ISS.
Environmental data (temperature, humidity, carbon dioxide, and light levels) and time-lapse images from the ISS and classrooms are uploaded to Magnitude.io's servers. Using a web-based application, students can compare their plants growth to that on the ISS as well as all other schools. Environmental data can be graphed as well as downloaded for further analysis.
This version on the ExoLab is compatible with that used on the ISS and the classrooms. In addition, it can be used stand-alone for classroom experiments outside of ISS missions since data and photos are stored on the RPi's SD card. Optionally, data can be uploaded to a dashboard on Adafruit's IOT server.
The chamber can be used to observe the growth of other biologics: fungi, mold, bacteria, silkworms, butterflies, etc.
A logical extension is to add an Adafruit moisture sensor that has a STEMMA connector and a Python library. It can be daisy-chained to the free connector on the Lux sensor which is conveniently located outside the bottom of the electronics enclosure.
You could design and 3D print a larger enclosure for growing larger plants. Outside of ISS missions, there is no reason to be limited to the CubeLab standard. With a larger enclosure, you could angle downwards the camera, if so desired. And the RPi could be installed in a more traditional case mounted to the back of the enclosure.
Magitude.io's software currently provides 4 lighting color options: white, red, blue, magenta at 10 levels for each color. The Adafruit LED panel used provides unlimited options. And the sensor used to measure light levels is a RGB color sensor that can be used to measure light color temperature. With some software enhancements, the ExoLab can be used to investigate how different colored lighting impacts plant growth.


_3u05Tpwasz.png?auto=compress%2Cformat&w=40&h=40&fit=fillmax&bg=fff&dpr=2)
Comments