


Hardware components | ||||||
 |
| × | 1 | |||
 |
| × | 1 | |||
 |
| × | 2 | |||
 |
| × | 1 | |||
Software apps and online services | ||||||
 |
| |||||
| ||||||
| ||||||
| ||||||
THIS PROJECT DOES NOT REQUIRE YOU TO HAVE A BITCOIN WALLET AND/OR PURCHASE/SELL BITCOINS. ALL THE EXTERNAL APIS USED IN THIS PROJECT ARE PUBLIC AND IT IS A PURELY EDUCATIONAL PROJECT.
StoryThe Bitcoin cryptocurrency was proposed by Satoshi Nakamoto in 2008.The idea was to produce a means of exchange, independent of any central authority, that could be transferred electronically in a secure, verifiable and immutable way.The price of a bitcoin can unpredictably increase or decrease in a short period of time.
To be a successfull trader, being regularly updated about price changes is absolutely important because of the volatility of cryptocurrency markets.
Have you ever thought of investing in Bitcoin?If yes,have you ever felt the need to get instant updates on the latest price of the Bitcoin and an alarm if the current value of Bitcoin crosses your desired threshold price?And have you ever felt tired checking the website every time for it's current value and felt aid was needed? Then this is the project for you.
In this project,I have created a crypto alert system using Bolt IoT which will set an alarm once the market price becomes greater than your defined selling price(Which will help make wise decisions on when to sell or buy it)
Best part of this project is really easy and you can finish it real quick!
Ok, so let's get started and see how easy this project goes.
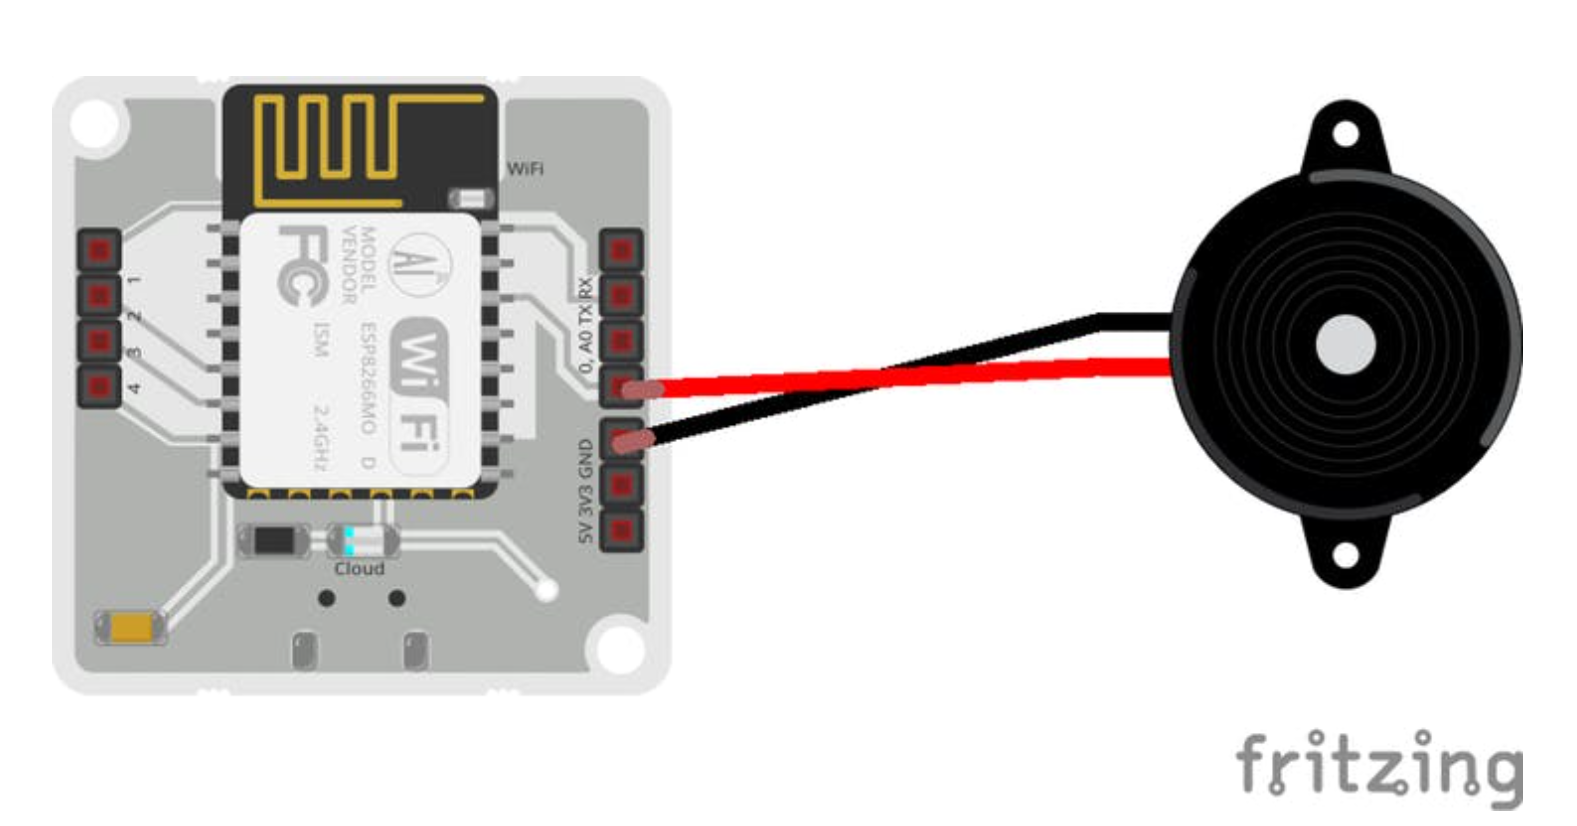
Step 1. Hardware SetupPlug the longer end of the Buzzer in the Pin 0 of Bolt WiFi module and the shorter end to the ground pin (GND) using Male/Female Jumper Wire.(There is no need of attaching an external resistor to the buzzer)
Registration Process
Step 1: Open www.cloud.boltiot.com on your web browser (Google Chrome recommended)
Step 2: Click on "SignUp”
Step 3: Enter your details in the SignUp page. Enter your name, email id (login ID for Bolt cloud),and password in the fields. Do confirm your password by typing it again in the Confirm Password field and then click on the Register button.
Step 4: Verification of your account- If you have entered all the details correctly, you will be successfully registered on Bolt Cloud and you shall see the screen below.
You will be sent a Verification Mail to your email(Please check in your spam if you do not see it in your mail Inbox)
Note: If you did not get the Verification mail you can go to cloud.boltiot.com and SignIn and Click on the Resend Email option marked below.
Open the mail and click on the “Click here to verify your E-mail ID” button
Once you click on the button, your email id will be verified and you will be directed to the following page thus completing the registration process on Bolt Cloud.
Download the Bolt IoT Android app and follow the steps to connect your Bolt device to the cloud.
Now, Login to cloud.boltiot.com and note the device ID of your Bolt WiFi Module.
Now click on the API Tab and under the section for Generate Key, click on Enable.( It would be set to Disable by default )
Next, click on the copy button to copy your API key to the clipboard
Step 3: Setting up EnvironmentFor this project, I am using Ubuntu 19.10 with python 3.7.5 but you can use other OS or Virtual Machine etc, you just need to find out the alternatives for that or you can buy some online ubuntu server here .
Before moving on to the project code,make sure you have installed the following libraries using the terminal(Type these commands into the terminal one by one)
sudo apt-get update
sudo pip3 install boltiot
sudo pip3 install pyOpenSSL ndg-httpsclient pyasn1
sudo pip3 install 'requests[security]'
NOTE: For installing the libraries using the pip3 command,you need to install the pip3 command first. It can be installed by typing in the following command in the terminal.
sudo apt install python3-pip(pip3 is a package manager for python3 used to install and manage packages and python libraries.)
Now,open the terminal(Ctrl+Alt+T) and create a new file named crypto_alert.py using the command as shown below:
You will be asked for your password(If you haven't set one just click Enter in this step). Type your password and click Enter
Step 3: Writing the python code.I am using cryptocompare to fetch the current Bitcoin rate using GET request. You can also fetch the rate for other coins.
In the first four line of below code, we are importing the json, request , time and Bolt packages. and in last four line we are just setting some global variables like our desired selling price , Bolt Cloud API key and device ID and in the last line creating a bolt object.
- json is a python library used for handling all operations on JSON objects. JSON is nothing but a data communication format widely used on the Internet for sending/receiving data between a client and server. More information on JSON can be found here. Remember, 'json' is the python library used for handling JSON objects and JSON is a data communication format
- time module is imported for using the sleep module
- requests module is imported for making HTTP requests
- In the 4th line,I am importing the Bolt Class from the boltiot python module
- In the last line, I am initializing the Bolt class with my API key and device ID which is stored in the api_key and device_id variable respectively
Then I wrote a function to fetch the current Bitcoin rate from cryptocompare. The below function will return the per bitcoins rate in Indian Rupees.
- The GET method in the 3rd line of the function is used to request data from a specified resource, here in this case, the cryptocompare URL specified at the start of the function. It is used to obtain the per bitcoin rate in Indian Rupees from the cryptocompare server
- The line `response = json.loads(response.text)` converts the text response to a JSON object and stores it in response variable.
and then in last I wrote an infinite while loop that keep checking the bitcoins price in every 10 second and will switch on and off the buzzer according to conditions.
- Since I want to continuously monitor the per bitcoins rate, I will enclose my logic to fetch, compare and buzzer alert inside an infinite loop using the `while True:` statement. An infinite loop is a special loop which executes its code continuously since its exit condition is never going to be valid. To exit the loop, you will need to forcibly exit the code by holding CTRL + C.
- The statement `time.sleep(10)` puts the program execution on hold for 10 seconds. This means that the program would not execute for a period of 10 seconds. The statement 'time.sleep(60)' does the same for 60 seconds or 1 minute
- mybolt.digitalWrite function writes the digital output, according to the conditions set. I am using this function since the buzzer is connected to the digital pin '0' of the Bolt Wi-Fi module
Type Ctrl+X on the keyboard and enter y in the keyboard and press Enter
Run the following python script using the following command
The program will print the current market price and my defined selling price and the alarm will beep as soon as market price will become greater than my defined selling_price.

Comments