
Hardware components | ||||||
 |
| × | 1 | |||
 |
| × | 50 | |||
 |
| × | 4 | |||
 |
| × | 8 | |||
| × | 3 | ||||
 |
| × | 4 | |||
Software apps and online services | ||||||
| ||||||
Hand tools and fabrication machines | ||||||
 |
| |||||
 |
| |||||
 |
| |||||
 |
| |||||
Let me introduce DzigaLoop
DzigaLoop is a tape looper. It controls volume, speed and direction of playback of three audio files (tapes), with an AM Tremolo effect on one of the audio streams (tapes).
Man with a movie cameraI defined a first version of DzigaLoop for a live sonification of an incredible movie (Man with a movie camera, 1929, by Dziga Vertov)
On February 2023 I played an improvised soundtrack with an amazing trio: Agnese Amico on violin, Francesco Cigana on live electronics and drums, me on bass clarinet and live electronics. We performed at Cinema Rex in Padova (Italy).
While preparing the debut, I knew that I needed to create different soundscapes and that I should have the possibility of manipulating drastically the sonic scenes without any interruption of the sonic flow.
In a few wordsI needed an instrument very strong at creating soundscapes with multiple sonic layers and good at modulating them.
First attemptThe code, and the idea as well, were quite at an early stage and I solved the problem of skipping scenes (whole loopsets or single tapes) by bringing on stage a couple of Bela Mini. Two boards were running different loopsets and I mixed the sounds on an iPad on its Focusrite iTrack dock, literally switching from a Bela to another Bela. It was quite a complex situation, an user-unfriendly setup.
The breakout for live performance was mounted on a double breadboard, with a lot of jumper cables. No case. It looked nerdy, worked fine on stage, had - as usual when speaking about Bela - a sublime sound, was really fragile, looked not exactly easy to be carried without running the risk of ending destroyed.
DzigaLoop plays continuosly a set of tapes, and works as a mixer, setting which (with a maximum of 3 tapes per time) sounds are heard by the audience, and controlling playback parameters, mixing the Tremolo effect.
The code is significantly different from the first instrument I played at Cinema Rex. There is only one board doing all the work, the main idea is better focused and, quite relevant for logistics, I found a solution for casing.
When I tried to use just one Bela Mini, I first thought about a code that would load, by means of a few buttons, audio files on just three PD tables, when needed. Just like changing a tape cassette on a recorder deck. But it didn't work. Bela encountered overrun errors in the process.
I looked for a different solution, and the mixing table approach over a set of tapes looked like the wisest path.
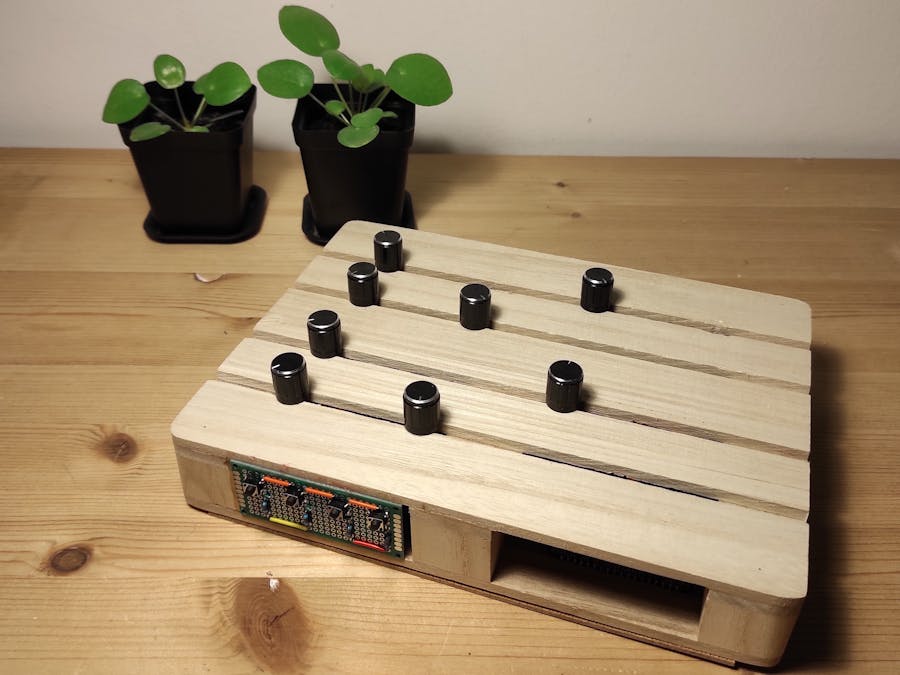
Now DzigaLoop is compact and easy to be powered. Bela Mini board is running a straightforward PureData code. Everything is packed into an airy wooden case that mimics a pallet.
I found a wooden element, originally conceived for decoupage, at a Chinese store. It’s produced in China and distributed in Italy by CuoriFoglio. Many similar wooden objects could be found online, but the one I used, I could found it only at a Chinese store near here and nowhere else on the net. So if you want to replicate DzigaLoop you can choose one of the many wooden decoupage elements that look like a pallet.
To me the first source of aesthetic inspiration, regarding knobs‘ displacement, was the insanely smart Monome Norns.
But, as everybody can see, I moved definetely far from the Monome style. DzigaLoop comes with a set of 8 knobs.
Here is how I decided to use the knobs, 3-pins simple and foolish potentiometers, that on Bela are read as analogic ADC inputs.
- KNOB 1 = Playback speed and direction for Audio1
- KNOB 5 = Volume for Audio1
- KNOB 2 = Playback speed and direction for Audio2
- KNOB 6 = Volume for Audio2
- KNOB 3 = Playback speed and direction for Audio3
- KNOB 7 = Volume for Audio3
- KNOB 4 = Tremolo (on Audio3) Frequency
- KNOB 8 = Tremolo (on Audio3) Depth
DzigaLoop has also four buttons. Four 4-pins buttons are read by the board as Digital Inputs. They control the composition of the loopset. I soldered them on a double sided PCB (millefori) with their 10 kOhm pull-down resistors.
Here‘s the function of each button:
- BUTTON 1 = Select which audio file is playing on Audio1
- BUTTON 2 = Select which audio file is playing on Audio2
- BUTTON 3 = Select which audio file is playing on Audio3
- BUTTON 4 = Reset Audio choices to Default loopset
The buttons are easily accessible, on the left side of DzigaLoop.
A couple of small PCB (millefori) were useful to create two small hubs for GND and 3.3V cables, and to connect them to Bela without stretching too many jumpers across the box. In the photo you can recognize them by the large use of black insulating tape I have made, in order to protect them.
I have to advice who is going to replicate this project: DzigaLoop requires lots of soldering and Zen concentration while completing cable connections and casing.
Notice that:
- Bela board and the button panel are on the same (left) side of the box. GND and 3.3V hubs, the small PCBs, are in the middle of the case. A couple of drawing pins hold their position.
- We all know that jumpers' colours don't matter. Usually they don't. In this situation, the setting is complex in a little messy space. So, it is a good idea to use “intelligent“ colours to recognize cables, for example: black for GND, red for 3.3V, blue for digital inputs, and so on.
- In the example on GitHub, the tapes are named cel01.wav, cel02.wav, etc. This is because the first tapes I used for DzigaLoop's debugging were celesta samples. Sounds have changed, names remained the same, also in the PureData code. We are talking about 44100 kHz wav files, strictly smaller than 20Mb.
- Adc~ numbers, due the complexity of cablation, may need to be changed in the code, after closing the box, in order to have a correct setting after a trial and error moment.
- Check which Block Size (audio frames) choice is the best for your tapes, and set it in the Setting interface of Bela IDE.
A word about the infamous 3-pins potentiometers.
I could have used better resistors. Yes, sir. But a bit of alea, just a small amount of indeterminacy, here is ok. Lack of precision could be the unpredictable element leading to a new and unexpected sound, especially when improvising. So, I went for the 3-pins potentiometers.
Closing the boxThis couple of photos explains much better than words how I close the box for DzigaLoop. I used a piece of soft wood, a waste of a picture frame, 4 screws and 4 rubber pads. Very easy and sloppy but efficient.
Let's have a look at the Pure Data _main.pd patch.
Please be careful about the above part of code. It is the key of the coding idea behind DzigaLoop. Each button can skip tapes. The [sel] part is a bit awkward since the 4-pins button sends a bang on press and a bang on release, while we want to skip tapes just when we press the button.
The crossfade is as easy as smart to be coded. It makes every variation in the sonic environment very smooth and elegant.
The bottom part of this section is controlled by the fourth button and recalls the Default setup of the tape looper, same for [loadbang].
Have a careful look at the right side of the above part of code
We don't have a Master Volume, but three Volume controls, one for each tape.
How many tapes?In the version of DzigaLoop you can find on GitHub, there’s a collection of 9 audio files, means 9 tapes. Remember that three of them are in the output, the other six, even if playing, are silent. Buttons skip tapes on each Audio stream with a slight crossfade. If a larger amount of Audio files or Audio streams will be needed in the future uses of DzigaLoop, such as in a complex performance without the possibility of coding on stage, the code is quite easy to be modified.
My Setup- a timbric, fragmentary tape.
- a lead idea (melody, voice, a signal), something minimal but assertive.
- a dense sound, such harmony or a complex field recording.
This is just a first suggestion, and I hope everybody trying DzigaLoop will find a new path for creating sonic environments, live soundtracks, improvised music, chamber contemporary music, soundscapes and so on.


Comments